How to make cardboard patterns

I’m looking for a better way to make a cardboard box.

Initially I hoped to 3D-print a stamping die. However, I was unable to print teeth that cut the cardboard reliably. As I press cardboard onto the die, it tends to crumble. This method works okay to make edges to bend, but not for cutting of the outline. So, I ended using the die to mark the outline, then cut it with a utility knife. That method is neither fast nor precise, in my hands anyway.

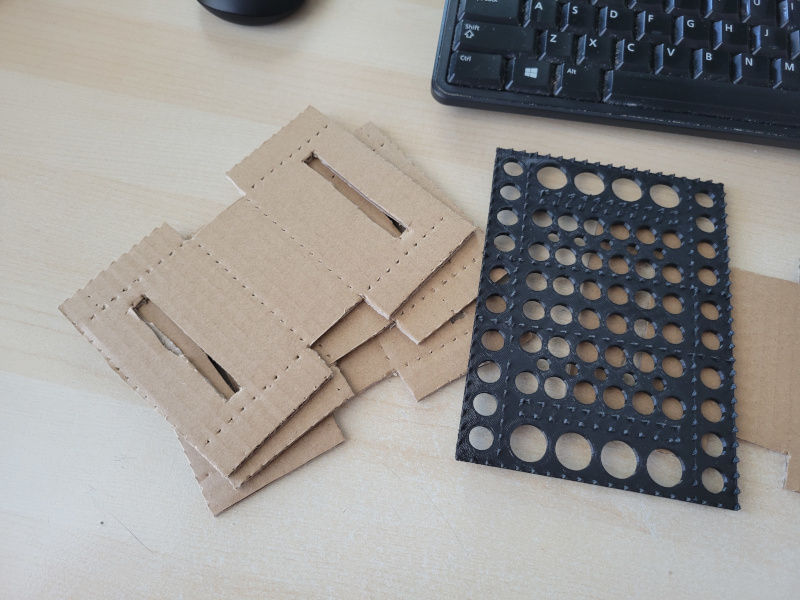
Here’s what the current project looks like:

Someone posted a note at social.makerforums.info about using a laser cutter. This part sounds intriguing: “even the humblest cheap diode #lasercutter can cut cardboard packaging.”

We also have an interesting thread where a member does exactly what I need with a laser:

However, I need to cut something like 300 to 500 of these things each year. Meanwhile, the K40 FAQ is full of scary warnings about not leaving the laser even for 30 seconds, keeping the fire extinguisher on hand, and so on. If these safety precautions were to be followed, the fun factor goes down quite a bit. Also, I obviously need a place with a ventillation system that can evacuate all the burned cardboard smoke.

So, I’m posting this to General CNC in order to solicit ideas about safer alternatives to laser that are more compatible with a living room or a garage at worst.

One idea I’m considering is using a Genmitsu 3018 with a spiral bit. Stack a few cardboard bits, compress with a 3D printed plate for clamping. Is this something that’s likely to work?

I’m also open to any other ideas. Who knows, maybe a router exists that uses some kind of vertical wire saw. There’s also a thing called “drag blade”, about which I know nothing about. So, any experience on the topic of cardboard packaging is welcome.

1 Like

@easytarget how long did it take you to cut that fairly complex pattern you posted on Social with a cheap diode laser?

I could imaging that one of the new focused diode lasers could cut fairly quickly with narrow kerf, given some of the results we’ve seen people here share with wood?

Not sure if it is practical but what about using Exacto(clone) blades pressed into a thicker 3D printed clamping or 2 piece mold? The blades should last for much longer and with a thicker holder just enough blade tip could stick out to get the job done.

Another option might be a large pin setup onto a laser diode head(or mount) with a servo or solenoid to poke holes in your cardboard. An optional head with a drag knife on it could then be used to cut the holes in the design or aid in that task.

I don’t think a drag knife would work well with corrugated cardboard, based on cutting cardboard with a sharp knife.

Let’s be more nuanced about fire risk. Both CO2 and diode lasers can cause a fire. Diode lasers are lower power and more tightly focused, so the risk of flame is lower. While lasers work by burning, what you really care about is ignition and flame. There are things you can do to reduce the possibility of flame, and things you can do to reduce the harm if there is a flame.

Basically, ignition is really annoying even if you are standing by with a fire extinguisher, so no matter what, you want to take actions to avoid flame in the first place. :smiling_face:

Let’s start with as assumption that you are willing to accept a small risk of ignition causing burning that damages the machine, as long as it doesn’t spread. If you are, for example, able to do your lightly-attended cutting on calm days without precipitation, outside, over a non-combustable surface, such that if it does catch fire you aren’t going to burn your house down, you might choose to accept some level of risk of destroying the machine.

There are relatively new diode laser heads which have better lenses that focus the laser much more tightly. This reduces the quantity of material that is heated, which will allow moving faster while ablating less cut material. Both of these things reduce the effective power/volume/time which reduce the risk of ignition. The tradeoff is that these heads are a bit more expensive. Without vouching for their quality, here are two random examples I found on Amazon with a quick search just as examples of the kind of thing I’m talking about:

Of course, there are entire gantries shipped with laser heads like these, as well. You’ll see examples in Solid State Lasers

The next point is that the cardboard itself does not ignite. Smoke ignites, and it needs to be mixed with air in a combustible (stoichiometric) ratio. Using air assist, where you blow air at the point where the laser is cutting, blows away smoke and makes the mixture leaner, which can make combustion much less likely. It also cools the material, reducing the amount of smoke emitted in the first place. This can be as simple as an aquarium pump and a 3d-printed nozzle. It doesn’t require vast quantities of air to be effective.

Then if you accept what you think of as a small enough risk of damage to your equipment for unattended operation and manage risks outside the equipment as well, it’s up to you. But with the high-power diode heads, you might find that it is so fast that the question of unattended operation becomes academic; it finishes one before you would effectively abandon it. (That’s why I was asking about how long it took for @easytarget to make the boxes you linked to.)

1 Like

Thanks Michael for articulating the points about the fire danger and ways to mitigate it. The executive summary is, nothing is going to happen if I use a modern, focused laser, air assist, and a proper cutting speed. But I still need to place the whole apparatus on a concrete pad and attend it while in operation.

I suspect a router offers a similar danger. After all, a dremel works by melting iron at the point of contact. But it looks like nobody thinks that a router bit exists that can handle cardboard, I take it. My idea was to use a spiral fluted bit and clamp with a plate from the top, with holes where I want to cut.

There’s one last possibility: the electric oscillating tool (EOT). It is what professionals use when they carve cardboard (and textiles) at their large table machines. That is 100% going to work, it’s just expensive. Here’s an example of a bunch of heads, including routers and EOT:

What I think would be ideal is to find a EOT module in the format of router and laser modules for something like Genmitsu 3018. My Internet search does not seem to identify anything like that. Needless to say, SainSmart themselves do not offer a EOT head.

1 Like

I don’t see why it can’t work… box made with of cardboard on cnc with drag knife plus pressure creasing roller tool set. - YouTube

2 Likes

I completely forgot that Brad Collette was talking about working on an oscillating tangential knife design some time ago! That would make sense. While those are normally steered, I seem to recall someone in the conversation, probably on Twitter, bringing up the idea of a free pivoting OTK.

I once tried gluing a #11 exacto blade to an old sonicare toothbrush, but it was definitely not effective.

Here’s a model that apparently has been used, though if I were doing it I think I’d modify it to use #11 blades.

1 Like

Sorry, late reply but…another TL;DR

I have one of the first ‘faux’ 40W modules, it’s actually 5 or 6W diode with very good optics, LaserTree claim the focus is just 0.06mm, and I believe them, I’ve had distinct scan lines rastering at 0.08 line width. When engraving plastic I can de-focus a lot to give a bigger line width and much faster results.

The upshot of this is that card, single ply or proper board, cuts very cleanly if you keep the beam moving fast enough. Some kind of air assist, even rudimentary, really helps too. Generally there is a very fine kerf on top, often none at all underneath.

The key here is very fast cutting, in multiple passes. Don’t try to cut in one pass! I use ‘two passes per ply’ as a rule-of-thumb. You really need some airflow to keep the cut clean since this makes plenty of smoke. My first attempt, a 40mm case fan pointing at the focus was already a massive improvement. I now have a proper nozzle and airpump setup.

Also! Safety! Paper burns at Farenheit 451, and if you know the book you’ll know that nobody wants a fireman arriving. Aim for fast full power passes so the beam is vaporising the material without remaining long enough to ignite it. Strong airflow, rather than fanning the flames, actually ensures that anything that tries to smoulder gets extinguished immediately.
… and keep an extinguisher handy. CO2 or powder.
… and watch the job.
And ventilation is needed, even card has additives in it that you don’t want in your bloodstream.

2 Likes

@zaitcev — I just had a new idea that goes back to your original 3D printed frame.

What if you made a 3d printed frame that holds #11 xacto blades everywhere you want a cut, and you place them in back-to-back pairs as much as possible so they cut locally away from each other so the cardboard doesn’t shift?

I think they are about $0.10 each, so this could be a lot less expensive than, say, an OTK.

You could press it down into sacrificial foam, or even the next layers of cardboard, where you remove the cardboard that you just cut through from the stack, and the next layers are partially cut.

If you use stacked cardboard, you might have a separate jig for scroring folds. If you cut into foam, you might integrate cutting with scoring features in the printed jig.

I think you would need to 3D print separate pieces to assemble into a complete jig. I don’t have a complete idea for the pattern in mind, but I’m pretty sure it could reasonably be done. :smiley:

1 Like

that makes 2 votes for a 3D printed part with Exacto blades for the cutters: How to make cardboard patterns - #3 by dougl

2 Likes

Yeah, it was specifically the back-to-back #11 blades that I was thinking of in particular here, to avoid twisting the cardboard when cutting, but also having tangential cutting so they don’t need a lot of force.

I’m not sure what blades you had in mind, but your suggestion “just enough blade tip could stick out” made me think you meant chisel tip blades which would require more force.

Double sided was what I had in mind but anything pointed and the #11s would want to be alternating direction. I was going to post a number for the double sided blade I had in mind but I don’t see them in any google search images. Then again, one of my kits are about 50 years old.

I haven’t found #23 blades cheap like #11. They would be convenient if you can find them cheap though! Best I can find are these:

Note that this is not the same as the common #23 scalpel blade which is easy to buy in bulk.

1 Like

Yes, thanks for finding them and #11s could be used if the blades were alternating in cutting direction. Personally, I would still look into the idea of making a head to go on something like an Ender 3 which had a #11 blade on it, a solenoid with ~15mm throw and a servo which could rotate that head at least 90 degree. The solenoid would be triggered by the laser on/off signal(would probably use an arduino/FET to convert PWM pulses to powered ON/OFF of the solenoid.
Next I would design the outline of the box for laser cutting making the lines dotted and then edit the resulting gcode to rotate the blade along certain axis. Curved lines would be more work but lines along X and Y axis wouldn’t require much additional gcode.

Something needing a larger area than an Ender 3 could be probably leverage the larger diode laser machines on the market for under $300 since a low power diode version could be purchased.

1 Like

I decided to go with printed blades for now. I made them twice taller than in the lead photo in the thread, about 6 mm. I found quickly that doing so made it quite uncomfortable to push the cardboard on them. What to say about embedding exacto-knife blades!

In fact, the original was made with the intention of one-pass cutting and creasing. It may be not too obvious in the picture, but the teeth have 2 heights. Pressing into that was no picnic when teeth turned into blades.

So for now I made a set of 3 printed plates: 1. plate with cutting blades, 2. plate with creasing teeth, and 3. plate that is used as a bucking surface, to save my fingers. Honestly it works so-so, but unfortunately I don’t have the time to go through and re-invent a EOT head for the 3018, like the one Michael linked off Thingverse above.

2 Likes