Prologue: still plan on fixing other laser cutting issues with original laser cutter I own, but decided to spend a few more dollars to replace it for now (and why not own 2!?)…
Bought another K40, which came in the mail (shipped upside down) with the power supply not mounted and partially unplugged. Set everything up and tried to turn it on… no power.
Fast forward to this morning… tried to power on, and got it to turn on, BUT, it wants to home itself into oblivion (x axis goes to home and tries to force itself past that point, causing a grinding noise…and does not stop). Then, after trying to figure that out, it stopped turning on again. Adding video references. Suggestions?
Hi,
For the grinding check the endstop switches. I would suggest you take a multimeter and set it to the continuity setting (might be the 'speaker type icon?) and make sure the switch is working and that it detects the switching. If it works as it should then check the cabling from the endstop to the controller. If it all looks ok and works (continuity test on the cables also!) the it might be the firmware? I suspect an edndstop issue though. ALL THIS WHEN IT IS POWERED OFF!
For the non-responsiveness I would check out the power supply. Start from the plug and work your way up. Others might know if there is a fuse in the K40, I dont think there was one on mine. Please be very careful when poking around with the power system. I would recommend you test the continuity of the power cables whilst it has been turned off for a while (there are capacitors that can still hold a charge). I got an electrician friend to check mine, with special attention to the earth. Hope this helps!
=)
On some models there is a fuse holder in-line from the back plug to the components, check to make sure it isn’t blown. Also check the connections on the front panel switches, that they are crimped and seated well and not loose. Verify the back lug is indeed well-grounded to the frame and not isolated, and that all grounds connect. I would also check all connections to the control board ensuring they are snug, fully seated and well terminated with no loose wires or crimps, etc.
On the limit switch make sure that the head actually reaches the trigger arm, or that it has something to interrupt the beam if it is an optical one(usually a metal tab that goes into the “U” of the sensor and breaks a light beam).
Adding a bit more detail to what @kibodwin kindly said: connected to the limit switch, you will find two wires. If you don’t, you’ve already found the problem. With careless shipping, wires knocked loose from the limit switch would result in what you saw if they are NO (Normally Open) switches (or NO/NC switches being used in the NO configuration). The control board will see no difference between “not at the limit yet” and “switch not even connected”. In that case, you might find that the switch has three connections and you don’t know which two of the three connections on the switch to use. If so, you’ll want to connect the wires to the inside post and one outside post that is labelled NO, or which you determine with a multimeter does not connect to the middle post when the switch is not depressed, and does conduct when the switch is depressed.
If that’s not the case, track those two wires to the control board. “work your way up” probably looks like this: Remove the plug from the control board, and check for continuity across the connector. It probably has a place where the contacts are exposed that you can touch the multimeter probe to. Check for change in continuity when you activate the switch. If that works, back to the limit switch at the other end of the cable, and check that the switch works. Fortunately, limit switches are inexpensive.
All that is in addition to @Domm434’s points, which are far more extensive checks that sound like a good idea generally!
K40s typically come with optical limit switches. For the x-axis there will be an optical pair of an emitter and a receiver under the left side of the arm. The head has a metal tab that sides in between to block the optical beam at the limit. With suspected rough shipping I would check the alignment of the components. I’ve seen it before where something was bent during shipping.
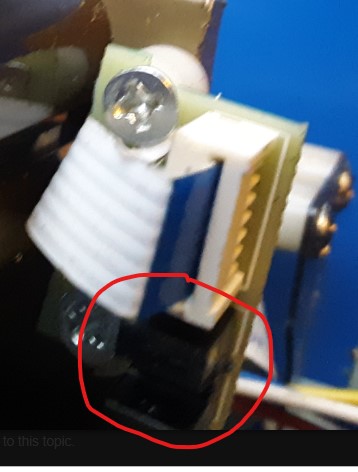
Going to look into all of this, but my priority is to get it to power on, first. It initially didn’t want to work, then it randomly decided to power on and do what was in the 1st video. But after about 15 minutes, it decided to no longer turn on. I couldn’t leave it on while trying to figure things out because when it got power, it automatically did what you see in the video and ONLY that. So leaving it on would’ve kept it grinding the x axis and likely caused damage. In throwing in a couple of pictures to show what’s on the left end of the x axis part of the gantry. I intend on focusing on the power issue first, though. Thanks for the help so far!
Here is the optical switch. I haven’t seen that arrangement before as mine is mounted under the arm and not on the side. Is there a tab on the head carriage that slides into the switch?
Yes, there is a tab that goes into that piece. Upon inspecting things further, I found that the head was actually partially off-track. Just slipped the wheels back into place so the head moves correctly and that tab slips perfectly into the slot on the piece circled. So that should fix the x axis issue… now to deal with the core issue of lack of power. Not sure where to begin and the seller I bought it from hasn’t been the most helpful while expressing they are willing to be as helpful as possible… But I digress. How do I figure out the power issue?
Disclaimer. I’m a stupid genius… due to reluctant habits, I can be a bit of a slow start to figure something out (misplaced stubbornness, I’d presume), but once I wrap my head around the initial part of the learning process, I tend to shift from 1st gear to 6th without any need for the gears in between. So anyone helping with the power troubleshooting, please explain this to me like I have absolutely no clue what’s going on and have never touched any of the tools needed to figure this out before today, then we’ll pick up the pace from there.
What problem is being worked now… a power-on problem.
If so have you:
Have you pulled up the emergency off switch (red button).
Checked the input fuse?
Any lights?
As of right now, there is a lack of power going to the system. Tried multiple power cables. Estop on and off, power switch on and off. I have not yet checked the input fuse. There are curently no lights on the machine that are functioning. I am just about to go through your pdf provided by @NedMan to see if I can figure out what’s going on.
Ok, so following the pdf: no green light, multimeter reading is 0 on ac mains, fuse doesn’t look blown (swapped for spare inside fuse box and still no go).
Note: machine turned on just fine for all of about 15-20 minutes out of nowhere (originally refused to power on at all). In the process of swapping ac plug with the one from the previous machine. Progress slowed because screws mounting plug do not seem to come out of the casing (and I’m highly confused as to why).
Read resistance across the fuse. If the fuse is good the fuse holder could be dead. You’ll just have to go down the chain to find what’s broken. (On one of my recent projects, the outlet I was using quit working mid-project, giving me the opportunity to teach my youngest the fine art of replacing a receptacle.)
Replacement for what? First diagnose what is wrong, then replace the broken part.
If you aren’t getting AC voltage at the power supply, unplug it and test continuity of every component between the wall outlet and the power supply separately until you find your open circuit. And (as I learned) try plugging it into a different outlet. My failing outlet worked for some plugs but not others (depending on exactly how wide the blade was).
Unintentionally vague, some of my message didn’t copy over. I was talking about replacing the plug built into the machine where the power cable plugs into. Even when testing each component through the path, being prepared to know where to buy parts is a good habit to have.
Once we isolate the problem I am sure we can find you a replacement part.
As @mcdanlj points out we need to test everything in the circuit that supplies power to the LPS.
with the machine unplugged, I would start by putting an ohm meter across the ON switch and seeing if when you turn the switch on/off it shows 0 ohms when on.
Then do the same with the E stop.
I just bought 6 5A 125V C14 switched receptacles for $8 on Amazon, prime delivery tomorrow. I haven’t seen quantity 1 for under $5. You can get them on ebay too.
Anything you find between the wall and the PSU is likely to be a cheap and easy fix. But first break out the multimeter and test continuity, one thing at a time.