Choosing a new corexy or markforged printer

Thanks!

I don’t think I’d care for one with wood panels… Also, like the Rat Rig, lots of plastic components; I want to be able to print high temp plastics confidently so I’d rather not use printed structural components. I should have listed that, I guess I’ll go back and edit that in!

I should also add to desiderata a design that’s been tested for a bit, the point being to set it up and start printing, so I can go back to experimenting on my mostly-self-made corexy. I’m OK with some build time with good instructions, but (unusually for me) I don’t want to be solving puzzles before printing. Every other printer I’ve had has been an opportunity to learn from failure, and… I’ve learned a lot. But this one I’d like to set-up-and-go.

1 Like

Who provides support only over facebook, so I can skip them from day 1?

Oh, I don’t know of any for sure. I’ve seen references to joining facebook groups. SecKit has one, for example. But they also have a presence on github and I think it’s a convenience not a requirement.

But if there were one, it wouldn’t be for me!

It looks like the Vivedino Troodon is a variant of the Voron 2.4 which they also carry as a kit:

That has a 5/16" / 8mm cast aluminum bed.

I think that the Troodon is basically an assembled version of that with an orbiter extruder, and metal parts instead of plastic. I don’t like that the heat bed on the Troodon sits above an acrylic plate, so the Voron 2.4 kit looks better in that regard. On the other hand, the Troodon has (I think) all metal components in the build chamber where the kit expects you to print plastic. But I can’t find anywhere whether the Troodon has a cast build plate. Probably? I hope so at that price?

Part of my problem here is that my family won’t let me print ABS right now due to smell. So I’d need to buy Voron 2.4 printed parts at $100-200, which gets me closer to the cost of the Troodon — and just printing out of the box.

I found a video that shows that the gantry is definitely flexible enough that it can rack, which I guess means that I guess four belts for X might be not actually over-constrained. :stuck_out_tongue:

The Flyingbear Reborn doesn’t look easy to enclose at the top, and I can’t see enough technical detail on it to evaluate it well according to my desiderata.

As I see it, SK-Tank mixes the advantages of the Voron Trident motion platform (three points determine a plane) and the Troodon metal parts for everything under stress (I think, and hope). The Troodon is either 300x300 or 400x400; the SK-Tank is 350x350. I have been repeatedly happy that my other corexy is about 330x330, so going up to 350x350 rather than down to 300x300 seems good; 400x400 seems huge to me. I don’t like that I can’t find any information on what the bed material is on the Troodon.

I asked SecKit and it turns out that it can ship next week. That’s good enough for me! Hopefully in a few weeks I’ll be putting it together.

It does require some printed parts, but I have a few days to print before it arrives. They are not supposed to be temperature-critical; even PLA is supposed to be OK. I’ll print in PETG. Or maybe ABS if I think I can get away with it. :grin:

I’ll see what duties are assessed; reports vary.

I’ll still have to enclose it and add filtration. I think, though, that for filtration I really want to return to the bottom of the printer rather than sucking in colder outside air, so even with the Troodon I would have been eventually modifying it before printing ABS.

1 Like

I bought an orbiter extruder to eventually mount on this printer. Chose one with an official LDO motor and made of molded glass-filled nylon. It arrived today. I don’t yet have the printer to test, but wow it’s small and light. I love it.

It was a really tight race between the SK-Tank and the Troodon (which comes with the Orbiter out of the box; Vivedino has credits for supporting its development). I could imagine that if I were making the decision over again, it could have gone the other way.

1 Like

My kit arrived yesterday, just a week after placing the order. No duties were assessed in my case. It was well packed. It came in two boxes; one for the frame components and one for everything else. DHL pestered me by text and email to sign up to waive signature (and of course liability) and I didn’t take them up on that. I was home for the delivery, but they just dumped it on my porch and ran without even ringing the doorbell.

It’s not clear to me that the HIWIN rails were worth the premium, as one of them appears to have some bad bearings (it hesitates from time to time as I slide it on the rail). If I had it to do over, I would not pay the $290 premium for genuine HIWIN. SecKit offers a single replacement of HIWIN rails within the first 7 days, so I hope the replacement is an improvement. But I could buy a lot of replacement knock-off rails for $290 if a couple were imperfect!

The steel frame is 2.5mm / 3/32" so it’s very heavy duty.

The seller has been extremely responsive to my emailed questions. However, the user community appears to be only on facebook, so I am a little bit isolated from that community when it comes to building and augmenting it. There are only two posts on r/seckit on Reddit…

2 Likes

The orbiter is a nice little unit.
I did have one installed on the Ender 5 but took it off when I got the PrinterMods XChange tool changer. It will now go on the Hevort.

1 Like

I had cleaned out the hesitating/catching rail three times alternating corrosionX and WD-40 and carefully wiping out the grooves each time, and it still caught. He said it was probably still a piece of metal, not a damaged bearing, and suggested I keep cleaning it; that I could send it back for them to clean or replace if necessary — but that every other case had required only cleaning. So I twice filled it with sulfur-bearing, sticky way oil and then flushed it with WD-40, running it across the ralis and cleaning them out each time. And so far, that seems to have done the trick. I’ll keep an eye on it, but so far so good. :crossed_fingers:

The parts aren’t labeled, and some of them are similar to each other. Also, some look very similar end-to-end. However, he has designed it so that if you put it together wrong, the holes don’t line up. There was one case where they seemed to fit but the flanges on flanged nuts overlapped a little, and turning the apparently-symmetric part around resolved the problem.

The instructions are a bit sparse. I’ve run into a few order of operation things so far. It’s a bit more of a puzzle project than the average kit. I wish he shipped a STEP model of the whole printer so I could just reference it as I went along.

Last night I assembled the frame loose. This morning I carefully snugged all the screws in an alternating pattern and checked squareness, and then my youngest and I removed and replaced with loctite 242 all the screws, again in an alternating pattern, fastening them tight. We used bits of tape to mark each screw we did this to. At the end, it still appeared to be square.

2 Likes

I’ve done almost everything now except finishing the wiring, and printing a few final pieces. It does live up to its name. Solid steel frame components; stiff and plenty of mass. Still satisfied by my purchase.

I’ve run into a few problems since my last post. The instructions have been sparse in places. Order of operations is not always clear, so I’ve had to re-do some things. For example, after using loctite on all the frame screws, I discovered that some of them had to be removed and replaced for later steps. Glad I used 242! :relaxed:

The seller has been quite responsive by email. I have been asking specific questions and providing feedback on how to improve it. However, I suspect that buyers willing to sign up for Facebook and are thus part of a community of builders are better off than I am here—and that’s probably most of them; I know I’m in the minority not signing up for Facebook. For anyone who has never assembled a 3D printer from loose components before, you might need lots of patience while figuring things out, and joining the SecKit Facebook group is probably a good idea.

It turns out that his supplier sent him the wrong spec of constant-force springs (too short), so he is trying to source the right spec and sent out the right ones. The perils of being a small manufacturer!

One of the XY joiners had sloppily-drilled holes that were out of square by over 1mm. I ended up using a 3mm endmill in the mill to elongate one hole in order to attach everything. Otherwise it would have taken some patience with a needle file I suppose. (I suspect he would have sent me a new one if I had asked, but I didn’t want to wait that long.) This was tricky, if you look specifically for it you can see it, but it would be easy to overlook otherwise. So hard to be too annoyed that he missed that supplier mistake.

At least with the volcano hot end, the nozzle can’t reach approximately the rear 15mm or so of the bed. And it sticks out beyond the front at max extension, which could get in the way of adding a door. I will have to see what I can do about making a compact design for moving to the orbiter, at least when I enclose it.

There are two control board options available. I chose the GTR. Apparently I was one of the first two people to order that option, and mounting holes hadn’t yet been added to the back panel. FreeCAD and the BIGTREETECH STEP file for the GTR to the rescue; I printed a frame that will be not only a drill template but also a mounting frame. :grin:

I’m thinking about how to make the frame also hold a duct for a fan to blow over the stepper drivers to keep them cool, but I haven’t figured that out yet, so for now I just printed the frame as shown.

There are lots of optional parts to print. Some of them are in the SecKit SK-Tank github repository; others are referenced in a separate section of the manual. I printed a cover for the high voltage terminals for the Mean Well power supply, as well as a set of TPU feet. SecKit warn that this is not a first printer, and this warning is certainly right; key parts require that you already have a 3D printer.

The Troodon would have been running already and enclosed for similar money, but with a smaller print bed. Ultimately, since I’m complaining about losing about 15mm front to back, I must care enough about size that the Troodon, with still a strictly smaller print area than even the reduced available size on the SK-Tank, would have been a bad choice. Similarly, while I think that @Eclsnowman hit the nail on the head—this is closer to a Voron Trident kit than it is to anything else out there—like the Troodon, the Voron Trident kit is also 300mm by 300mm. While I never make use of the full volume of my existing 330x330 corexy I often appreciate having at least one horizontal axis be more than 300mm. For example, it was very helpful when I was printing face shields. So I still think this was the right choice for me.

But if I had it to do over, I think I would not spend extra for genuine hiwin rail. It wasn’t obviously better than the good clone rail I’ve gotten in the past, and the amount of cleaning I had to do before it ran right was more than I had expected from brand-new genuine hiwin.

1 Like

SecKit have confirmed that they are intentionally not releasing STEP files because they are afraid of knock-offs. Honestly I have trouble understanding this; first, they built on the work of others in the first place; second, anyone who wants to build something similar could make their own files. A STEP file of bent steel doesn’t actually address the harder problem of designing parts to be formed. So anyone who want to have an accurate model of their printer to help them mod it should probably pass on this one, and start from one of the open source designs instead.

Also, they have confirmed that the default configuration does not actually provide the full build volume, and are considering fixing that in a later revision. In the meantime, we have worked out a possible workaround for the existing components that I plan to explore.

1 Like

The workaround parts I have designed get me within a few mm of using the whole bed.

I finally learned that the TMC2225 drivers that are shipped with it are basically a different packaging of the TMC2208.

Here’s the secret decoder ring, it seems:
TMC2225 ~= TMC2208
TMC2226 ~= TMC2209

This means TMC2225 don’t have sensorless homing. It isn’t that I want sensorless homing necessarily, but it turns out that the bed is slightly larger than the maximum travel for the head, and using sensors for X/Y homing will further slightly reduce that. So it seems at least possible that I’d rather use sensorless homing for X and Y — which I also set up for the cantilever printer I abandoned, which worked fine.

To get full bed width, I would also have to design and fabricate a new narrower carriage.

I am ordering a set of TMC2209s as they have lower RDSon; I will either use them from the start or have them as standby units; they support higher power at lower heat and sensorless homing; the tradeoff is a higher possible voltage but I’ll be running them at 24V anyway so there’s no value in the higher voltage support on the TMC2208/TMC2225 vs the cooler TMC2209/TMC2226.

1 Like

On the GTR control board, the manual says that the DIAG jumpers do nothing, and that TMC2209/2226 stepsticks require clipping the diag pin to use end stops. Not sure why, if the end stops would trigger first anyway. So I suppose I’ll start with the TMC2225 step sticks that the unit shipped with. I do still need to design a fan duct to print to keep them cool.

The thermistor came (as usual) with bare wire ends. This board uses a JST connector for thermistor, not screw terminals. The kit includes a generous JST pigtail terminated in bare wires. SecKit recommended crimping my own JST inline connectors to join the thermistor wires to the JST pigtail.

I think that this kit should be primarily considered a frame and motion kit with a bunch of wiring. It’s less complete than I hoped. I’ve had to ask enough questions that I feel a little bad about pestering him on email. Not that he has complained, and many questions have turned into improvements he has promised to the manual. But I think that if you have any doubts but are still interested in any SecKit printer, whether you use Facebook might reasonably be a deciding factor.

1 Like

SecKit recommend a cooling duct to avoid skipped step artifacts, and with stepper sticks instead of an integrated board, this seems wise to me. But just blowing a fan in the general direction of the step sticks seems optimistic; I’d rather focus that airflow where it is important.

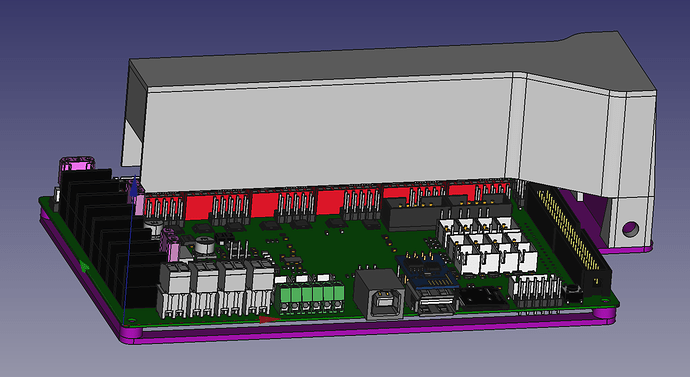
I’m trying out a fan duct design I made for the GTR board. It’s a mounting bracket and fan duct in two parts. The base is an integrated spacer and fan base, and above it is a duct. Together, they are designed to hold any 10x40 axial fan. Modeled around the board:

The hole at the right takes an M5 bolt.

There is meant to be enough space below the duct for free airflow and to avoid impinging on any wiring. I should be able to wire the board and then install the duct over it.

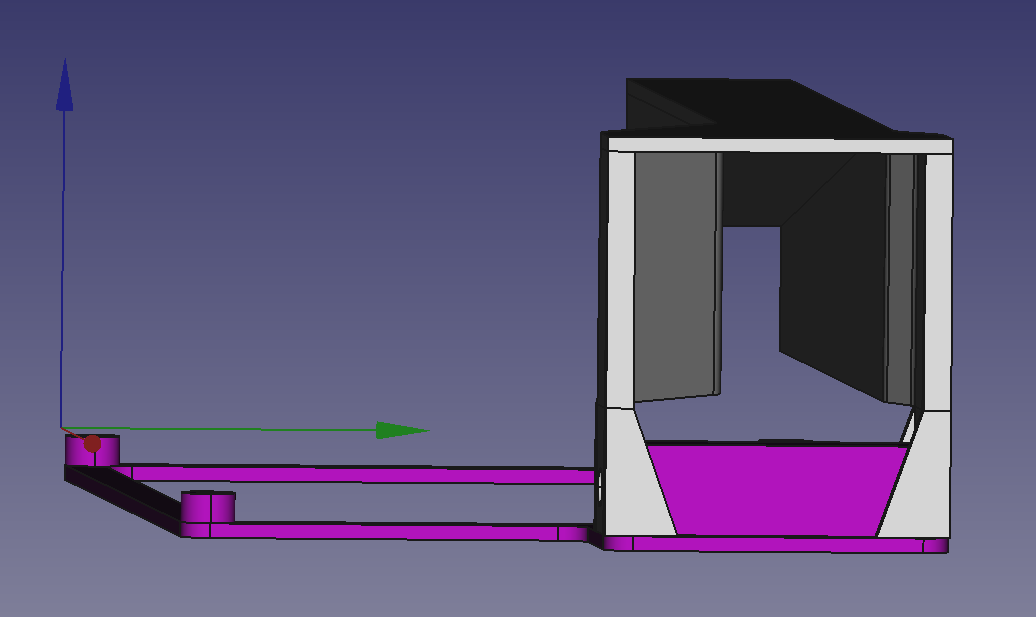
I haven’t modeled the fan itself, but it goes in this opening, here shown without the board.

The duct gets narrower as it goes away from the fan, and there is space at the bottom for air to flow out, with the idea that there shouldn’t be too much impedance, and fresh air hits all of the step sticks on the way out.

The triangular tangs at the bottom both hold the duct in position over the board and, at the bottom, capture the corners of the fan. I hope. Also it’s 39.8mm wide, with the idea that bolting it together will hold the fan in place. I’ll see how well that works. I could imaging the duct taking a couple iterations to work just right.

Nothing about this set is specific to the SK-Tank. It’s really just modeled around the BTT GTR board.

It is all designed to print without supports. The duct prints upside down.

It’s modeled in the realthunder branch of FreeCAD, and I plan to release the files once I test the print.

3 Likes

If you want control over the airflow at all 4 driver chips instead of a fully open bottom close it off, add holes above the chips and use a centrifugal fan for better buildup of air pressure in the duct.

The long open channel often results in far more airflow in the front or back of the channel and little in the middle.

It’s six chips, and I designed it for the fan that shipped with the kit. These are TMC drivers so they shouldn’t run terribly hot. Might not be obvious from the picture but the channel cross section gets narrower as it crosses all the steppers. I haven’t tested running it to see what airflow is actually like yet. But the delivered axial fan is understood to be good enough in practice, I’m just adapting to the new driver board.

It could be argued that I should close it at the end rather than taper only partially, but excess impedance is a bad idea for an axial fan.

1 Like

Did a quick airflow test, and airflow seems sufficient that I’ll probably run the fan below full speed. If I want it to be maximally quiet, I could figure out whether I can control it based on a thermistor or 18b20 I guess.

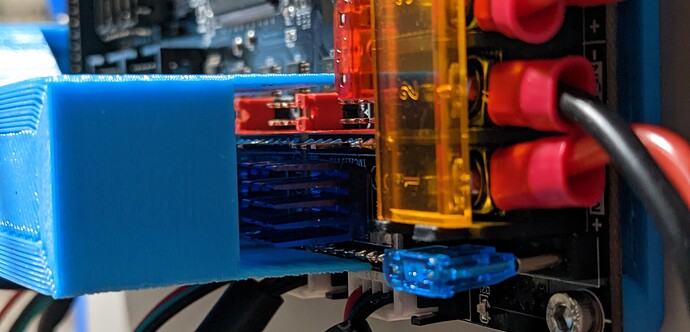
Here’s the small end, installed. It is 40x40mm at the fan end, but gradually tapers down inside to just big enough for airflow through the heat sink.

Now I have some work to do on cable management.

2 Likes

It’s wired up and moving. I’ve set it so that the inductive sensor is probing to tram the bed over the pivot points, which I think is the intent. I moved the bed forward for more usable area, so I had to adjust the

I’m able to set the stepper driver cooling fan speed; it’s controlled by PWM. It also runs only when the X, Y, or extruder steppers are powered, in the default config.

The stepper driver cooling fan shipped with the printer is certainly not silent. I could put a Noctua 4010 fan in place. It’s a 24V system, though, and Noctua makes 12V but not 24V fans — but I can just configure it for 50% duty cycle. (Klipper does have the ability to attach a temperature sensor to a fan, if I want to use it. But I think that if I switch to a noctua I won’t care.)

The resonance testing for klipper resonance compensation made it clear I need to add some cross-bracing to my printing table. I’ll expect to run that again after I add the cross-bracing. But also it’s a pain to try to hold the Raspberry Pi running the printer right next to the print head, because the accelerometer doesn’t like long wires, so I have ordered a Raspberry Pi Pico to connect to the accelerometer to make it easier.

The tiny little fan on the volcano hotend could be worse, but it’s not great. I can definitely feel the vibration, and that will show up in surface finish. I’ll probably see what I can do about putting something more like what I had on the cantilever printer eventually.

The 7.5mm/s probing speed SecKit provide in their default klipper config is way too fast for accurate probing on my system. I chose 2mm/s and got typical repeatability within 1 micron, whereas with 7.5mm/s I got about 25 microns of variance.

I feel uncertain about the bed mesh probing. It’s quite consistent from run to run, but the mesh it generates isn’t as flat as I had hoped for. Here are the raw points, probed with a cold bed:

 0.027507,  0.160757,  0.247757, 0.290757, 0.274007,  0.175007,  0.029507
-0.036993,  0.071007,  0.144007, 0.169757, 0.128257,  0.038507, -0.113243
-0.115993, -0.009493,  0.061757, 0.095007, 0.048507, -0.050243, -0.197243
-0.177993, -0.064243,  0.019507, 0.049757, 0.011757, -0.067493, -0.195493
-0.198493, -0.072743,  0.004007, 0.041257, 0.024757, -0.059993, -0.159993
-0.214243, -0.091743, -0.014243, 0.029507, 0.021507, -0.050743, -0.157993
-0.261993, -0.145743, -0.042493, 0.011507, 0.018507, -0.044993, -0.156743

That’s .55275mm different between lowest and highest point, after tramming. The tramming happens near points measured at 0.027507, 0.029507, and 0.011507 so the tramming was done right, the bed just isn’t as flat as I would have hoped. It’s not as flat as the bed on the corexy I made myself.

The corexy I designed myself has a 6.35mm thick 330mm x 330mm bed with a 300mm x 300mm 750W heater. This has an 8mm thick 350mm x 350mm bed with a 330mm x 330mm 400W heater.

1 Like

I learned that the Z_TILT_ADJUST feature in klipper seems picky. It gives up trying to level unless I get the bed almost level to start with. I ended up using a square to align the bed by eye before Z_TILT_ADJUST would complete. That surprised me.

The 400W bed is a bit under-powered, in my opinion. I have become used to the bed getting quite quickly to temperature with the 750W keenovo on my original corexy.

I finally started my first print on this printer tonight. It’s a mount that I designed to hold the raspberry pi I’m running klipper on above the ACM back of the printer, for better wifi reception.

1 Like