Makerfront woes

Hello all,

My Makerfront printer has sort of died. I control it with a raspberry pi runing Octopi. When the Pi attempts to connect to the printer, it says “SD Init failed”. Interestingly, there is NO SD card or socket on the printer.

The Makerfront is a Prusa i3 clone from 2016. It has a laser-cut steel chassis, and it is a fairly large printer, with an 8" by 12" bed. The control board is an Arduino Mega 2650 plugged onto a RAMPS 1.4 card. Pretty standard for that time.

Here’s the complete dialog between the printer and the Octopi:
------------- snip --------------------

Changing monitoring state from “Offline” to “Opening serial connection”
Connecting to port /dev/ttyACM0, baudrate 250000
Changing monitoring state from “Opening serial connection” to “Connecting”
Connected to: Serial<id=0x6f433cf0, open=True>(port=‘/dev/ttyACM0’, baudrate=250000, bytesize=8, parity=‘N’, stopbits=1, timeout=10.0, xonxoff=False, rtscts=False, dsrdtr=False), starting monitor
Send: N0 M110 N0125
Recv: start
Recv: echo:Marlin 1.0.0
Recv: echo: Last Updated: Jul 20 2016 8-15-13 06:14:52 | Author: (MakerFront, i3PRO_XL)
Recv: Compiled: Jul 20 2016
Recv: echo: Free Memory: 4495 PlannerBufferBytes: 1232
Recv: echo:Using Default settings:
Recv: echo:Steps per unit:
Recv: echo: M92 X80.00 Y80.00 Z4000.00 E90.00
Recv: echo:Maximum feedrates (mm/s):
Recv: echo: M203 X250.00 Y250.00 Z1.50 E22.00
Recv: echo:Maximum Acceleration (mm/s2):
Recv: echo: M201 X750 Y750 Z5 E500
Recv: echo:Acceleration: S=acceleration, T=retract acceleration
Recv: echo: M204 S400.00 T400.00
Recv: echo:Advanced variables: S=Min feedrate (mm/s), T=Min travel feedrate (mm/s), B=minimum segment time (ms), X=maximum xY jerk (mm/s), Z=maximum Z jerk (mm/s)
Recv: echo: M205 S0.00 T0.00 B20000 X20.00 Z0.40 E5.00
Recv: echo:Home offset (mm):
Recv: echo: M206 X0.00 Y0.00 Z0.00
Recv: echo:PID settings:
Recv: echo: M301 P12.00 I1.20 D200.00
Recv: echo:SD init fail
No answer from the printer within the connection timeout, trying another hello
Send: N0 M110 N0
125
Recv: ok
There was a timeout while trying to connect to the printer
Changing monitoring state from “Connecting” to “Offline”
Connection closed, closing down monitor
------------- endsnip ---------------
I have tried to connect to the printer with some other linux program “screen” or “minicom” - no
go. The baud rate is too nonstandard ( 250000 ).

Clearly, the printer mostly works. I am able to use a local controller ( plugged into the RAMPS board with ribbon cables ) to jog and home it.

What to do? I have set up to compile the Marlin firmware - have done a successful build on that. Marlin has come a long way since version 1.0.0. But there are a lot of options; I figure a few days of trying different things.

One can still buy an Arduino 2650 - genuine or clone. Also RAMPS 1.4 cards are out there. If OTOH I’m recompiling and replacing cards, maybe there are better cards now? 32-bit cards? Cards with tighter microstepping, quieter stepper action, auto-leveling?

There is no help from the company; they went out of business during the COVID, and their website now links to Chinese porn.
Definitely recommend 32-bit. It’s not just better; by now, it’s also generally cheaper!

I find it ironic that I have a preference for integrated steppers on boards (for better thermal management) and now both my active printers came with control boards that use step sticks… The list I was collecting of integrated stepper driver boards is a little out of date, but might point you in the right direction for an inexpensive replacement:

Sometimes the hardest problem is the connectors on the wires not fitting, and having to crimp new connectors. So the connectors available might be a part of deciding what board to buy.

Want to share pictures of the board with connectors?

Also, what board works best might depend on whether the gantry is driven by one stepper or two…

The gantry is driven by two steppers. So yeah - it would be really nice to have independent drivers so software could do auto-leveling on it. As far as I can tell, the board is a bog-standard RAMPS 1.4. Connectors & cables are not much of an issue for me. As a long time
electronics nerd, I have lots of crimpers - and soldering is only slightly more difficult than breathing :).

I was looking at the BTT cards - the MK-3 EZ looked really nice - I liked that big heatsink - but it only has one Z-axis output. And some of the Amazon feedback was not comforting - stuff like “the card broke and no help from the company”.

1 Like

Yeah, I haven’t seen many inexpensive boards with 5 or more trinamic drivers built in. The 2209s have lower RDSon in their integrated MOSFETs than 2208s I think, so should produce less heat.

I would kind of expect support for the least expensive boards to be about the level of support you are paying for, on the theory that you rarely get more than you pay for, though you occasionally get less than you pay for.

So unless you decide that you want to also make hardware changes, one of the boards that holds 5 or more step sticks is probably a good choice.

Either modern Marlin or Klipper can now give you resonance compensation, so consider getting a pair of ADXL345 boards, one for the head and one for the bed, if you want to go faster with higher quality.

Is the existing power supply 12V or 24V?

12V. The existing motor drivers are "Stepstick A4988"s. There are 5 of em. Right now I’m looking at the “Makerbase” boards. People comment that they’re more stable than the BTT cards, and while they don’t give extensive handholding, the info is all out there in github repositories, and they do replace DOA cards.

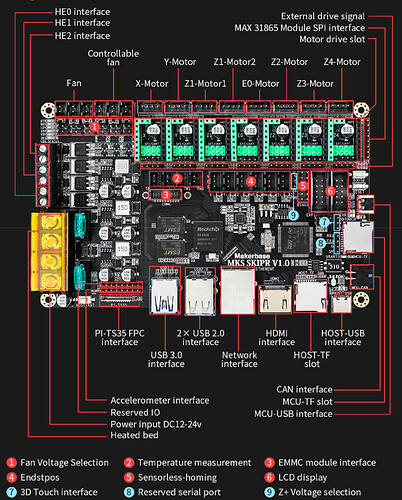
I just ordered an “MKS SKIPR” card. This card has two CPUs on it; one to control the printer, and the second to run Octoprint. So no separate rPI needed. It has five TMC2209 stepsticks, included in the bundle. Enough horsepower on card to run Klipper.

In for a penny, in for a pound? Maybe it’s time to indulge in a “BL-Touch”. I really do get tired of mechanically leveling the printer.

             - Jerryk
2 Likes

OK, one genuine “BL-touch” on order. I’ll have to kludge up a mount for it.

1 Like

My Qidi X-Max 3 is running on a card that I think is a trimmed-down relative of the SKIPR (the config file even says it is for the SKIPR, though it’s clearly modified). Having Klipper and the primary MCU on a single board is convenient. Sounds like you found a convenient bundle for your needs! :smiling_face:

I went looking for pictures of the Makerfront to tickly my memory, and once I saw them I remembered it. I also found this rebuild series from Steven Scotten:

I mention that because among many other upgrades he put a new 3d printed carriage with a BL-touch on it.

He replaced nearly everything. Not for a moment suggesting you want to do that, but since you bring up leveling… he credits @Mark_Rehorst with convincing him to move to 3-point leveling. However, Steven went the long way around, buying a new “frog” and drilling holes in his bed. You don’t need to take the same approach to move to 3-point leveling for the bed. You shouldn’t actually need to drill holes through the bed. You don’t need a new “frog” or a new bed. So if you want to go that way, now or later, there are simpler ways to do it. Happy to share if you want to try that at some point; won’t bother if you don’t care.

Consider switching to 24V. You don’t have to replace your steppers like Steven did. I switched my first bed-flinging 3D printer from 12V to 24V along with my first heater cartridge replacement; the bed heating had been anemic and the switch to 24V was a definite improvement. That new hot end heater cartridge was the only thing I changed when I went from 12V to 24V.

If you have any problems with the microswitches for X and Y limits, with the 2209 drivers you should be able to set up sensorless homing. It’s pretty neat; it’s basically using back-EMF from the stepper motors as the sensors.

Yes, I found Steven Scotten’s website. Unfortunately, he didn’t put contact info, and the signup for his website doesn’t work. I just found him on LinkedIn…

So I could go to 24V without replacing the steppers and the heaters? My bed heater is as you described…“anemic”.

1 Like

Since you have electronics experience you know you can measure the resistance of the bed. Since W = V²/R if you double the voltage you quadruple the power. E.g. If your bed is 2 Ohms you’ll go from 72W to 288W. This ignores the temperature coefficient of resistance, which will of course reduce actual power draw as resistance rises as it heats, so it makes the room temperature resistance conservative for calculating max load. The bed heater plus your hot end heater will dominate your load. Add to that ~1A each for the steppers and you should have some margin. Fans and control board should be lost in the noise. :smiling_face:

I wouldn’t use a 12V heater cartridge at 24V; fortunately, replacements are cheap.

While I’ve put a CHC (Ceramic Heater Core) heater on my corexy, I wouldn’t go above 50W on a bed flinger. 40W is probably better and is more common.

I’m assuming you are leaving the hot end alone except for replacing the heater cartridge if you move to 24V. If you decide you want to replace it with a lightweight one, happy to talk about what I’ve learned.

So - again - you didn’t have to replace the stepper motors?

Correct. I suppose you could look up the stepper motor data sheet if you can find one, but don’t conflate the nominal rating (which might be around 3V) with a max voltage. That ~3V rating is a DC voltage at which it makes rated torque, drawing the max rated current. You just configure the stepper drivers (in Klipper that’s going to be in printer.cfg) with the current you want to draw (which can be less than nominal max in order to run the steppers cooler) and it will basically be like a variable buck power supply controlled by configured current. The actual current will be split between the two phases of the stepper motor.

You probably want the most current to fling the bed back and forth (an amp or more), less to move the head, still less for each Z motor because of the mechanical advantage of the screws. Do you know the original configuration? The necessary current doesn’t change if you change the voltage going to the steppers.

BTW: If your unit has threaded rod instead of trapezoidal lead screws, I’d suggest it would be worth your effort to switch. I strongly suggest single or at most double start for unsynchronized Z axes to avoid back driving them. I used single start and never regretted it. The typical quad-start lead screws are a bad choice unless the are explicitly synchronized with a timing belt.

OK - the stepper motors are driven by a pulsed current source. That makes sense. Inductive “stuff” is always faster when driven by a current source. My first encounter with that was when I was a teen, trying to get a #15 teletype working. It had “selector magnets” which pulsed in time with the incoming signal, which was fed from a 100-ish volt voltage source piped through a power resistor to get the desired current of 20mA.

At the instant you apply voltage to an inductor, it looks like an open circuit - so it’s advantageous to have a high voltage, and have it smoothly sag down as the inductor accepts current.

One challenge is that I don’t know what thermistor they used. In the Marlin config - and I assume also in the Klipper - there is a large field of thermistors, and I have to choose one. Well, two - one for the hot end, one for the bed. Maybe the same as the Prusa? Can’t seem to find that out, either.

Hmm - now that I remember it, I did exchange some emails with a Mike Mayer - the principal of Makerfront. Maybe I could ask him? His domain alas is no longer his, so “mike@makerfront.com” is no good. But he’s on linkedIn… I just sent him a connect request.

Was just reading about heater cartridges. 30W is safe, 40W isn’t. 40W can actually melt the aluminum block. Of course, only if the driver MOSFET shorts out - which they sometimes do. I actually have a 48V CNC board where that happened to the MOSFET driving the spindle. The spindle then ran full blast no matter what I set it to. I wound up buying a second board on Ebay, but got mine running by replacing the transistor. So I have a spare 24/48V CNC board. 32-bit & all. Yeah, I considered trying it out on the printer, but I don’t think it has the heater outputs.

NTC 100K is a good guess for the thermistors; as far as I know it’s the most common type.

Worse case you can just buy a new heater block and new thermistor. The ones with thermistor cartridges seem more reliable than the ones with bare thermistors, in my experience.

Whether any wattage cartridge can melt an aluminum block is a factor of heat flux rate through the block and whatever insulation you have around it (silicone sock, kaptan tape, rock wool wrapped with kaptan tape, etc.). So I don’t think there’s a fixed wattage for which that’s true for all heater blocks. But a bed flinger simply can’t print as fast as a corexy, so 30W is probably enough to melt the plastic as fast as you want to print anyway? I guess that might not be true if you were using a large nozzle diameter to print fast by printing really thick layers, but I don’t think there were ever that many people doing that with bed flingers?

I just received the MKS SKIPR card and a set of 2209 stepsticks. Have I bitten off more than I can chew? There is NO documentation whatsoever. Just the cards in their antistat baggies.

The hardware is open source - the schematics are on Github. Also a sheet showing all the connectors with cryptic names for each pin.

The card has two CPU’s. One to directly run the motors etc, and the second is a raspberry pi equivalent. There was a heatsink in the box. Don’t know which CPU it’s for.
There is also the usual forest of pins under each stepstick, and a baggie of jumpers. Don’t know which pins to jumper. Maybe the same ones as the old board?

The 2209 is supposed to have a UART interface that can be used for total control.

OK, I found some info in Youtube videos. Got the stepsticks configured in UART mode,
stuck the heatsink onto the correct chip. Powered it up with my lab supply, LEDs come on. I loaded it with the SD card from my Octoprint raspberry pi, plugged in an HDMI display and a keyboard… no joy. No video output from the pi section.

I stuck the SD card back into my PI 3B, and it booted up fine. Maybe this thing
won’t work with a normal raspberry pi OS SD card? More research…

Did it come with an eMMC module?

I noticed that on my Qidi where the board is part of the printer, they still use /home/mks and the root password as shipped is “makerbase” ­— that makes me think that makerbase may have an eMMC module image that includes Klipper. Hmm, yes, download eMMC images here. I wouldn’t try to boot your existing octoprint rPi image; I’d use the image they provide. Then on that page, is this the image where you could use some help interpreting the pin names?

OK, I downloaded the latest “armbian” image from the MKS google drive. It works, we have HDMI output. But I really don’t like it so far. There is no Linux command line. It comes up to a printer control screen. It ignores the keyboard & mouse. Something is not quite right.

OK, I have access via the builtin webserver. Gotta say, it’s a fancy interface. But no command line access yet. It does have a working sshd, but the usual login - user “pi” and
password “raspberry” doesn’t work.