I am a fine artist and just started using the Omtech/K40 Whisperer to cut 10 mil polyester paper. The designs are extremely small, intricate and precise which forces me to use a very slow speed and power combo to maintain the delicate nature of the art without melting it away. It has to be just enough to cut through but not so much that it begins to melt and curl the paper in tight areas. I have had some success in the past but it has been hit and miss for the most part. As my designs become more complex and larger, the time required to cut a single piece has increased and thus my issue seems to be getting worse.
THE ISSUE
After testing a small section of my design on scraps and dialing in the speed/strength, I begin the cut. After a period of time, the laser begins to lose strength/power, finally resulting in merely marking the paper instead of cutting through. I therefore have to “babysit” the cut and when I notice it losing strength, I bump the power up by .1% (4.2 > 4.3). Typically, a single design can take anywhere from 1 – 1.5 hours and I begin to notice a slow drop off around 10 mins into the cut.
Omtech 40 watt laser
Digital meter (not amp meter)
Custom air blower (No air assist needed… there’s almost no smoke produced)
Custom cooling with 5-gallon bucket/distilled water and aquarium pump
Stock mirrors and lenses (cleaned thoroughly)
No water temp gauge (but the water is in the 50’s… cold in New England)
Cut Speed: 1mms
Cut Strength on Digital Meter: 4.2
K40 Whisperer
MY GOAL
I am new to lasers and would like to know if my tolerances are too much to ask of this simple machine. Since the power and speed are so slow, I was rather hoping this would not be an issue. I would like to be able to have a machine that can maintain the initial power/strength selected without having to manually watch for deterioration of power and having to bump it up during the cut phase by .1% as the power decreases.
QUESTIONS
Is this simple machine not capable of handling these tight tolerances? Is there a different laser cutter which would be better suited to this type of work?
What modifications can be tried to add stability to the output?
Is the laser overheating? I noticed my water pump isn’t the strongest (better than what it came with!) but it does move water through. Could I need a stronger pump to push water through more quickly?
THANK YOU
I appreciate the time you took to read through and offer your thoughts. Cheers!
If it’s a new machine and you really are cutting with the digitital display set to 4.x% then my guess is that you are losing power because the water is warming. It should never get to 25C. By monitoring both the water temperature and the mA current flow through your tube, you can not only have a better understanding of what’s changing but also prevent early wear to the tube.
Have you read through the FAQ/K40 Intro linked at the top of this page?
Thank you for your input! I have been using the laser for about half a year cutting the paper as well as acrylic and wood but never have seen this issue. I was hoping since the power was so low that the water wouldn’t warm up that fast but the little voice in the back of my head said that it was a strong possibility due to the length of time for the cut. Not having a flow meter, amp meter and water temp gauge certainly hampers any ability to diagnose the issue but your knowledge has spurred me on. If there is a possibility the water temp could solve the issue, I will go ahead with modifications. I had read quite a bit of the FAQ prior to purchasing the machine. Thank you!
And that is new information too since originally you’d mentioned there was no smoke being created by your use of the laser and therefore no air-assist was used. But there’s no way to cut acrylic and wood without smoke… So without air assist it is highly probable your lens in the laser head is quite dirty and may need to be cleaned or eve replaced. If you’ve had really good chassis air evacuation there’s a chance your mirrors will be clean but if there was any smoke swirling about inside the chassis, all the mirrors could use a cleaning too.
Understood. I had cleaned all mirrors and the lens thoroughly prior to output. I do this often and if I ever did cut any wood, I can see the exhaust being pulled out over the top of the surface of the wood due to the strong fan.
The alignment seems to be fine because it cuts in the same spot are OK and the next time not.
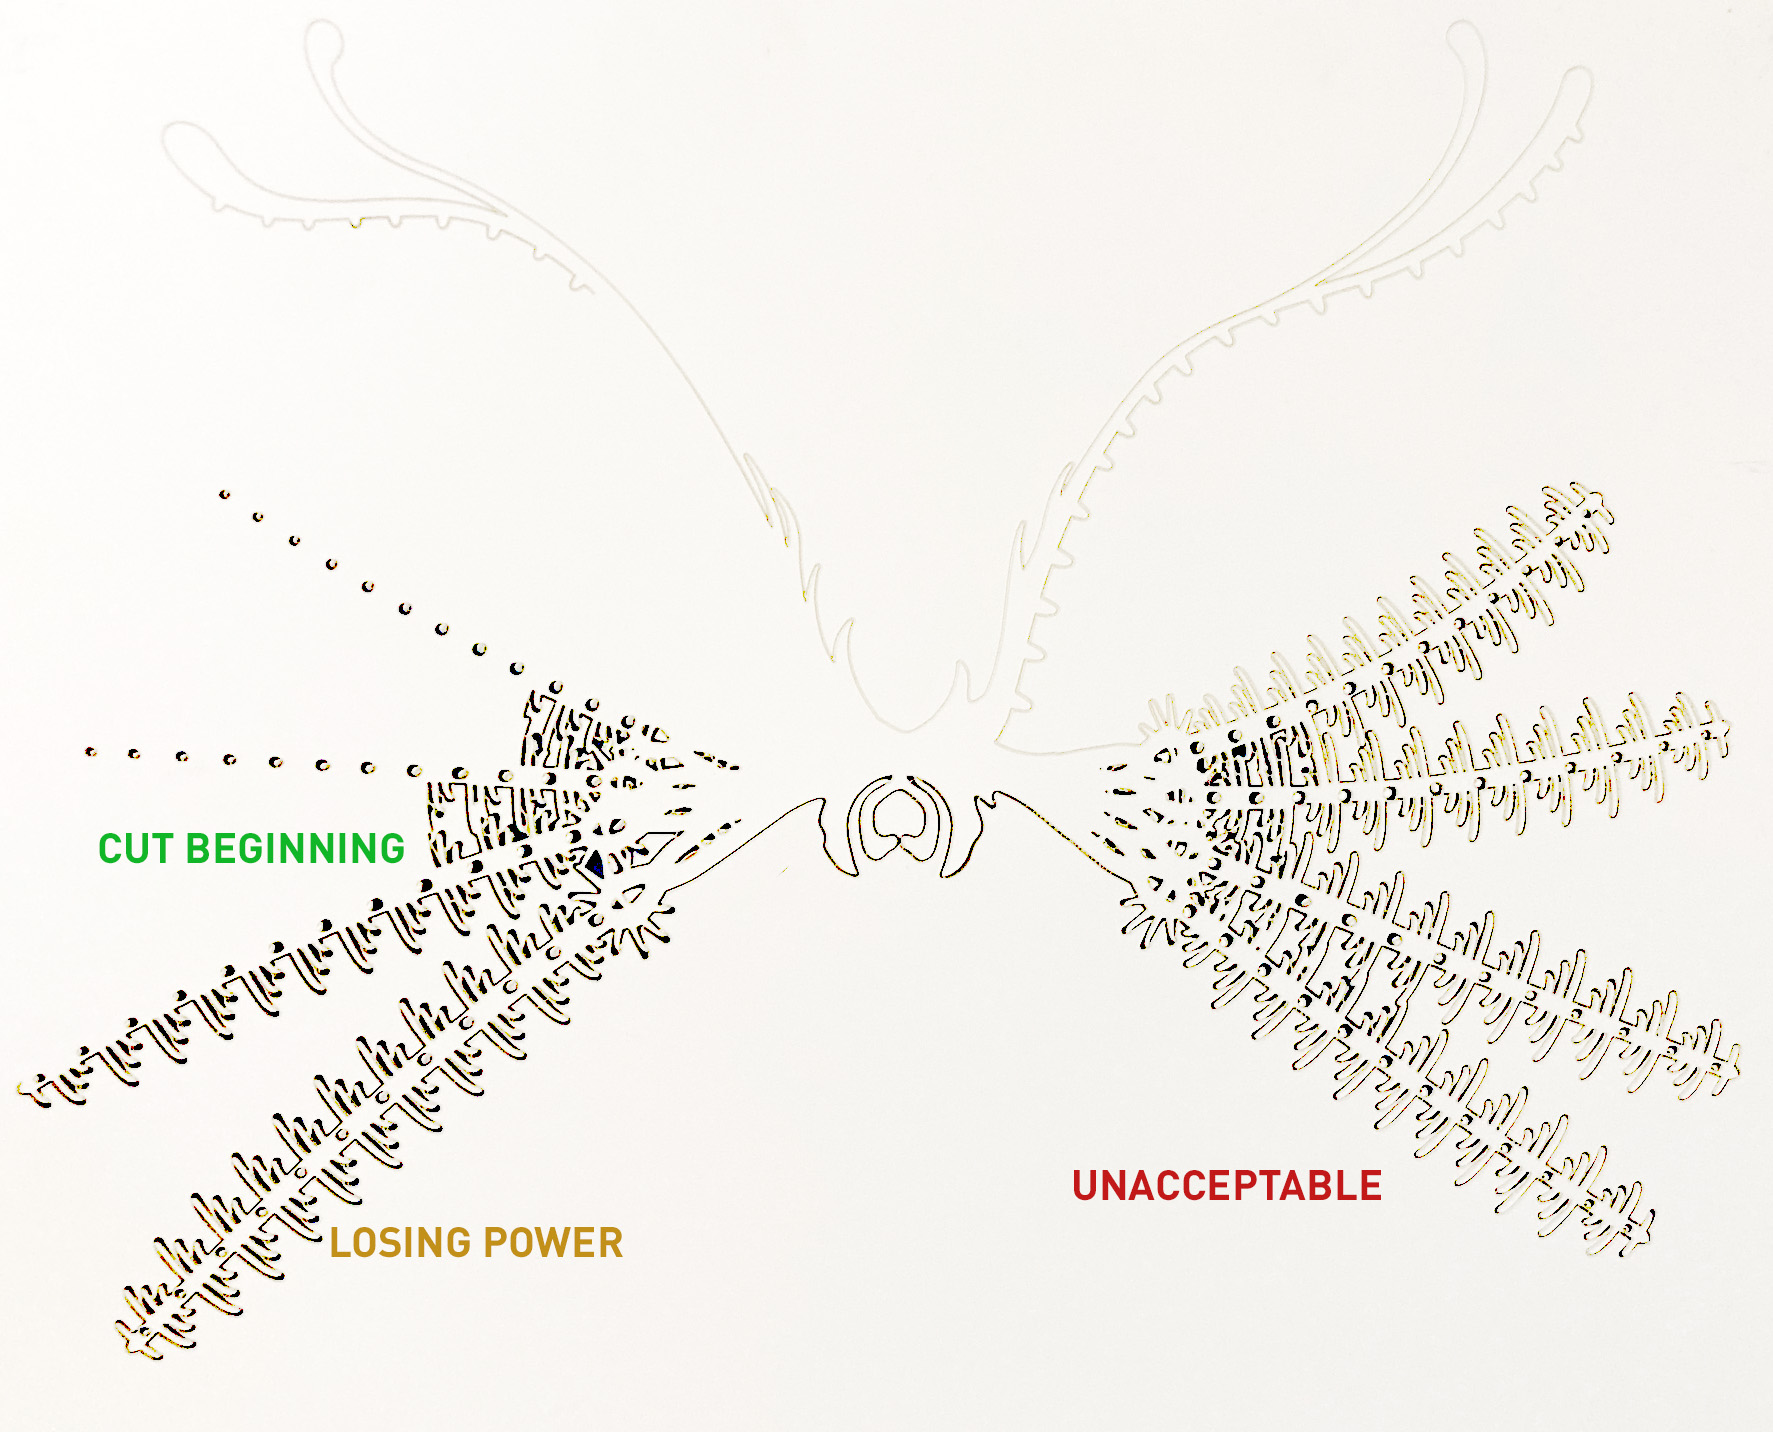
I just ran the test again, this time with a highly sensitive water temp/data logger.
The run takes 1hr 49min
HOWEVER… The output varied this time and at different locations.
LOWER POWER THAN NORMAL: 35-40%, 60-65%, and 90-100%.
HIGHER POWER THAN NORMAL: 80-88%.
There seems to be no correlation between the time/temperature/power that I can discern. I am beginning to think that what I am attempting to do is too sensitive for this machine.
In the past, I had run it at a more forgiving setting which, if ever there was a loss of power, seemed to compensate for that issue:
NEW SETTINGS THAT DON’T WORK: 4.2% @ 1mms
OLD SETTINGS THAT WORKED BETTER: 4.6% @ 2mms
Unfortunately, due to the intricate nature of the design, the OLD settings can’t maintain that detail.
I may bring this to a manufacturer and get their opinion as well. If you have any other suggestions, I’d appreciate the thoughts. Many thanks!
ok, sounds like you’ve been doing lots of things correctly.
Seeing your low power settings( 4.2-4.6% on the digital display ) I’m starting to wonder if indeed you’re operating too close to the low end of the capabilities of the CO2 laser and therefore are getting these variations in output power.
Often we can increase power settings and increase speed to get the same “burn” results. Maybe you can try some experiments with less detailed designs by first validating you still see power variations at your current speeds, then double the power setting and keep increasing the speed until you get similar burning results at the low power/low speed settings. And look to see if power variations are fewer or eliminated.
Those are all very good ideas. In the past, I had started with higher power and faster speed but as the designs became more complex, the kerf on the higher power began to interfere with the design. As you said, it may be that I’m just at the lower end of what it is capable of. I did try another design at 4.3% @ 2mms for 28 min. and it worked wonderful.
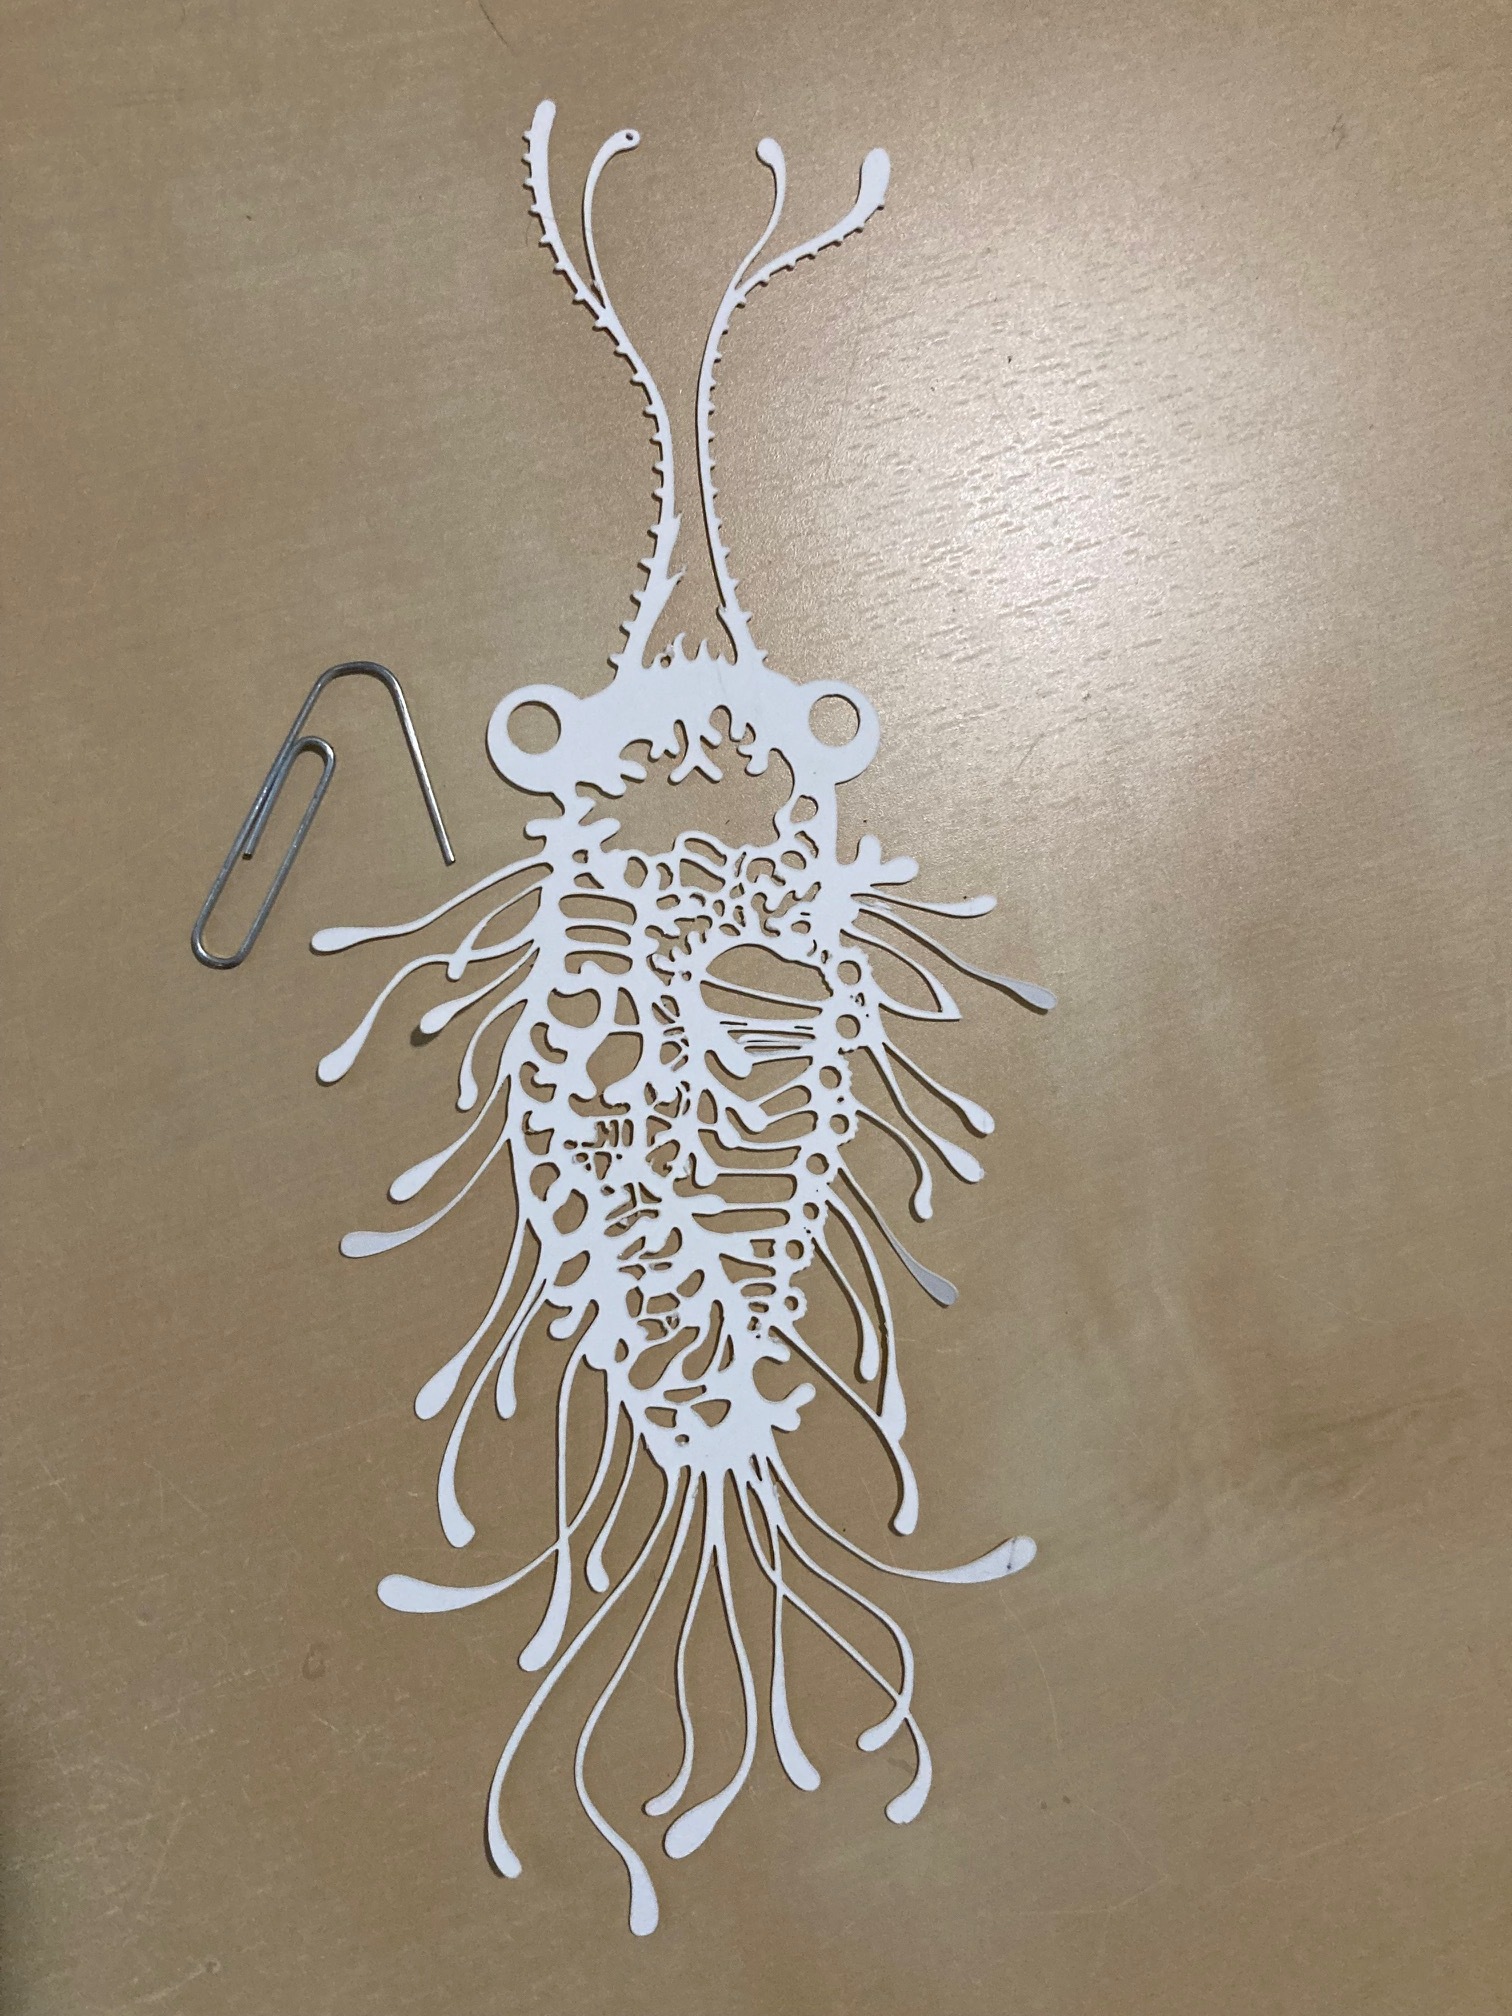
In the meantime, here is what I am making. The box and all packaging is made entirely with the laser and a vinyl cutter.
Also consider a different focal length lens so that your kerf might be more consistent. The inexpensive tubes often found in the stock K40 has a higher divergence than an A-rated tube. Look for Russ Sadler on Youtube and see if you can find his video’s on kerf. It sounds like your kerf is getting larger when you turn up the power might be related to the beam divergence and more energy in the outer diameter of the larger beam.
I would also try talking to the guys at American Photonics to see if they have any ideas on how you can increase the power level without increasing the beam/diameter at the lens. They are experts at CO2 optics and the K40. - K40 - Adjustable focus Head upgrade – American Photonics
Fantastic! I will look into this and give them a shout.
The substrate I use may have something to do with it as well. Since it melts and doesn’t burn, the material isn’t eliminated… it’s more or less pushed to the sides. Areas where it has to make an acute turn is an issue. For instance, you can not make a sharp point with this type of polyester paper whereas with cardstock you can. In order to create a sharp-ish point, I find you have to turn down the heat as much as possible and run it at a slower speed or the tip will turn into a blob since the paper is still hot. I only have one design so far where this is a major issue so I may just have to compromise. The benefit of using this paper however far outweighs this inconvenience; you can achieve hairline cuts in places it it will not tear, crimp or fall apart… even if you use all your strength to tear it.
That sounds like what would be a Min Power setting in LightBurn so maybe Whisperer has a similar Max / Min power setting. Burning/melting is a function of how much laser power/energy is put into a spot on the material. When the physics of changing direction is taken into account there is a deceleration before the direction change and this means that if the laser power is not also lowered it will be putting more power into the areas where the speed has changed do to deceleration.
Oh, but K40 Whisperer doesn’t control power so maybe it can’t/doesn’t do anything with regards to acceleration/deceleration… If that’s the case, you might consider a controller upgrade which allows control of the Laser Power Supply(LPS) via a control signal but you’ll also have to change software to do this.
Others who know K40 Whisperer or Meerk4t software(which both work with stock K40 controller) know if either has the ability to change cutting power(pulsing) based on speed?
I understand and it makes perfect sense given my findings described below.
I have made a few adjustments to various steps to get it to work for me. Like most art, in order to solve an issue it’s best to take a little from multiple areas to solve the problem. In this case, I increased the size by .0075 in. in only the ares where the laser had to make a lot of tight turns. I also noticed that where it has to make a lot of turns, I was able to cut at a lower power setting than other areas where it had long runs of straighter lines. Using a lower power helped maintain the precision needed in those tight areas.
So while I had to babysit the cut and manually increase/decrease power during the run, it worked out OK. That being said, it is not a long-term solution and there’s too much guesswork on my end to hope it works every time. If this is something a board and software takes into consideration, I’d be interested. Upgrading the board would also be nice since I do all my design on a Mac!
IIRC the M2Nano and M3Nano based software(MeerK40t, K40Whisperer and VisiCut) all used fixed power for vectors letting the designer set the power at the machine controls. But for engraving they use dithering(pulsing) to adjust the amount of power in a given region in the design. So I’m wondering if you could change your lines to very thin grayscaled lines so that you get the effect of less power on those curves and turnaround points.
Otherwise, getting full control via a PWM output from a new controller/software setup would be the way forward. The G-Code based controllers(GRBL, SMoothieware, etc) setup a PWM output signal going into the LPS-L input in order to get the power variations relative to speed you’re looking for.
The M3/M3 Nano curves are semi-attenuated. There is, in the power setting, a value that gives effectively the change in speed (really the change in period between ticks) when making a diagonal rather than an orthogonal tick.
Effectively the laser has two stepper motors for X and Y and when you travel 100 units right and 100 units upper you end up 100 * sqrt(2) units away. But, you traveled orthogonality. If you traveled that 100x100 at an angle you would not travel 200 units, but 100 * sqrt(2) units away. Further since both stepper motors ticked at the same rate as they would have orthogonally you actually arrive at your destination in 100 ticks of time. Meaning you went significantly faster because you went diagonal. So, there’s a setting to increase this value and while it seems like the correct value would be 41% since that’d make it about 1.41 which is roughly equal to the square root of 2. It actually uses a value that is about 28% since that actually minimizes distances at other angles.
This phenomena can be measured pretty easily with a stack of paper where the number of papers the laser cut through can be easily measured. And you can tell whether your cut was about on par or too far off. But, it is the case that sometimes curves will be a bit less. And there’s an attempt to minimize this difference made in the board by saying anytime it travels with both x and y it travels at 23% slower of a speed. You sort of need to graph this out to see why 28% will about minimize the error. Basically at 41% all the error is negative except for pure diagonal cuts where it’s actually 0. But, for average angle cuts you reduce the overall error at a lesser value for the d_ratio which is in meerk40t but literally nobody knows what it means.