Hi folks,
I decided a while ago to get a laser engraver. The main choice was build it myself or buy a commercial unit. In the end I decided to build it. For the basic unit (without laser) I decided to take a chance on a Chinese import, so I forked over £40 for a VigoTec VG-L3. I thought I’d give some feedback - having just finished assembling it.
The kit comes with aluminium frame rails, 3 stepper motors (and cables), screws and fixings (together with tools needed). The advert said that there would be no laser or control board supplied, but there was a surprise - an Arduino-based control board WAS supplied, together with power supply and green safety glasses.
The instructions are usable and it took about 2 hours to complete the build. The only problem I found was that the supplied 8mm spanner was wrong for the nuts (7mm), but otherwise no real issues.
For £40 this does seem to be very good value - you could easily pay that for just the motors.
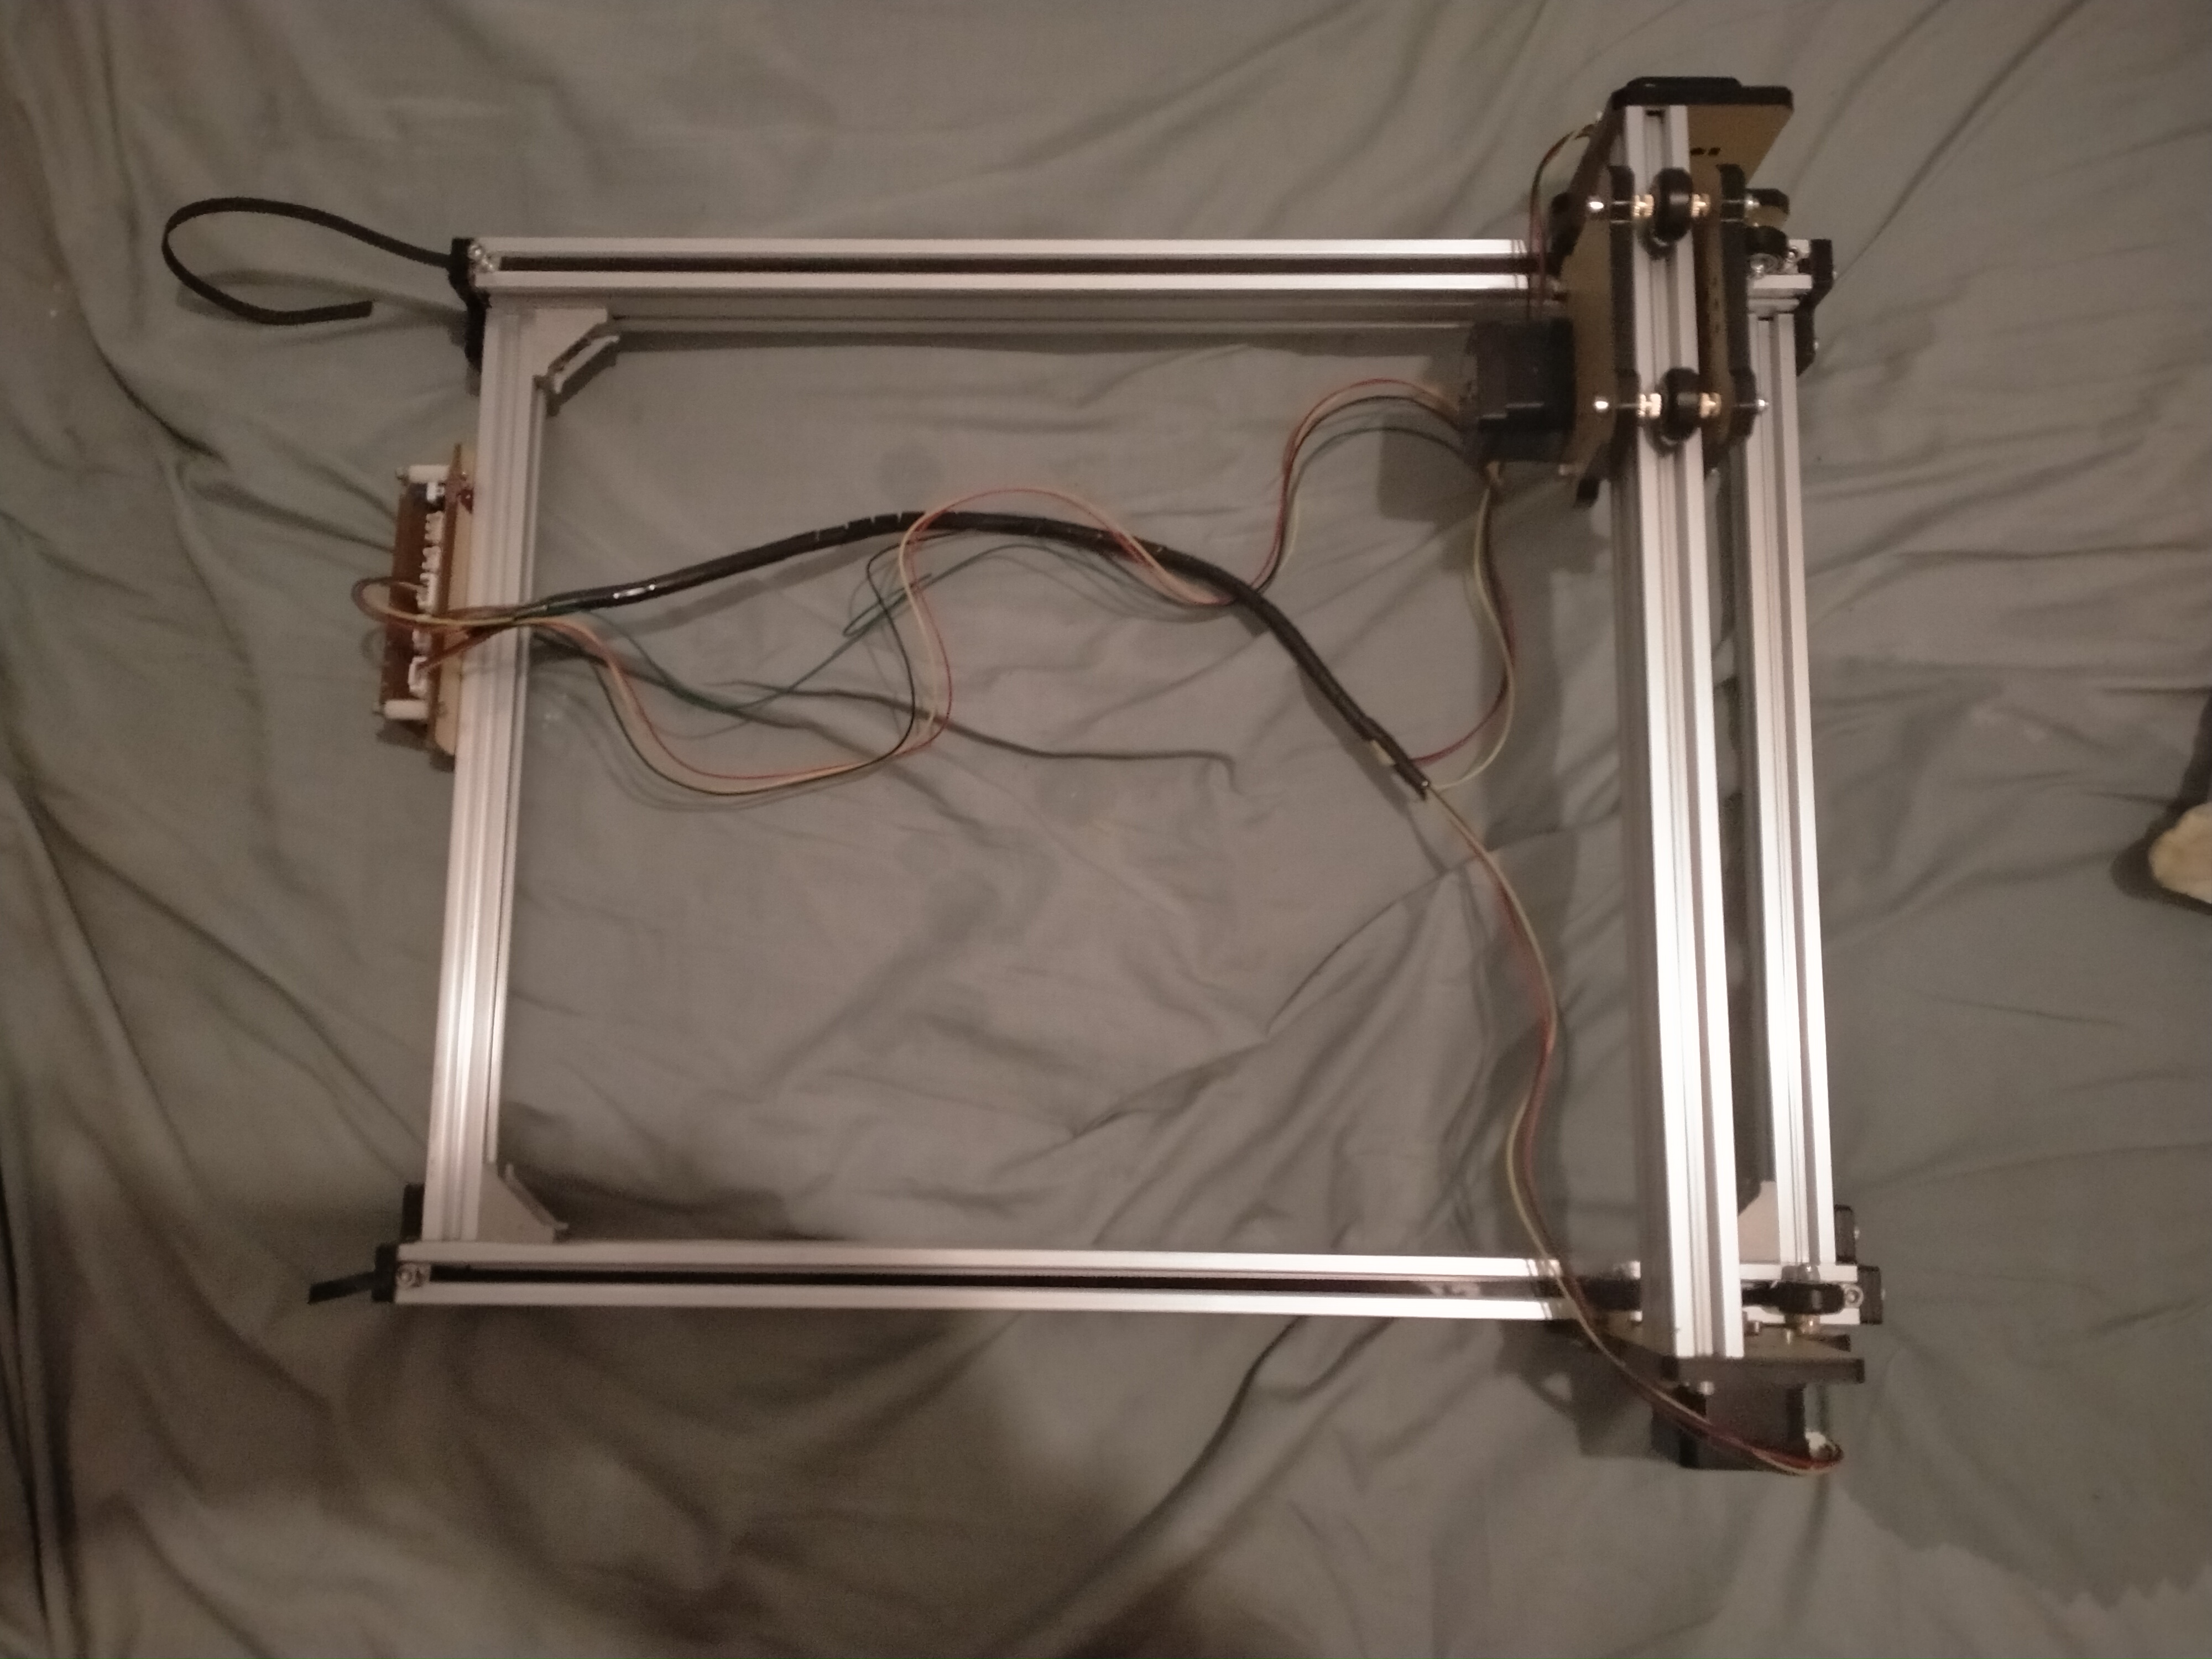
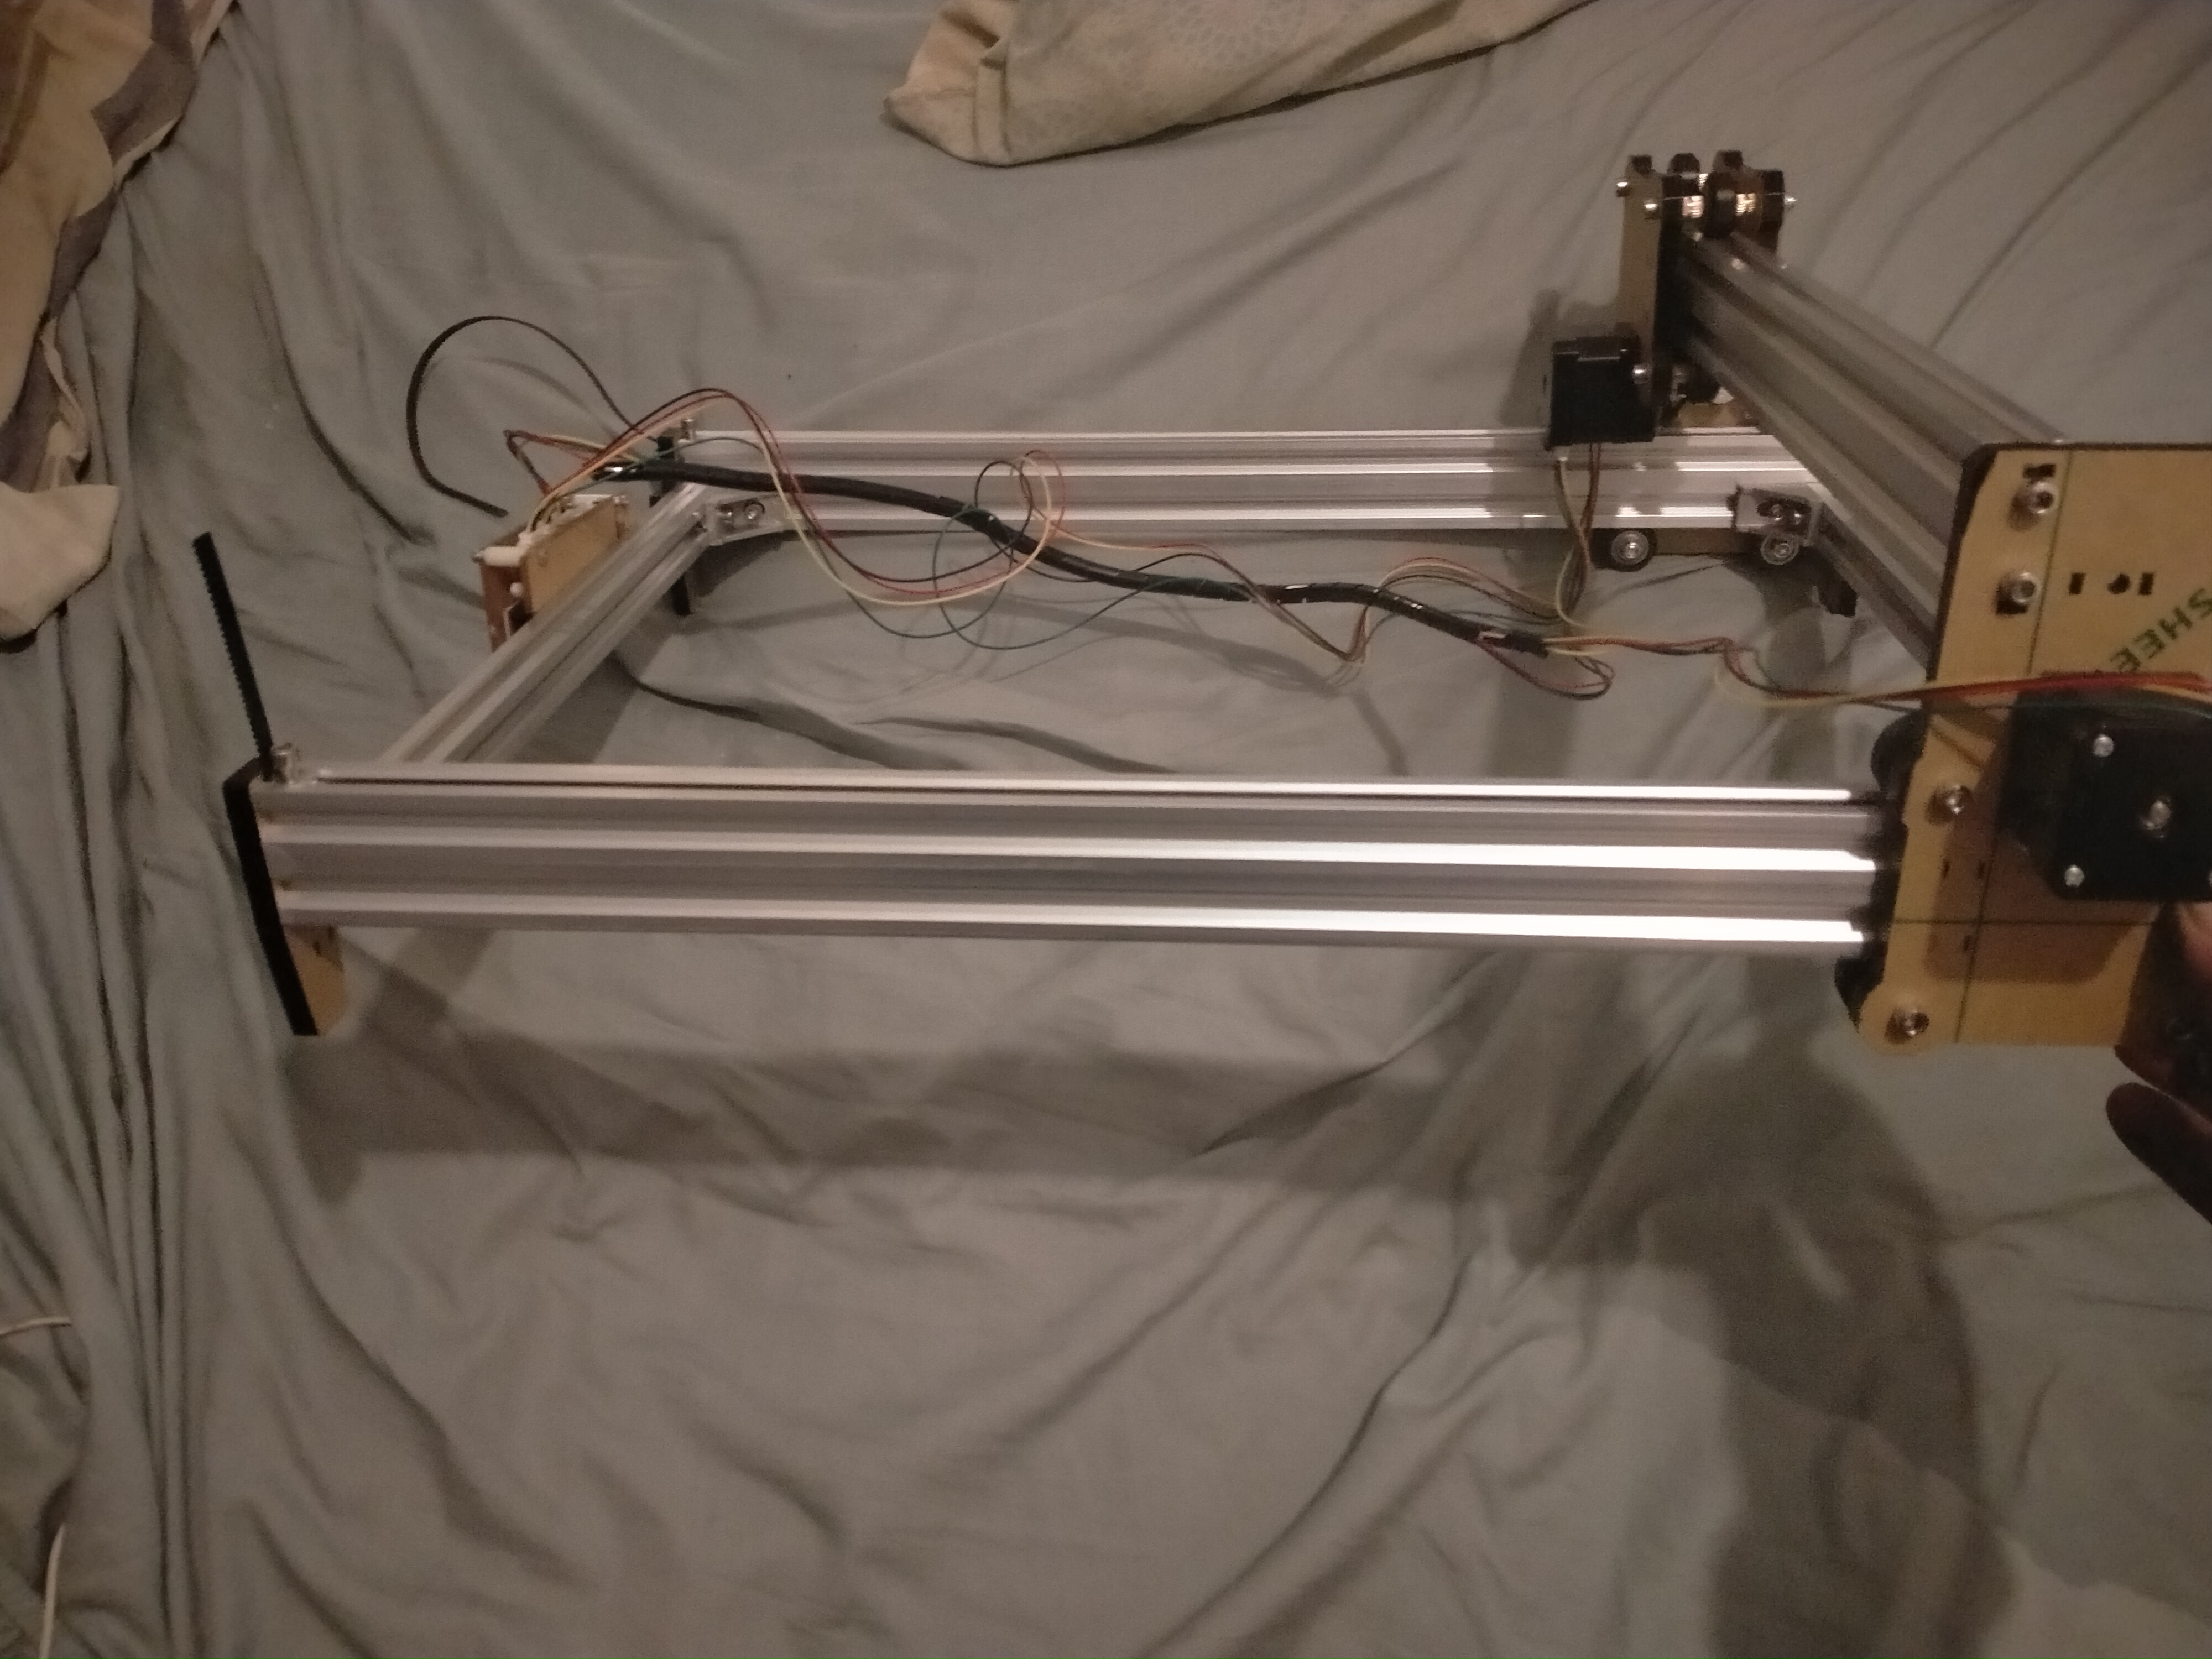
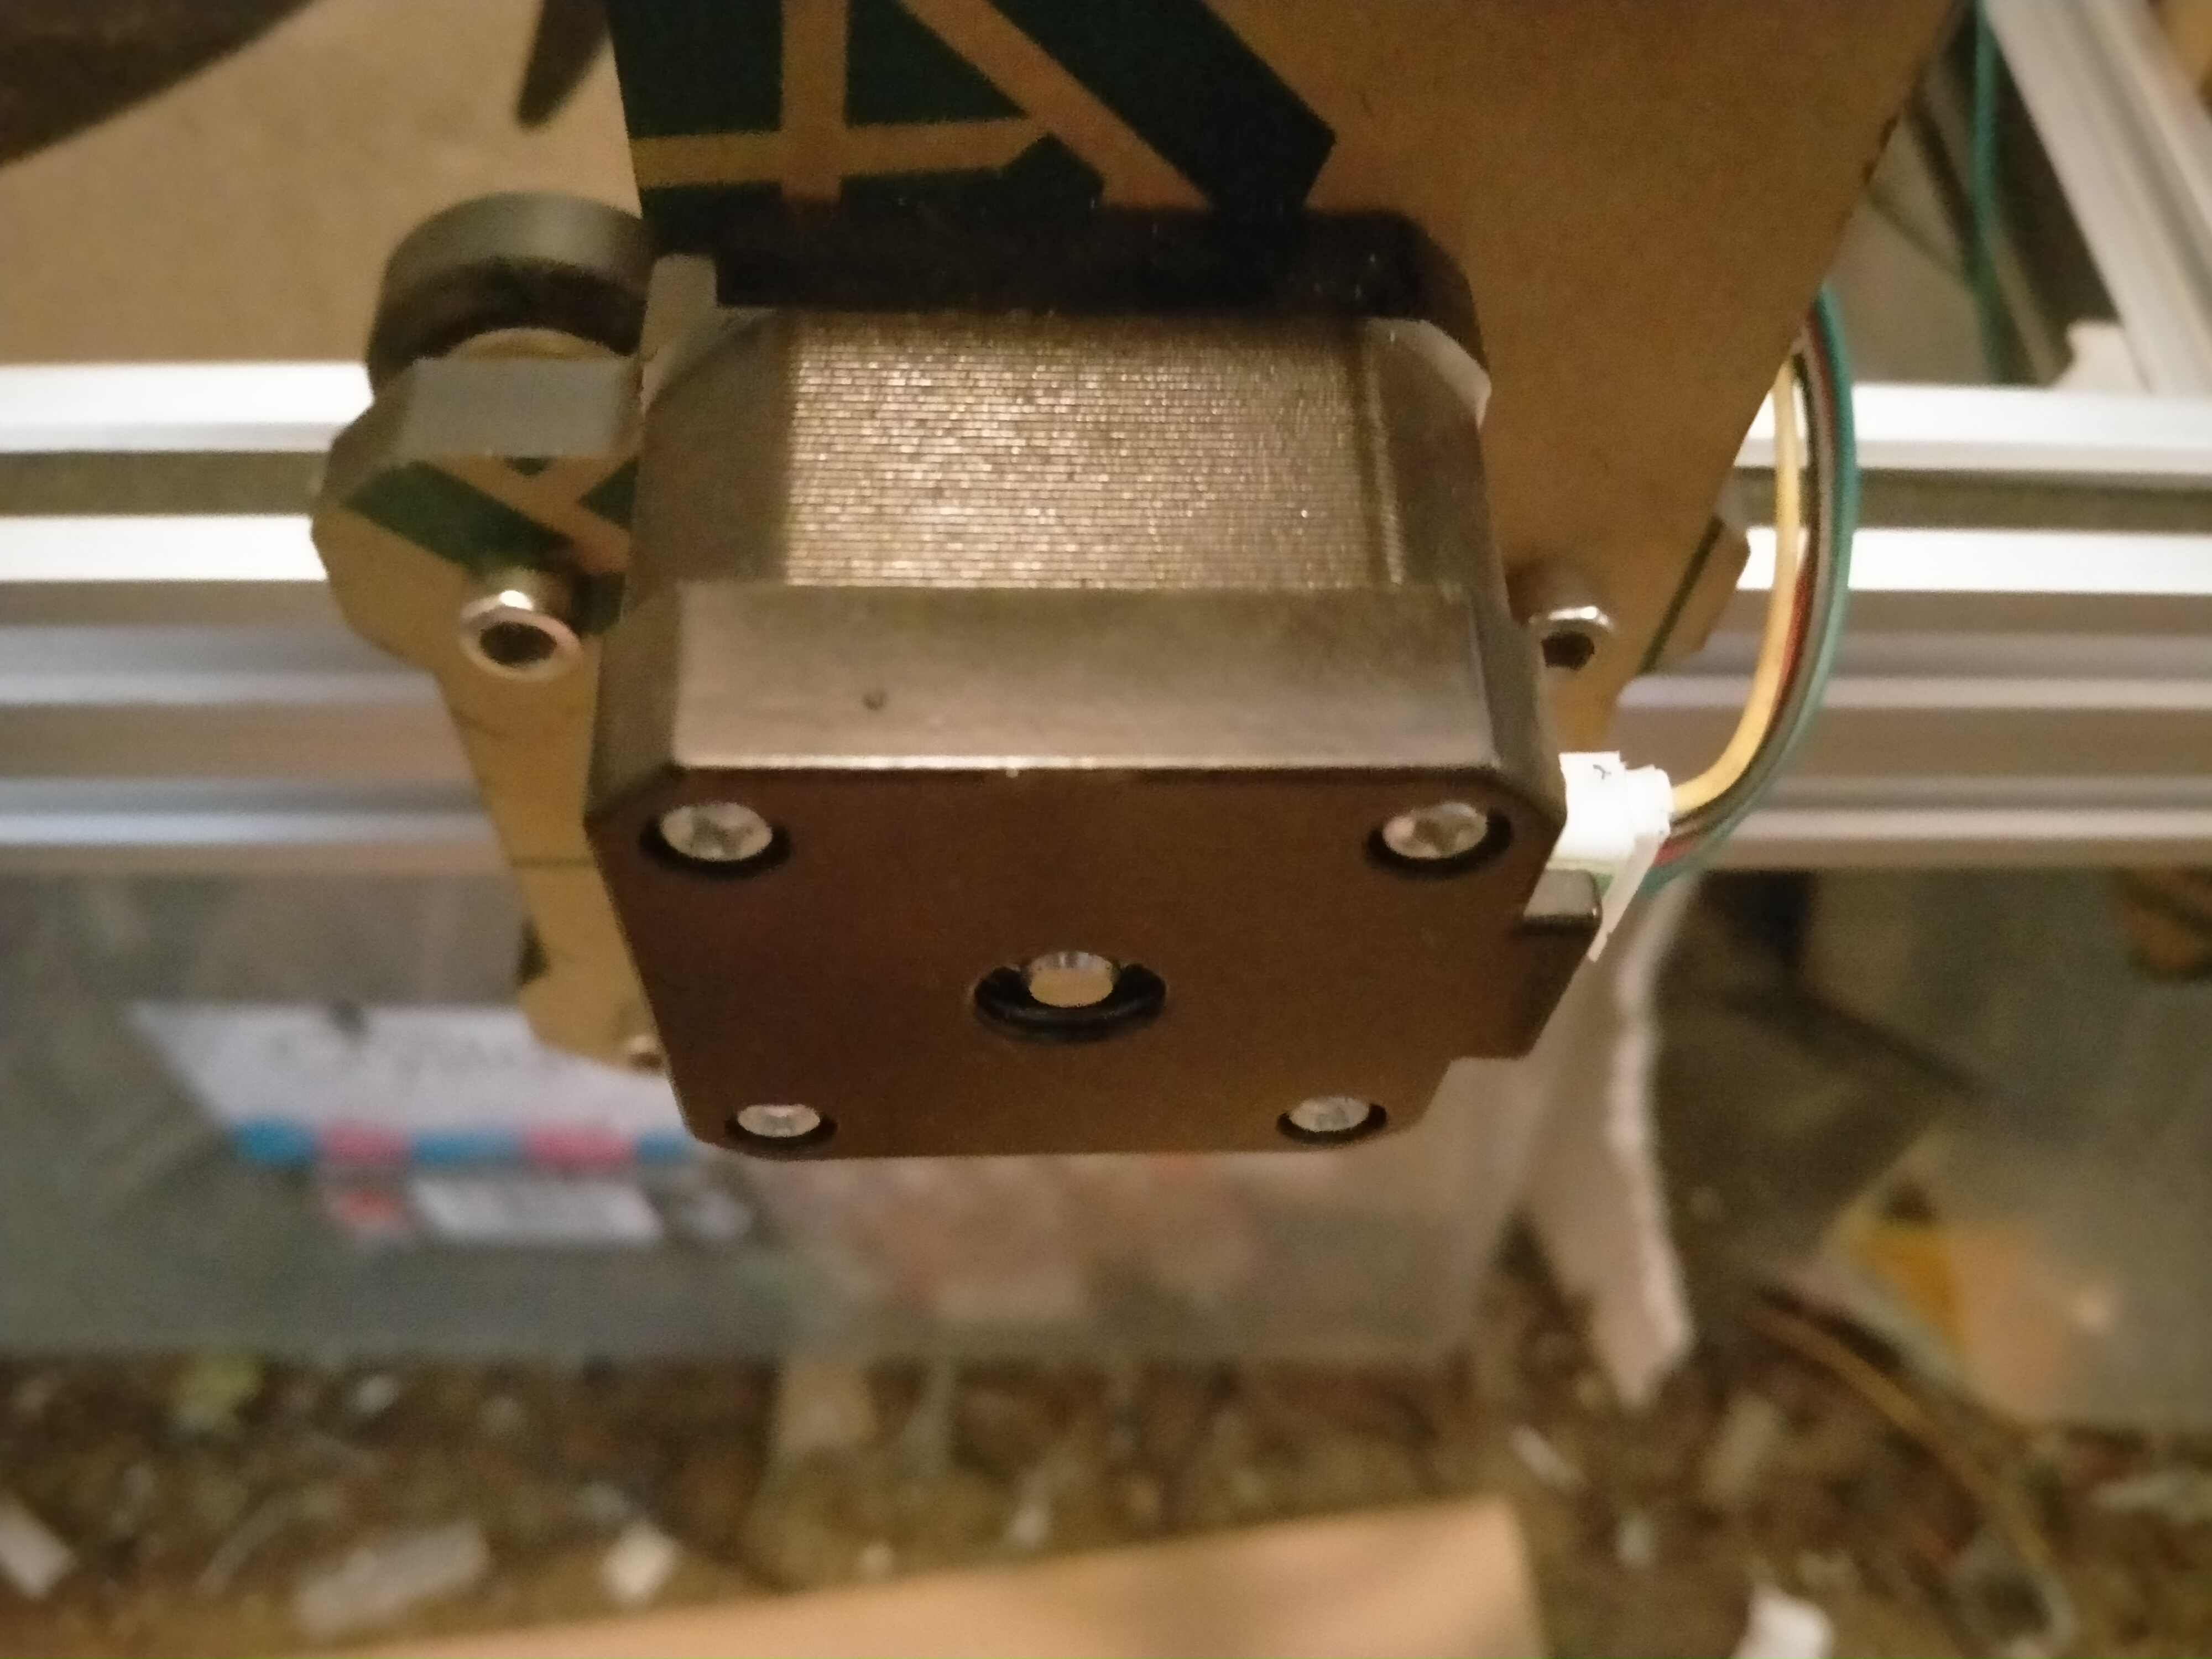
The picture below shows the unit completely assembled.
Upon powering up the unit all seemed well. I downloaded software called VigoWorks from the website referenced in the instructions and was able to control motion in the X and Y axes immediately.
Since I am still deciding which Laser head to buy it is not yet a functioning unit, but my overall impression so far is that it should be a usable tool for very little money.
The link below goes to the same unit on Ebay, but this one comes with a 500MW laser - I didn’t want the standard laser since I’m planning to use something with more ‘oomph’.
Difficult to say - they are unlabelled, a little smaller (shorter) than a Neema 17. They have the same 6-pin connector, so I’m guessing they are cheapo copies.
I seem to remember that for 3D printers the 0.9 motor gives better results (less VFAs), but I don’t know whether the same thing applies in an etching/cutting scenario…
you might be able to figure it out if there are no numbers on the motors to find the specifications from looking up. To figure it out, you’ll need the steps per mm from the firmware, the micro-stepping set on the stepper driver board and the size of the belt drive gear on the motor.
Yes, 0.9 will get you better resolution than 1.8 and on belt drive systems, as opposed to screw drive, it’ll be more noticeable.
The small NEMA 17’s on K40 laser cutters are 0.9 deg motors. I was surprised at how low power and small they were also but when the laser head is light they don’t need to be too big. CO2 lasers have much lighter laser heads than laser diode machines.
I’ll see how it performs with the supplied motors. Fortunately I have several spare steppers lying around and I’m pretty sure that at least some of them are 0.9, so I can swap them out if the quality is a concern.
PS - Michael, I’ve learned something new today - didn’t know that about the footprint.
ta
Chris
Well cool, glad to have passed on something useful. In case you care, here’s a bit more trivia that I wish I knew when I first started learning…
The “17” in NEMA17 means that the face plate is 1.7" square; you’ll see it also referred to as a “42mm stepper”. Similarly, a NEMA8 is 0.8" square, NEMA14 is 1.4" square, and a NEMA23 is 2.3" square.
Incidentally, the protruding circle on the face of the motor is intended to be what registers its location; in use cases where the axis of the motor must be precisely aligned, that alignment is achieved not by the screws (which by design must have some clearance) but by the registration circle feature mating with a matching circle in the mounting plate.
A NEMA17 stepper typically is tapped with 3mm x 0.5mm threads for mounting, set up to be attached with the screw going through clearance holes in the mounting plate into the face. Typically the screw hole is short; you may have only 8 turns (4mm) max engagement before the screw hole bottoms out. Some NEMA17 steppers have instead the similar 4-48 imperial thread (I have some of those, which annoys me every time I try to put an m3 screw into them). By contrast, at least all my NEMA23 steppers have a smooth hole that is accessible from the back of the stepper, and are intended that the mounting plate has a threaded hole.
I’m always interested I’m a teacher/lecturer which, I suppose, means I know a little about a lot, so what some call trivia or ‘technicalities’ triggers my inner geek
LOL…And me. I share that slightly more than irritated and slightly less than raving feeling at the use of Imperial thread in this case. As a brit, AF and other imperial measures are fine reminders of our former importance. But in an environment where everything else is metric (If I’m spannering an old Brit bike then a set of AF spanners is my friend), having one set of screws of a different type is (in the words of the late, much missed Pratchett) an embuggerance.
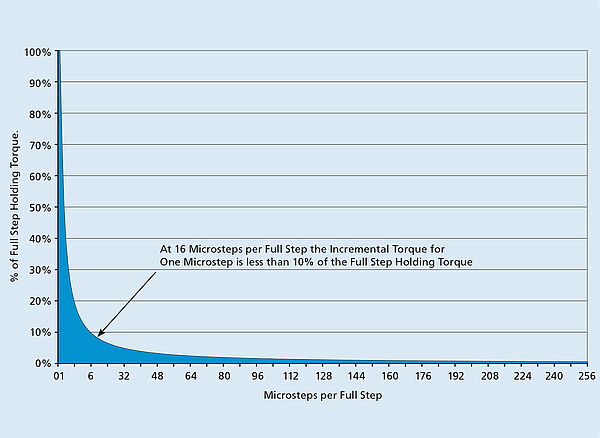
A question on this has occurred to me. As I’ve mentioned elsewhere, my long-term project is to build a sand table. I’ve already assembled the electronics and steppers on the prototype, and I’m using Nema 17s controlled through a couple of hefty drivers (can’t remember the codes, but they are commonly used and are the size of a thick pack of cigarettes). The drivers have various possible values of ‘microstepping’ which are selected using DIP switches. So here’s the question. What would be the difference between microstepping a 0.9 motor with a value of 2 and setting a value of 4 for a 1.8 motor?
Thanks Michael,
I was being slightly lazy - I could have googled and then trawled for the answer. My excuse is that I was pretty sure you would already know and would also probably be able to point at information that wouldn’t require me to spend time engaging the normal 3 pass web-filter.
1. is it obvious bull#### ? 2. Is it from an interested party and therefore not to be trusted without some further checking? 3. Is it timely (in terms of addressing the point reasonably concisely and in terms of being current).
Having read the article I’m happy to confirm my confidence was well-placed
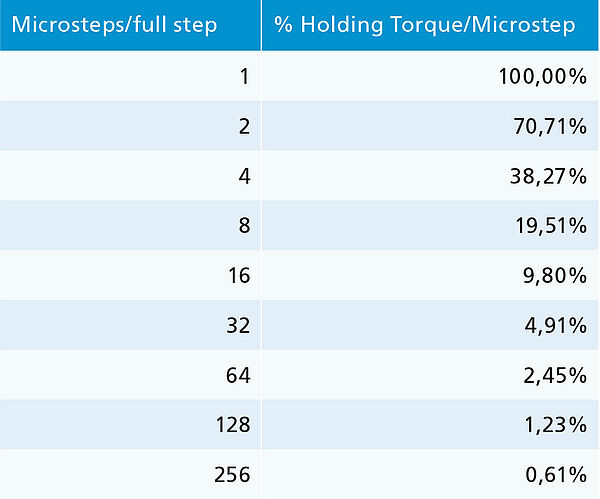
Note that this is incremental torque. Doesn’t mean more likely to miss steps, it’s just less precision between microsteps; when you get to a full step it’s still full holding torque at that full step. For a sand table you would want the smoothest/quietest possible motion, and slight loss of precision at the sub-mm scale just doesn’t matter, so I’d use highest microstepping available.
Personally, I’d be using TMC drivers for their near-silent mode if I were building a sand table. They have low RDSon MOSFETs and so can run much cooler than some of the older stepper controllers.
Thanks again Michael.
I just checked and I have got TB6600s. I’ll see how noisy they are and if that is an issue I’ll take your advice and buy TMCs (I can always use the 6600s on another project).
Thanks Laurence,
I’m always grateful for information from more experienced makers, so don’t worry about ‘patronising’ me.
I did read up a little and discovered that diode lasers, no matter what the ‘headline’ number is, are limited to about 10W of optical laser power. To be fair, that is what the unit I bought claims (beneath the banner headline of 40W).
I checked the board you recommend and it seems to be just the thing, and at £10 is certainly cheap enough to risk, so I’ve ordered one.
I’ll see how it performs with my existing laser diode.
Another thing I have read is that the cheaper diode lasers tend to loose power after only a few hours of use - particularly if you use them at a high setting. I have used this one for a couple of hours or so and so far it seems OK, but I’ll keep an eye on it.
Best wishes
Chris
I just bought the Vigotec L3 itself and finished mounting but not tested due to the lack of the software USB pen. The laser in the package is 2.5 W. I too had left the brown films in the assembly, but removed it is all black and more decent. I will look for the software on the Vigotec.cn site and start some tests.
Let me know how you get on. I started a new job recently and have been unable to put much time in with my projects, but I’m now on half-term and can get back to it.
I’ve got the unit working pretty reliably - I found that LighBurn is most suited to me - the interface and options are pretty intuitive, and it has some power under the bonnet for when my projects get more complex.
I’m going to write up the experience when I’ve finished a last tweak or two, so hope to have something to share by the end of the week.
Best wishes
Chris.

 I’m a teacher/lecturer which, I suppose, means I know a little about a lot, so what some call trivia or ‘technicalities’ triggers my inner geek