“The sky was the colour of television, tuned to a dead panel”
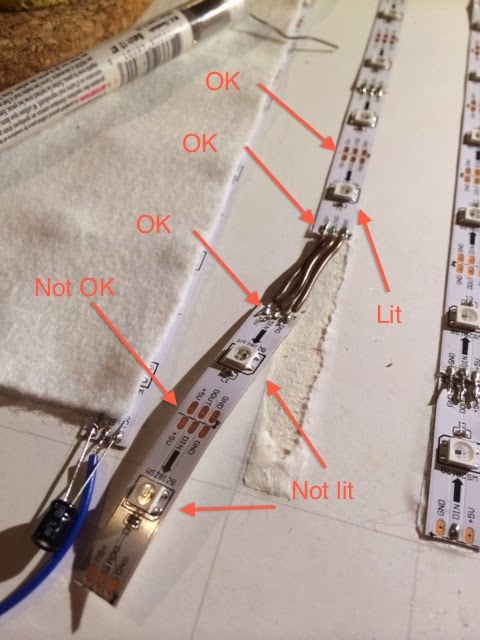
With my ghetto scope (great idea!), I’ve done some more experiments. You can see in the picture, I’m getting a data signal from the pads before and after the last working LED, on the join on the new strip, but not after the first LED on the new strip. I think somehow the data line is being shorted to ground at the start of the new section, maybe because the cutters I used to snip it apart are mashing the metal together? I’ll try and make a neater cut with a knife and report back.
Now I’ve taken that little strip of two off and tried to hook it direct to the Arduino (which, now back on the panel, works fine). Again the signal isn’t getting past the first LED. Apparently I’m frying it somehow? That ought to be pretty hard to do, right?
Unfortunately, I think it’s pretty easy to do - I had a project recently where I fried 4 first leds on the strips accidentally - not even entirely sure how i did it. Also once or twice fried the last led on the strip…
Unfortunately with those built-in driver LEDs, there’s no easy way to test each individual one. You can do it if you can figure out how to attach wires to its pads, but it’s a hassle. There are just too many variables here, the strip itself may be bad, the traces may be crossed somewhere, or the driver is fried. If the driver is fried, it won’t pass data on down the line, you’re SOL. You can try and replace that one pixel section, but if you are consistently frying that one pixel, I’d say something else is going on … though I don’t have a clue what that could be.
It is really easy to kill a pixel (the IC really) by connecting the wrong wires but that typically only takes out the first pixel on a string. But then again I have had a few die randomly.
Could someone have set something on the strips that released a static charge? (Plastic and vinyl coverings can hold a charge for a bit after cutting and people walking on carpet in dry weather could touch it and zap).
Is there anything near the strips that could have shorted VCC to DIN/DOUT ? (Looking for stray wire, solder blob, component fragment, or solder flux).
Is it possible that the strip in question was crushed or bent too far (the copper trace could be broken inside a crease or dent)?
Where the LED meets the strip are the solder feet fully connected?
Does your Ghetto test work on the LED feet?
Here are the data sheets for the 2812 and 2812b pixels so you can tell which leg of the pixel is what.
I replaced two pixels on each strip around the end that was having the problem and that seems to have fixed it… but then another one blew at the other end of the next strip. So I replaced that. And now the far end of the next one’s dead.
So yeah, it seems that I’m frying them somehow. I’ll replace this last one and hopefully that’s it. I dialled the PSU trim down from 5.3V to 5.07V; and I’ll also check for stray solder blobs, etc. I hope there’s not something systematic wrong and I’m just unlucky. I do have spares, I hope I don’t run out at this rate
I have a bunch of WS2812b strips. I am also having issues with burning out pixels. I’m not sure how I’m doing it. Static? Power surge on startup? Anyone have some ideas to make these reliable?
I’ve seen a whole strand be completely out from a dead first pixel.
When the dead pixel is in the middle and there is an outage or flicker. It seems to be either the first pixel that is flickering/out or the last pixel that isn’t flickering in the chain.
More than likely a suggestion from many of us here. I do the same thing with my strips. It helps smooth out the ripples when you’re flashing the strip from nothing to full brightness.
What I don’t get is why shorting the data line to +5V will fry a pixel—the data line is supposed to go to +5V all the time—it’s just like a REALLY BIG “1” BIT isn’t it?
(Or is an actual stream of 1-bits so much less power on average than an even momentary short to +5V that it’s within the current-carrying capacity of those wires, while the short is not?)
I think that @Ivan_Davletshin is onto something. While I haven’t been brave enough to attempt to fry an LED purposefully, I haven’t had LED cooking problems since I’ve been careful to connect ground, power, data. I also make sure to disconnect in that order.
It seems like ground, data, power could be the order that damages the thing.
I too have been having trouble with blown WS2812b LED’s. In fact I have now replaced the first LED 5 times since putting the strip around my TV as an Ambilight.
Originally I was using a Arduino Due powered by 12v from a PC supply with the 5v for the strip. Of course the Due can also derive it’s power from the USB of the PC it’s plugged into. The blown LED’s occurred when I was moving the USB from the media pc to my laptop for reprogramming. I had presumed it was grounding issues but found that it still killed the first LED even with the PSU unplugged during the swap and reprogram!
I now have a dedicated 5v supply and a Teensy 3.1 and have had the same issue again even with the Teensy set for non USB power.
My conclusion is that you should disconnect all 3 wires to the LED’s when plugging the controller into your pc and reprogramming it. I have been messing with at least 12 different LED demos since using the LED disconnect method and not had any more blown LED’s.