Hi All,
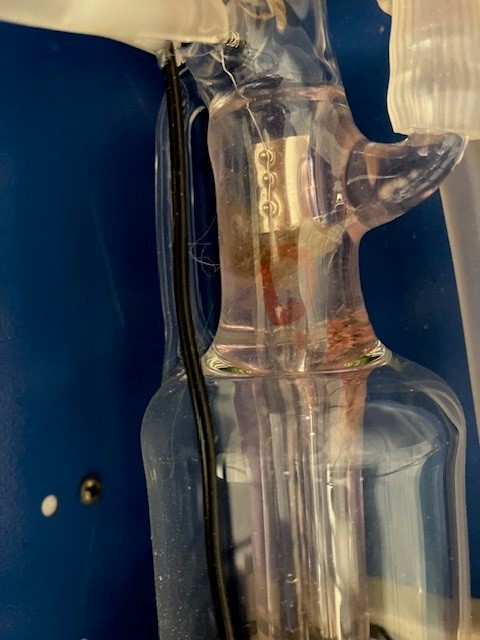
Although I am not a newbie in that I do 3D printing and CNC machining and laser etching using a 3018 , I decided to concentrate on laser and in particular cutting and so researched heavily the K40 laser. I bought a used machine because I knew I might need to change everything (apart from the box and tub) and indeed the one I bought seemed to work fine cutting through 2.5mm birch ply as an initial test but I wanted to do all the changes and setting up before starting properly and I only got the air assist in last week. I now find that I cannot cut through 3mm MDF and when I checked the internet, I came across your site where you have dealt with this issue numerous times. Although I can confirm the changes and setting up, I have done, I think I have covered everything you have recommended in the past. In trying to determine my problem, I found the site most useful I have come across for the newbie with a K40, so I wanted to reassure you that I think I have tried everything you have suggested in the past. This morning I think I may have found the problem in that I think there are some fibres in the lasing neck end of the tube. I cannot work out how this debris has got in as I was so careful in setting up the cooling system. Anyway, I hope you can see this in the pic. If you agree that I do need to clean this out, it does seem to be stuck at the lasing end of the tube so and I cannot remove by tilting the machine so it is unlikely I can remove it without flushing it out in some way. Do you think I might I be able to reverse flush it in situ using water from the tap which I could at least connect to the outlet hose? Would I need to limit the tap pressure? or do you think I will need to remove the tube which I would prefer not to do? If you think I should remove the tube, do you have a process for this? Going forward can you recommend an inline filter ensuring that debris does not get into the tube again presumably at the inlet end.
Sorry its a bit long. Many thanks for reading. Hope you can advise.
There is no picture did you try to post it?
I doubt the debris is your problem. The cooling jacket contents surround the light path and do not interpose it. You probably have algae in the water jacket. You should flush it out but I do not think that is why your power is down.
If you have properly done the alignment then there may be a problem with the Laser power supply.
Yes, I would suggest flushing the tube from one or the other end. Normal house pressure should be ok. Obviously do not pressurize the tube, i.e. close one end. Once we determine what the debris is we can entertain an additive to kill and/or loosen it.
I think it is too early to think about removing the tube.
Below are some actions to aid in troubleshooting.
- Post a picture of your control panel
- Do you have a laser current meter on the unit if so what is the current reading when you are trying to cut?
- Post pictures of a burned dot on a target placed in front of each mirror. Show the dot in a manner that lets us see where on the mirror the beam is placed.
- Post pictures of your Laser Power Supply (LPS) showing the input connectors.
- What kind of coolant are you using?
What guide did you use to align the mirrors?
I have never used a filter but do add algaecide to the coolant. If the coolant is the correct PH and conductivity along with regular replacement I do not think a filter is necessary. We can address that when we determine what the debris is.
I thought I had. It does not appear when I try to drag it in.
If Drag / Drop is not working, click on the little Upload icon(

) at the top of the edit window. In my text, it is between the words “click on”. That should bring up a dialog box to upload your images.
When I try to drag or copy a picture into the reply box, it says its doing it but it does not appear. Am I doing something wrong? To answer the questions:
- I will flush the tube
- Yes I have a current meter which I set to 15mA for cutting, 10mm/s.
- I will change the water and use algaecide going forward. I only put some antifreeze in the water
- I’ll send pics when I know what I am doing wrong.
- The mirror alignment on this site is essentially what I used and I had to raise the head about 5mm to get alignment.
Antifreeze in your coolant is generally a bad idea. It can make the water conductive reducing the LPS’s power and causing damage.
Use distilled water treated with algaecide.
Does the current meter read 15 ma when it is cutting poorly?
Does the current meter bounce while cutting?
Do you hear a crackling or hissing sound from the tube or LPS while cutting?
More on why what Don said about antifreeze can be found here:
Point taken about using algaecide, I did know about this.
As I said it did cut 2.5mm birch ply in a single pass when I first had it so I started to do real testing once I fitted air assist hence the surprise.
I fitted a 1.1kohm resistor on the pot to limit the full scale to be 15mA and this is what it reads.
No once it is on a cut it stays at 15mA
No noises from the psu or tube
Yes I did read this which was also helpful of knowing the heat given off and so the limits to run the tube. I have noted I get about an hour from putting in 4L of ice (in milk bottles) before I goes above 20C. I did know I should have used algaecide.
That’s a new one, where did you read about doing that?
The POT is adjustable, 0 - 5V, so you don’t need to add a 1K ohm resistor to limit the POTs max setting. On top of that, as your tube degrades, you will want to slowly increase your setting so that when your software instructs for 70% power it is consistently putting out the same 70% power. Tubes wear out and this not only means you’d doing less guessing of what will cut and what won’t, you’ll also be getting an indication that the tube end-of-life is nearing.
myself, I purchased a new PoT with a cap which gives more turns and has a locking ring. Like this one:
https://www.amazon.com/gp/product/B01MQSJXHO
… and here is some detail.
You also need to stop using antifreeze. If your coolant is conductive some of the LPS current is short-circuited and not used to power the laser. So all of the current read on the meter is not actually powering the tube.
Just a note; the pot serves to adjust the available current as the tube wears. The tube [and to some extent the LPS) is a consumable and the current required to produce a certain power (power vs current) changes as the tube is used. It is normal for the tube’s current characteristic curve to change over time.
Therefore you may not want to lock down the pot’s max setting.
I wonder if the combination of the locked pot and the antifreeze is resulting in the cut being underpowered.
Yes but the stock pot maxes out (15mA) at around 2.55v so adding the resistor ensures the pot on max is at that voltage. I did look at the multi-turn pot but it has no advantage as I use the voltage which I display to set the correct current up to a maximum of 15mA and means I cannot overdrive the tube. It works well. I could have set it higher and I can change it or remove it but I thought the max was always 15mA. Currently my Nano board cannot change the power.
This is helpful information since we still didn’t know you were using an M2Nano board for control( not pictures yet ). We now know you use the POT to adjust your power for each layer/operation. Many of us on this site have done that but then upgraded/replaced the controller board with one which has a pin/output which puts out a PWM signal and controls the power on the “L” input of the LPS.
Regarding the POT being limited to only going up to 15ma max - Don is correct again, you will want to increase that eventually as the tube wears. 15ma max will get you a good tube lifespan if cooling temps are kept below 25C. But when it does get to near it’s end of life, it will take a bit more current to get the same amount of power out as it was making when the tube was young and operating at 15mA.
Also, it just dawned on me that you mentioned cutting 2.5mm baltic birch plywood at 10mm/s and now you are testing 3mm MDF. Those are NOT the same materials and MDF has lots of glue in it compared to maybe 2 thin layers of glue in baltic birch plywood.
As I say, I am walking before I run so I will upgrade the board in time. There are quite a few to choose from - any recommendations? Yes I am aware apps like Lightburn will then control the machine’s power. Looks like I will revert the mod when that time comes as I am hoping the tube will not degrade before I do the upgrade and that it is “fairly new” as it stands. I agree that 3mm MDF is different but it was on this site I saw that it ought to cut in one pass. The acid test is that I tried to cut the birch ply again today and it now will not cut even though the cut line looks nice and thin. Because I thought the debris might be causing the problem which is now unlikely but still needs to be resolved I am back to wondering what my problem is. I will try to understand why I cannot post pictures but thanks to all for all your advise so far.
I mention that you did NOT tell us about your system, I was not asking or recommending you upgrade your board. We can only help with an understanding of your existing system and I tried to explain my failure of thinking you had an upgraded controller with PWM power control… That’s all. The M2Nano is a fine board and I ran mine for a few months, others run it for years. There are 3 very nice software packages which work with it. K40 Whisperer, MeerK40t, and VisiCut.
That helps in understanding what’s going on because when you are comparing cutting different materials, well you just can’t do that. And yes, with an air assist system which blows enough pressure directly on the cut, you should be even better cuts than before. But we know nothing of your air assist setup so we can’t comment on its effectiveness. The fact that you but the 2.5mm baltic birch at 10mm/s before mods and now it won’t do the same means something changed and we’re trying to help you get to the bottom of that. Don is one of the “masters” of this so please answer every one of his questions. Not just the first or not just the last.
I’m going to sit on the sidelines because it appears you got distracted by my feedback instead of using it as background to what Don was asking. He’ll help you figure it out and sorry for distraction.
Any chance the mirror alignment got thrown off when you added the air assist?
Any chance the beam is hitting the inside of the air assist nozzle?
Will do. Thanks so far. I seem to be able to send a pic which is what I intended to sent this morning showing the debris. I appreciate this is not the problem but I will get around to fixing in the next few days.
As it seems I can now send photos I will respond to those requested in other posts and will add a pic of my head setup
That looks like brown algae.
I think you can remove it with a dilute solution of vinegar and distilled water.
@NedMan (our resident chemist ![]() ) can confirm.
) can confirm.
It is a good point and although I think so because I checked it afterwards and I am not getting any reflections (which I have had in the past) I am going to use the guide from the site to get it as good as I can. I will also take off the air assist. This might take a few days as we are having a heat wave here in the UK and the ambient water temperature in my garage is 26C.