Sorry, this is a bit of a long read but I hope you find the conclusions of interest.
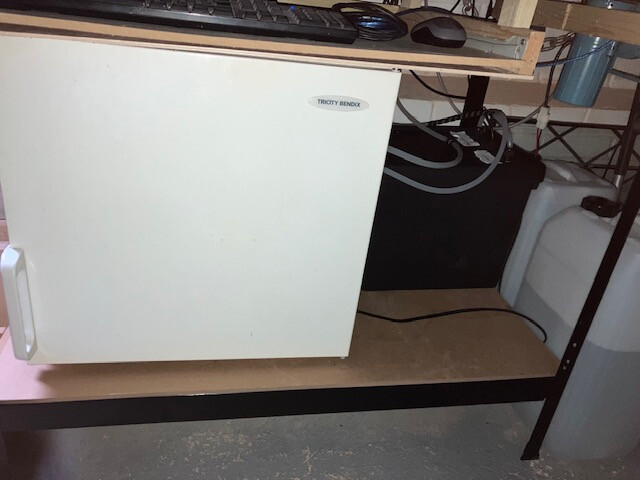
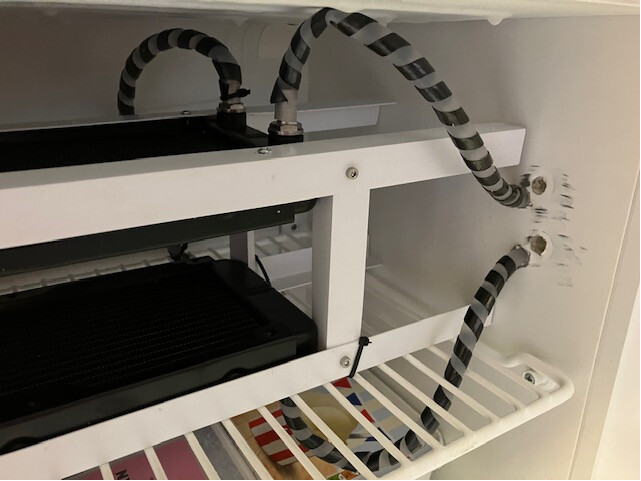
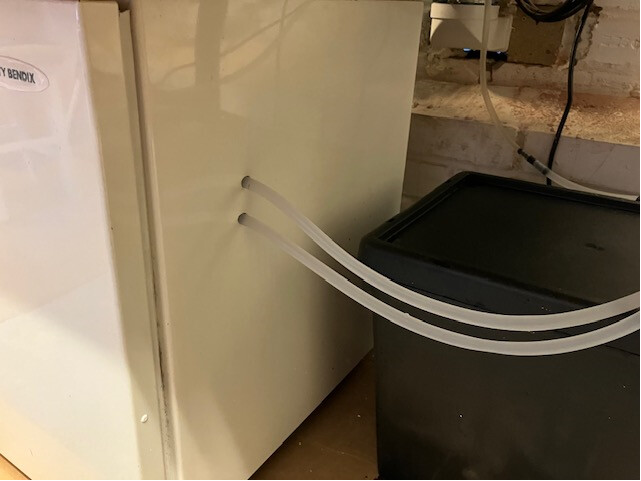
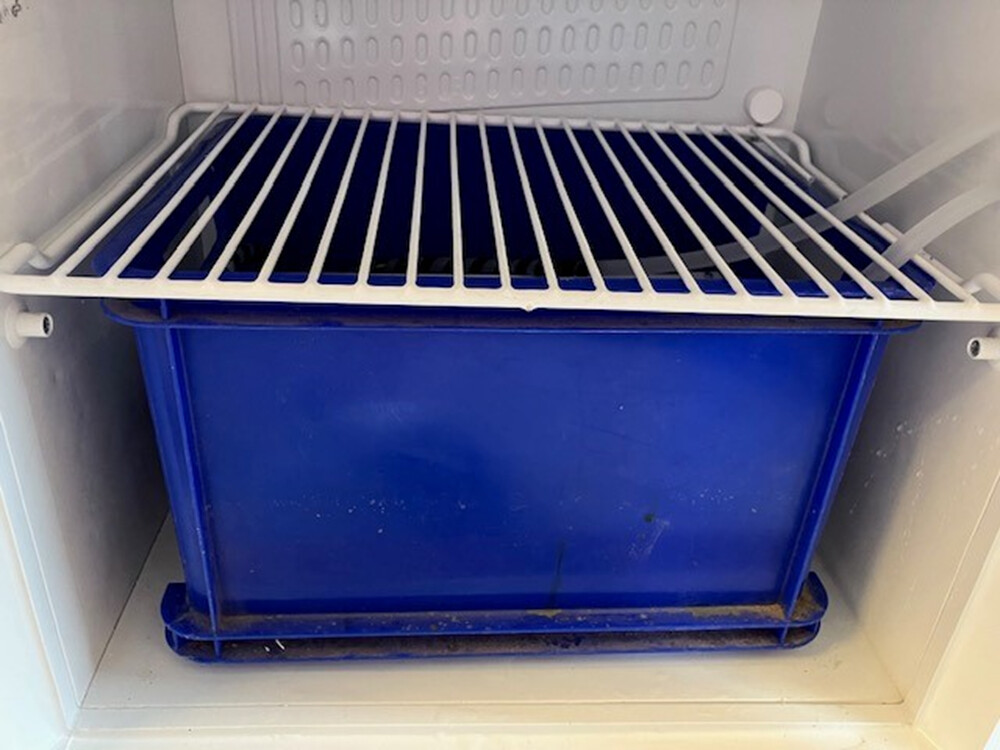
As a newbie to K40 lasering, I am finally knocking my second-hand machine into shape as I knew there would be work to do, but there was just one problem left – Laser Cooling – as I was struggling to get the water temperature under 20C. I know from posts on the site, that the temperature ought to stay between 15 and 20C for optimum laser performance and I learnt a lot from the excellent “Cooling the K40 laser tube” post which brings home the point when cutting you need to dissipate around 160W of heat into the water reservoir, so it is not surprising that it is not a straightforward problem to solve. The guide provided some ideas, and the obvious choice is to buy a chiller, but these cost more than double my investment in a K40!! I had noted that the temperature of the reservoir when running on its own settles down to around 20C i.e., ambient temperature and I think the submersible pump also helps to keep the temperature raised. The obvious first solution was to add 2L ice blocks in ice cream containers frozen in the freezer. Placing 2 of these in the reservoir at a time only dropped the temperature by about 3C and melted very quickly. Thinking about the problem further, I felt I had a second problem in that ideally, I did not want to compromise the primary water circuit by adding ice bricks every time I use it. In this regard the machine came with two small, air-cooled water radiators which were ineffective due to the high ambient temperature, so I thought why not immerse them into a secondary bucket of cold water? Would dissipating the heat into this secondary reservoir work? So, I bought 2 larger 100mm x 200mm radiators which offers 4 x the cooling surface and plumbed them into the primary circuit. I intended to use a 25L distilled water container to act as the secondary reservoir. As this secondary circuit is isolated from the primary circuit, I would not need to interfere with the primary circuit so I could use tap water and normal ice. Furthermore, I could drain the system with a butt tap and refill it with fresh cold tap water and ice as needed. I constructed the system but still felt that this might not work, and I might still need to look to active cooling so I checked the local second-hand sites and saw a small worktop freezer (20” x 20” x 20”) for £15 which would fit under my K40 bench. After experimenting, I set the temperature high, so it acted as a chiller rather than a freezer. So, instead of putting the radiators into water I suspended them in the cold environment of the chiller and bingo this brought the temperature down to around 16C within a few hours of switching it on. By placing the original fans on top of the radiators so dragging cold air through them the temperature bottomed out at around 14C. I did have a plan B in that I could place a reservoir of water in the chiller and submerge the radiators into the water, but this has not been necessary. Now that I know it works, I could have gone back to putting this chiller into the primary circuit with the water reservoir inside the freezer, but I will probably not do this now that I have a working solution. it does look like I have stable temperature control within the limits, but I can always add a temperature sensor to switch off the appliance when it reaches 15C and switch it on again if it goes above 20C, but I need only do this if required. Of the cutting tests I have carried out, I ran a continuous test for around 1 hour and the temperature reached 20.5C but when paused it dropped to under 20C within 10 minutes and dropped rapidly. In conclusion, I think I have constructed a DIY K40 chiller for around £50 (even a new worktop freezer from Amazon is still only around £95) and I still have room in the bottom for a few beers which you don’t get with a CW5000 !! Can anyone think of anything I have forgotten, or that I should consider.
Seems like it will work well to me. And it looks professional too! You’ll probably get better performance by having water (or soda, beer…) in the freezer rather than just dead air space, just to provide more thermal mass.
My cooler setup is similar. It uses an office style water cooler (the kind with the big blue jug on top) set to almost freezing, with a coil of copper pipe as a heat exchanger between the laser water and the cooler water. Then a thermostat and a pump so it only circulates through the cooler when it has to. I’d eventually overheat if I was running constantly, but I’m always running small jobs.
Yes, this is the third day today. I did look for a chiller but the freezer came up first. Do you keep your chiller on or not until you need it? How long does it take to get to operating temp? Night before last I switched off the chiller and circulation and yesterday morning it was about 16C and this morning 17C. It dropped to about 14C and it stabilises there within about 1 hour. The ambient temp in my garage today was 28C and it did go to just over 20C with no usage but putting it back to super chill it dropped again to around 15C so I am pretty happy with It. I take your point about filling it with beer and soda to provide more thermal mass and I have kept 4 ice cream tubs of ice (8L) more from the point of view whether it freezes which is does not in normal mode. In time I may simply put my primary water in a container inside the chiller and dispense with the external bucket. Because I am now confident that I can keep the temperature between 15 and 20C I can now get on with cutting and engraving testing to build a new library.
My whole setup is in my basement, so ambient temps are usually near operating temps anyways. If I know I’m going to be using the laser I’ll switch the chiller on the day before and let it get down to temp.
Looks Highly professional, Well Done. I personally use an Ice cube making machine. And I love it. On days when it is 33 deg C ambient, I can still manage to laser at 12mA area for several hours continuos before it cannot keep up any longer, (Im only using 1.5 gallons/4.5L of water). Maybe when the funds are available Ill upgrade to a set up larger than my current. Let us know how it works!!
Yes that is what I do and being insulated it does stay cold so does not take too long to get to temperature but I am going to try water cooling rather than air cooling as putting the radiators in a container of water inside the chiller will offer a larger thermal mass. If this works I may then move to this being my primary cooling and so eliminate my external bucket.
Yes I did look at doing this. My 2L ice bricks were not very effective which might be due to limited surface area they offer but ice cubes would be very effective. Presumably you use distilled water ice as this is your primary cooling system and you need to decant water from the system after your session to make way for more ice at your next session. I do intend to try water cooling as opposed to air cooling by placing the radiators in a container of water inside the chiller. I believe this will offer a higher thermal mass but we will see.
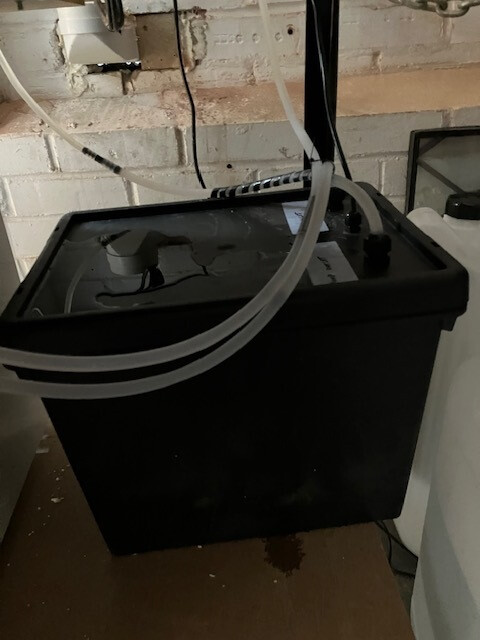
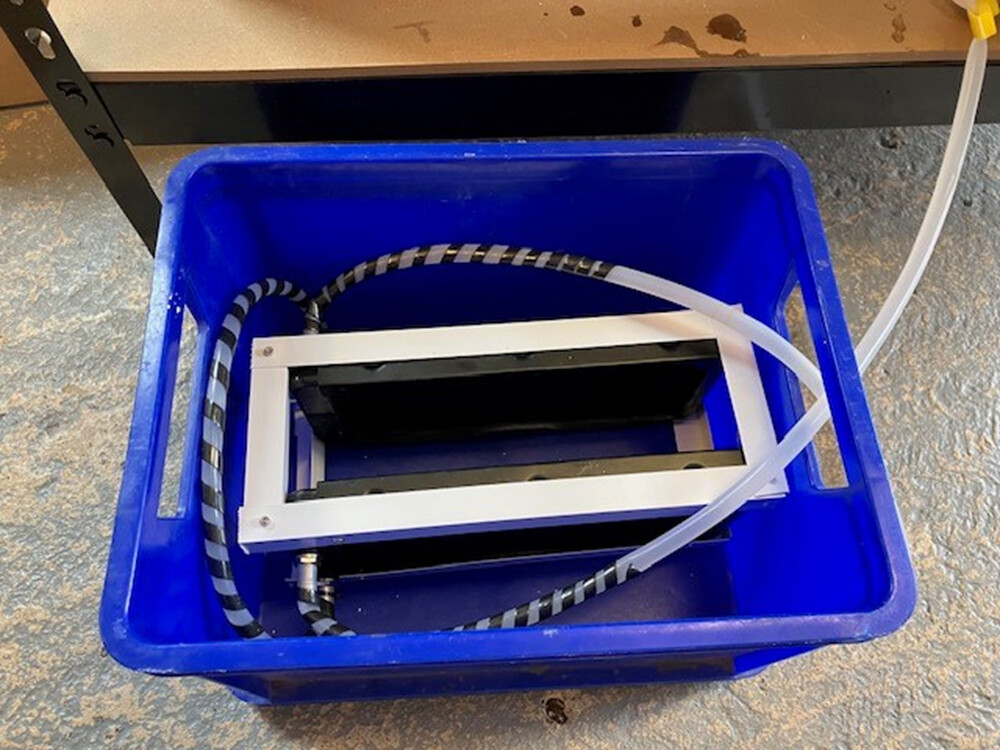
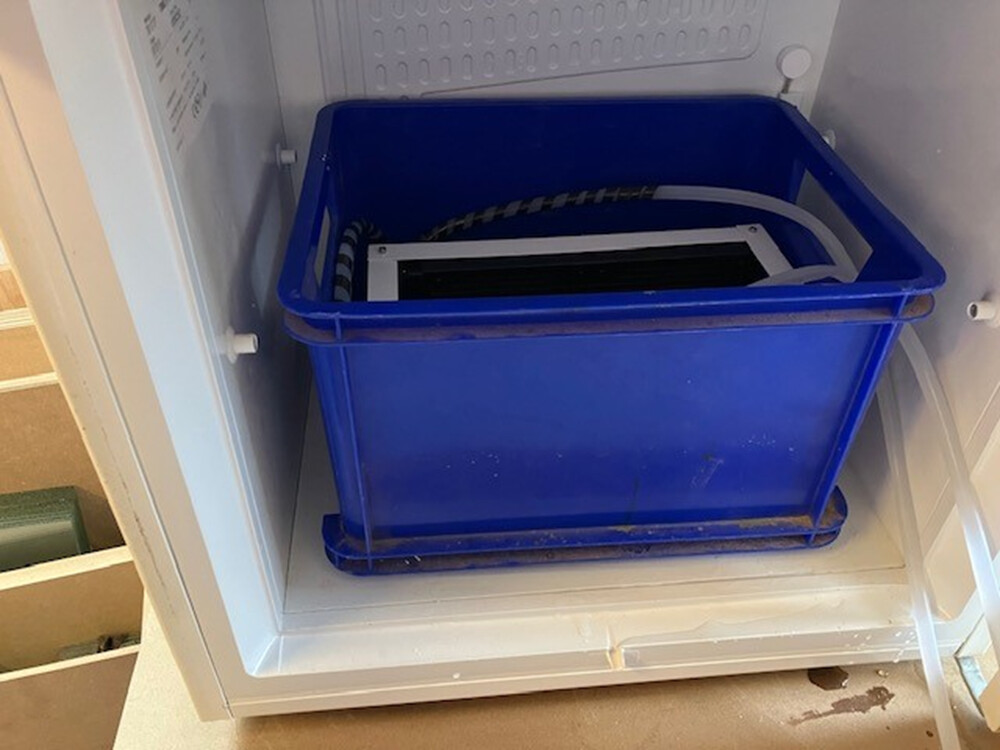
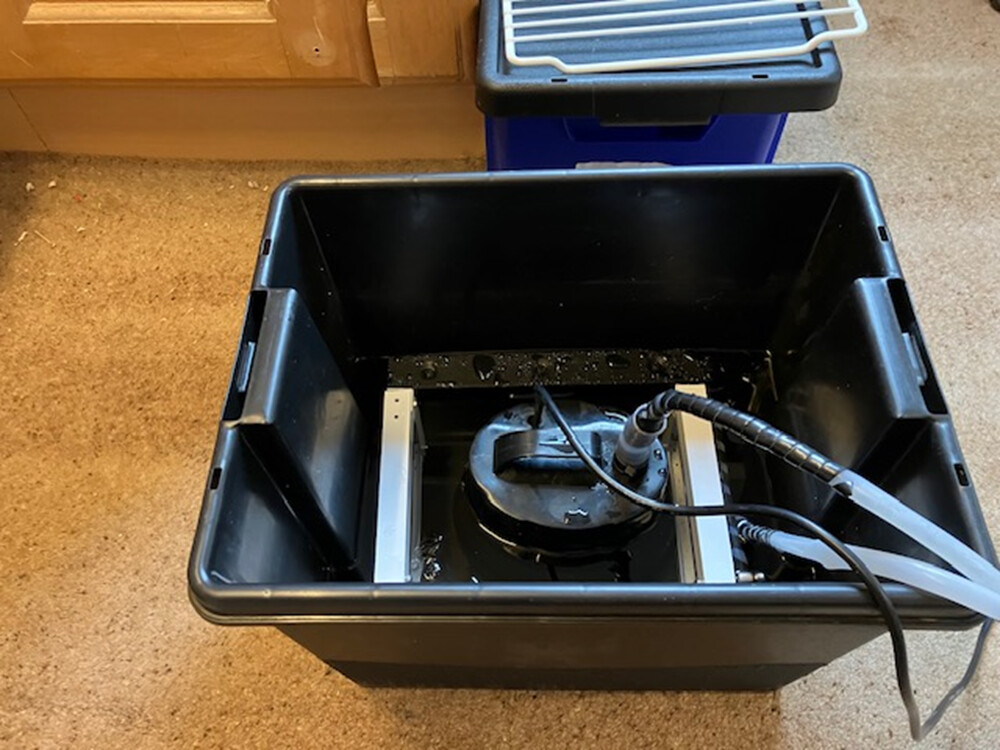
I have had some downtime due to problems with my LPS/tube so I decided to test out a change on my chiller by placing the radiators in a container of water sitting in my chiller as I just happened to have a suitable container that fitted perfectly. Although air chilling has been working well, I think that once down to temperature, water will have more thermal mass than air so may provide longer sessions.
The good news is there is still a place to store the beers!!
However, the results were not as expected, and the temperature has stayed stubbornly at around ambient 17.5C. Putting ice into the water did bring it down to 16C but rose again when it melted. I suspect the larger 20L primary tank sitting at ambient is actually pushing warmth into the secondary 10L water and even though the chiller is cold the water does feel warm so maybe it simply cannot chill the water.
The real test is to use the secondary tank as the primary water container so eliminating the current primary container like a professional water chiller and saving space but I am not sure if I can get my pump, which is larger than the normal aquarium type, into this smaller container alongside the radiators. I will check this out but if this does not work I will return to forced fan assisted air cooling.
You will want your primary tank/reservoir( the one feeding water to the tube ) to be an insulated container with insulated top( like an Igloo cooler ). And if you keep your Secondary system cold at all times, then you’d just need to put a jug or two of ice in the Primary cooler just before you start getting your laser project ready. This will kick the temp of the Primary up quickly and then with it being insulated, your cooler should help keep it cool. I would also insulate your water lines.
Your system is way better than mine and I do something similar but with an office water bubbler cooler and a coil of copper in the primary. I ether have to run my secondary circulation pump the night before to get the Primary tank ready for lasing or I use an ice jug to shock it up to temp. Your system will work.
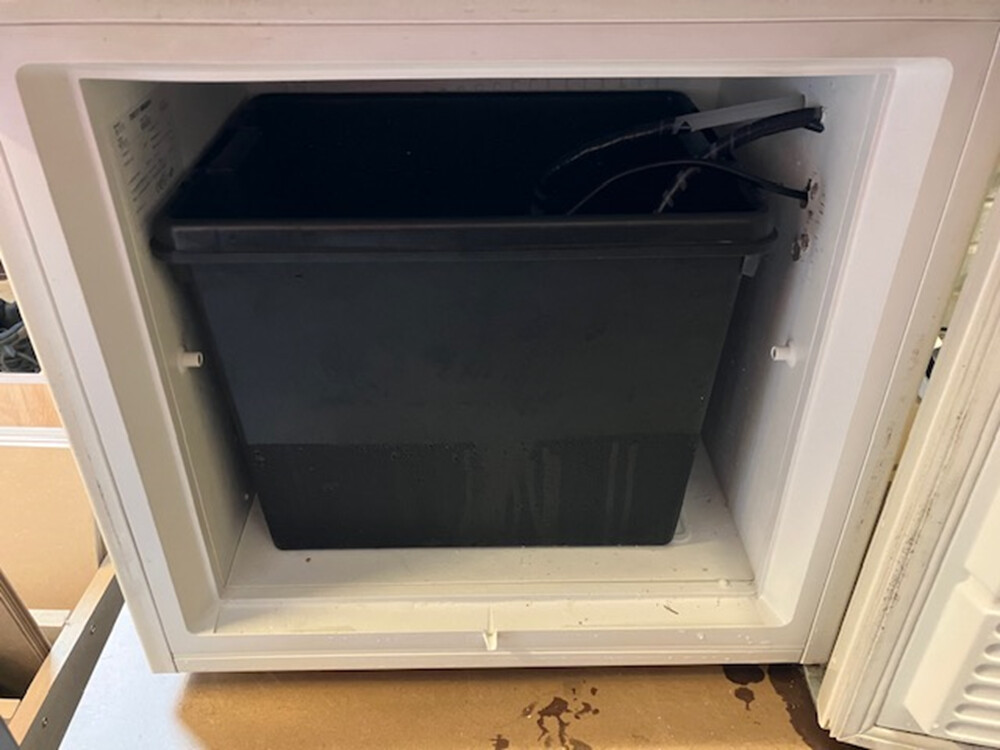
Yes, I take your point, but I decided to go to the third option whilst waiting for parts to fix my laser – put the primary system in the chiller. I could not believe my luck that my primary container just fitted into the chiller (no room for beers), and I could mount the radiators either side of the pump so the whole cooling system is sitting inside the chiller. Although I switched the chiller on last night, I had not connected up the external cooling circuit so the water was cold this morning. When I switched it on starting at 18C it moved to 9.9C in 20 minutes and the external tubes had heavy condensation at which point I switched off the chiller leaving the pump on and so far, it has only moved to 11.5C. I also noted that the flow indicator was spinning faster. In reality, I need to test with the laser dissipating heat, but it is likely that the cooler will more than keep up with the laser so I may need to add thermostatic control, but I can control manually for now. Am I right that laser operating temperature should be between 15C to 20C?
Wow, that’s a rather large water pump. The pumps I use a something which might be used on a 10gal fish tank and one even operates on 5V.
I’ve never really researched what flow rate range would be optimal but I do know that these pumps generate heat themselves and the more force needed to move water faster will also generate more heat.
Yes I agree it is a whopper but it is what I inherited with the machine and yes I believe it is adding heat to the system. I saw a video where the pump motor is external to the cooling water for this reason but as with air-assist can it be too strong?
My approach to something I get used is to see what it was like new and figure out what’s been hacked and if the hack is safe and/or needed. You might also look at the specs for commercial cooling systems like the CW5000 units and see if your pump is anywhere near those specs for volume and pressure.
The pump is a Senelux SL-4000B: 4000L/H and 90W so yes it is heating the water so not surprising I was having problems before. The upside is that it takes in water from the bottom so could work in 2cm of water but I am not going to reduce the water in the tank. At some stage I will change it for my pond pump but the temperature bottomed out at 10C this morning so the chiller is keeping up. The acid test will be when I get the laser working and I have a cutting session but this fully contained cooling solution is the way forward so I will be sticking with it.
I did as @dougl suggested and looked at the spec of the CW5200 and although it is hard to work out how my chiller compares, what I did take from it is that a professional chiller also includes thermostatic control and protection against cooling failure. Last night I kept the pump on but switched off the chiller and was surprised to find the temperature at 30C this morning so yes the pump is heating the water even inside a cool chamber BUT this may not be a problem as I may need to warm the water in the winter and as I have already confirmed, the chiller more than keeps up against the pump with a steady state temp of around 10C. So, having gone this far I may as well finish the job and apply these additional features. I can source both the thermostatic control and a water flow sensor for not a lot of money so this is the plan:
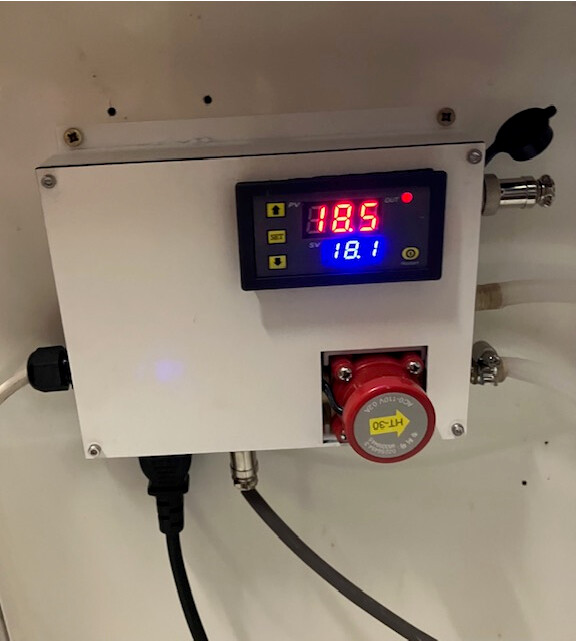
- Create and print an enclosure for these elements on the side of the chiller for the thermostatic control which will provide a display and settable temperature, the water flow sensor on the pump outlet - is this the right place? - (as there is little room inside the machine) with the sensor port connection back to the machine and inlet and outlet water connection points to the outside so the whole system can be disconnected from the machine when required.
- The pump will always be on if the chiller is switched on and the thermostatic control will switch the chiller on and off dependent on the temperature and this should work in winter too as the pump will heat the water if it is too low.
- The water flow sensor will detect the lack of flow if the pump fails, with an electrical exit port back to the laser in series with the laser switch and lid switch.
- I will retain the flow indicator and house it along with the current temperature display above the machine, so I always have an active view of flow and temperature.
All this being said, it is seeing how it responds to a long cutting session is what really counts and whether latency of the temperature change may be an issue so we shall see.
all well and good but I was trying to get you to find out what is the norm for water flow rates. Lots of use use little dinky aquarium pumps, not outdoor waterfall pumps. Maybe blasting water through the tube at 30KPH is better as long as you can overcome the heat generated to do that and your electric circuit(s) can handled the combined power usage.
Yes I will definitely look into both the both this and my air assist pressure once I am back up and working - new tube comes in today.
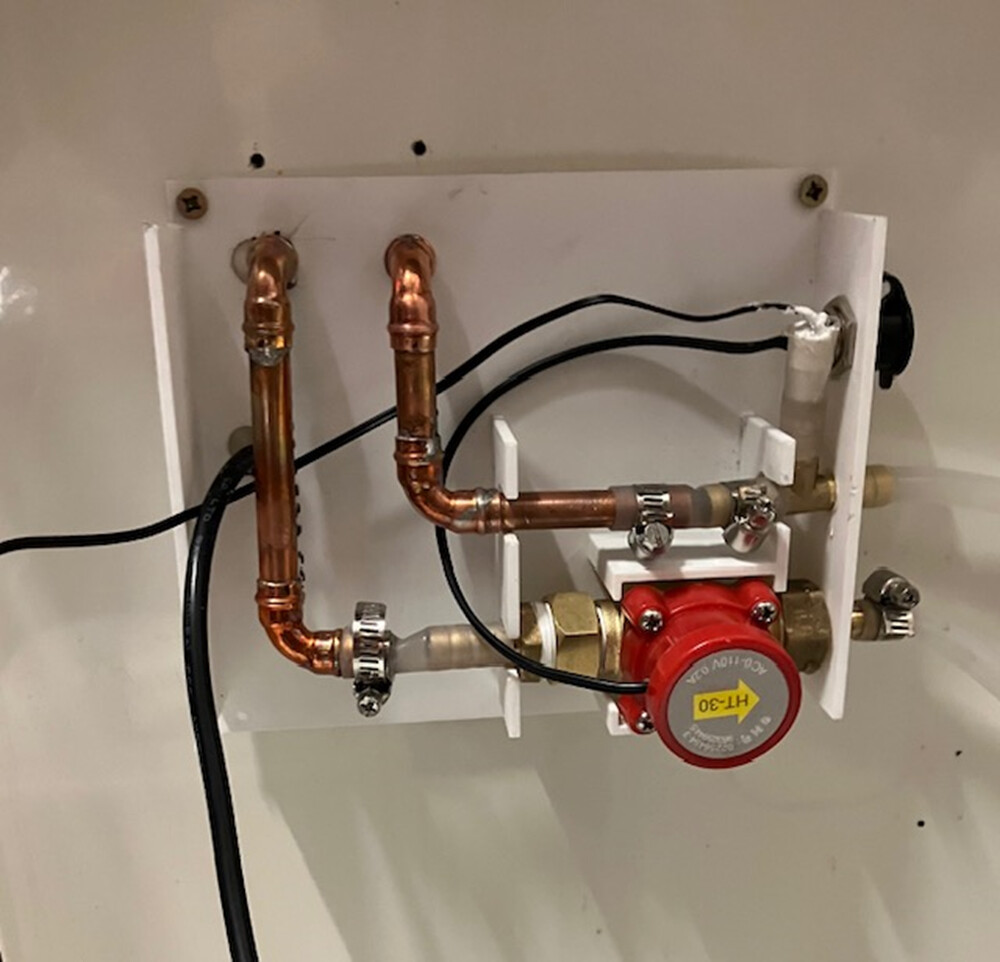
As you can see, the setup is more complex than I had intended. The thermostatic temperature sensor is set into a T piece in the return flow around 0.5m from the visible flow indicator temperature sensor. Both sensors track the same temperature within about 0.5C. The flow sensor is set into the outflow circuit from the pump, and I have checked it does work as it provides a closed circuit when flow is stopped but I still need to wire it back to the machine in series to the laser and lid switches. My first prototype proved the overall system seemed to work and the second prototype used silicon tubing but due to the sharp angles involved piping it from the chiller, I took the hit and used 10mm copper tube. This has proved to work well so it was worth putting in the effort.
The fact that the pump does heat the water is a positive factor as it warms the water if it is below the threshold particularly on start up but the chiller will always cool the water despite the pump heating. I am hoping that warming will come into its own even more in winter when the ambient temperature will be lower than 18C. The thermostatic switch works well and due to the tight constraints of keeping the water temperature between around 18 and 20C, I have found I can set it at 18C as it only drops around about 0.5C lower than the set point. I have carried out cutting sessions over an hour and the chiller kicks in as soon as the temperature goes higher than 18C and so far, it has not gone over 20C and moreover it only takes around 30 minutes for it to get back down to 18C once I stop using the laser.
Overall, this project has gone better than I could have ever expected, which started with a humble worktop freezer costing £15 ($20) and it should stand me in good stead with one less hassle to deal with.