Hello Smoothieware forum,
I bought a smoothieboard x5 (looked like the perfect controller especially since this is my first home build printer, and the documentation on this site looked great!) and build a kossel delta around it, after carefully reading the smoothieware config documentation I have a running/moving printer.
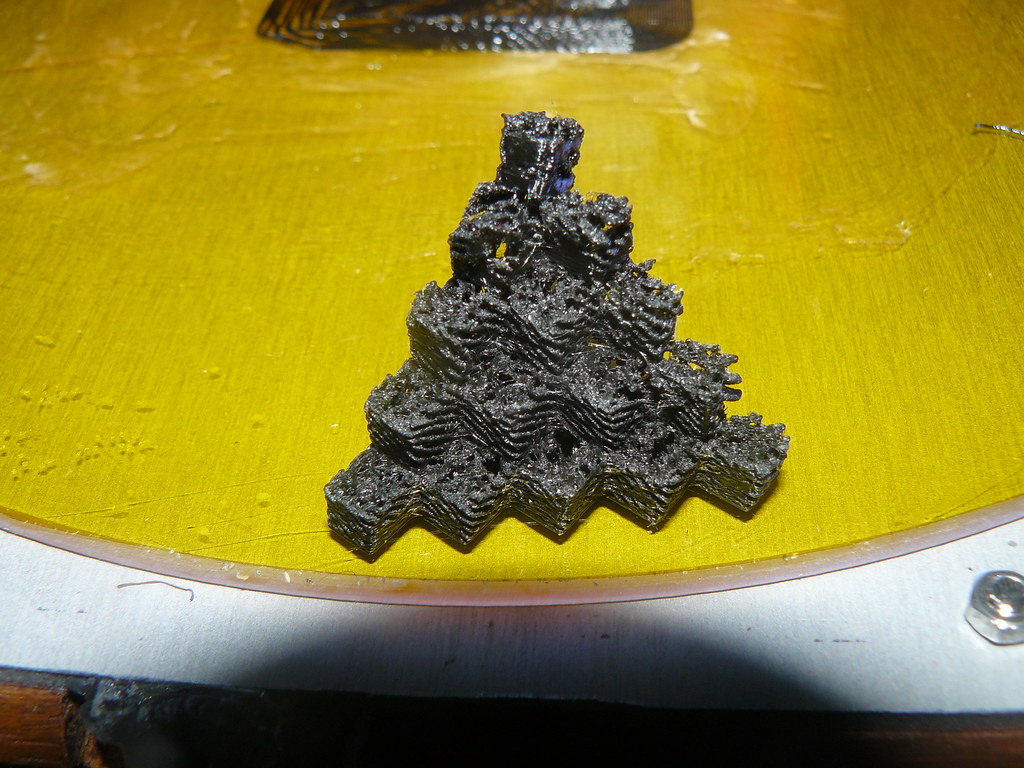
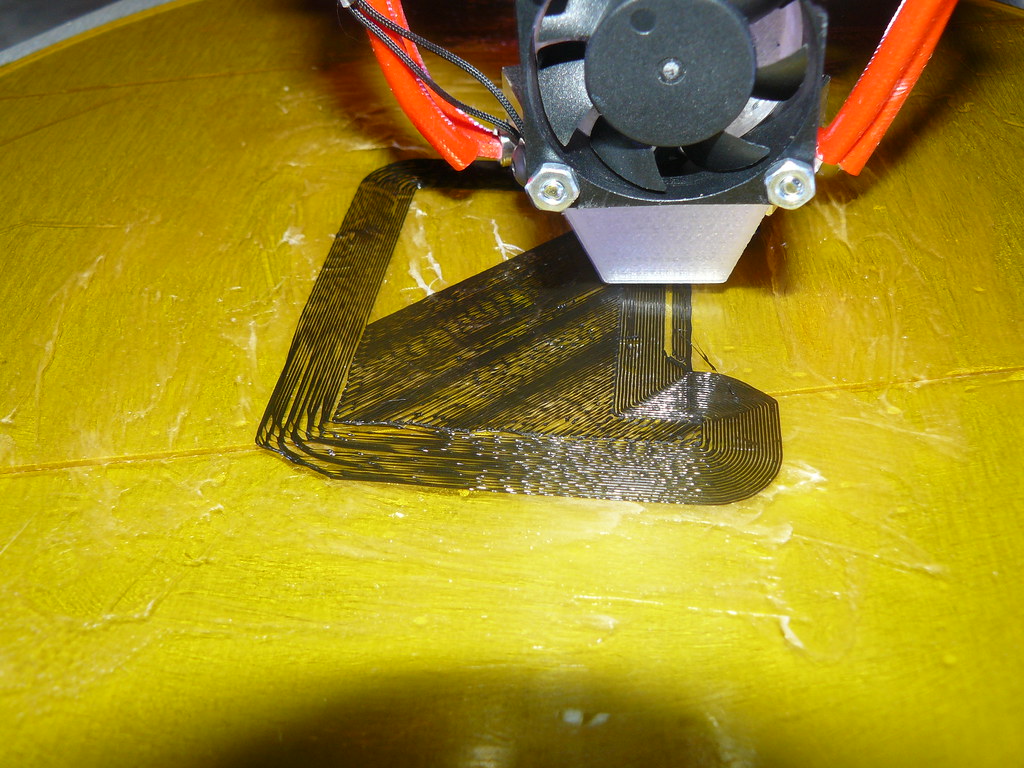
However I have a problem with printing (that after days of searching for an solution myself, I couldn’t solve on my own). The problem is that all the printed objects have holes in it (looks like there isn’t enough plastic extruded or something… (but I have the steps per mm calibrated…) and the lines in the first layer don’t touch each other (some gap between the lines).
For the extruder I used 2 geared nema 17 1.8deg motors with a 52/11 :1 ratio gearbox, the motor is rated for 1.3A(U) (label on the motor, motor type is wantai 42BYGH4413AG5.18.X (bought from builda3dprinter the geared extruder)
The hotend is a e3d chimera 0,4mm nozzle 24v volt setup, the heatbed is also a 24 volt setup (same power supply).
[The rest of the delta-motors are 0,9 deg steppers 1.7A.] and I have installed the Reprap discount GLCD on this printer.
I have tested/ calibrated the steps/mm for the extruder (looked how much filament was extruded (in the bowden tube) with 5mm,10mm, 150mm… and 437 steps per mm worked perfectly (less than 0,01mm difference).
Furthermore I use the Z-probe automatic calibration function for calibrating the build platform, used the G32 command.
I used paper for calibrating the z-height/nozzle, first I used regular a4 paper and lowered the head until the paper got stuck/friction but this was too close to the bed and my nozzle got clogged(think that I got the paper to stuck/nozzle to close, because I read afterwards on the web that you should be able to reinsert the paper after removing it, and I could do that/ was to close to the bed). So now I have used a 3d-printing calibration-card/Business card (0,3mm thick) that I got with my craftbot 3d printer for calibrating the height (on that printer it works perfectly).
Does anyone now what the problem could be?
{I would like to show some pictures that I have made of the problem, but have some problems with the karma/new user message… needed to remove the normal links in the comment of the config too…).
Here is my config file (use the latest nightly version of the firmware):
# NOTE Lines must not exceed 132 characters # Robot module configurations : general handling of movement G-codes and slicing into moves default_feed_rate 2500 # Default rate ( mm/minute ) for G1/G2/G3 moves default_seek_rate 2500 # Default rate ( mm/minute ) for G0 moves mm_per_arc_segment 0.5 # Arcs are cut into segments ( lines ), this is the length for # these segments. Smaller values mean more resolution, # higher values mean faster computation #mm_per_line_segment 0.5 # Lines can be cut into segments ( not useful with cartesian # coordinates robots ). delta_segments_per_second 100 # for deltas only same as in Marlin/Delta, set to 0 to disable # and use mm_per_line_segmentArm solution configuration : Cartesian robot. Translates mm positions into stepper positions
arm_solution linear_delta # selects the delta arm solution
alpha_steps_per_mm 200 # Steps per mm for alpha stepper
beta_steps_per_mm 200 # Steps per mm for beta stepper
gamma_steps_per_mm 200 # Steps per mm for gamma stepperarm_length 335.0 # this is the length of an arm from hinge to hinge
arm_radius 175.0 # this is the horizontal distance from hinge to hinge
# when the effector is centeredPlanner module configuration : Look-ahead and acceleration configuration
planner_queue_size 32 # DO NOT CHANGE THIS UNLESS YOU KNOW EXACTLY WHAT YOU ARE DOING
acceleration 2000 # Acceleration in mm/second/second.
acceleration_ticks_per_second 1000 # Number of times per second the speed is updated
junction_deviation 0.05 # Similar to the old “max_jerk”, in millimeters,
#
#
# Lower values mean being more careful, higher values means being
# faster and have more jerk
#minimum_planner_speed 0.0 # sets the minimum planner speed in mm/secStepper module configuration
microseconds_per_step_pulse 1 # Duration of step pulses to stepper drivers, in microseconds
base_stepping_frequency 100000 # Base frequency for steppingCartesian axis speed limits
x_axis_max_speed 30000 # mm/min
y_axis_max_speed 30000 # mm/min
z_axis_max_speed 30000 # mm/minStepper module pins ( ports, and pin numbers, appending “!” to the number will invert a pin )
alpha_step_pin 2.0 # Pin for alpha stepper step signal
alpha_dir_pin 0.5! # Pin for alpha stepper direction
alpha_en_pin 0.4 # Pin for alpha enable pin
alpha_current 1.7 # X stepper motor current
alpha_max_rate 30000.0 # mm/minbeta_step_pin 2.1 # Pin for beta stepper step signal
beta_dir_pin 0.11! # Pin for beta stepper direction
beta_en_pin 0.10 # Pin for beta enable
beta_current 1.7 # Y stepper motor current
beta_max_rate 30000.0 # mm/mingamma_step_pin 2.2 # Pin for gamma stepper step signal
gamma_dir_pin 0.20! # Pin for gamma stepper direction
gamma_en_pin 0.19 # Pin for gamma enable
gamma_current 1.7 # Z stepper motor current
gamma_max_rate 30000.0 # mm/minSerial communications configuration ( baud rate default to 9600 if undefined )
uart0.baud_rate 115200 # Baud rate for the default hardware serial port
second_usb_serial_enable false # This enables a second usb serial port (to have both pronterface
# and a terminal connected)
#leds_disable true # disable using leds after config loaded
#msd_disable false # disable the MSD (USB SDCARD) when set to trueExtruder module configuration
extruder.hotend.enable true # Whether to activate the extruder module at all. All configuration is ignored if false
extruder.hotend.steps_per_mm 437 # Steps per mm for extruder stepper
extruder.hotend.default_feed_rate 2000 # Default rate ( mm/minute ) for moves where only the extruder moves
extruder.hotend.acceleration 500 # Acceleration for the stepper motor, as of 0.6, arbitrary ratio
extruder.hotend.max_speed 50 # mm/sextruder.hotend.step_pin 2.3 # Pin for extruder step signal
extruder.hotend.dir_pin 0.22 # Pin for extruder dir signal
extruder.hotend.en_pin 0.21 # Pin for extruder enable signalextruder offset
extruder.hotend.x_offset 0 # x offset from origin in mm
extruder.hotend.y_offset -9.0 # y offset from origin in mm
extruder.hotend.z_offset 0 # z offset from origin in mmfirmware retract settings when using G10/G11, these are the defaults if not defined, must be defined for each extruder if not using the defaults
extruder.hotend.retract_length 3 # retract length in mm
extruder.hotend.retract_feedrate 45 # retract feedrate in mm/sec
extruder.hotend.retract_recover_length 0 # additional length for recover
extruder.hotend.retract_recover_feedrate 8 # recover feedrate in mm/sec (should be less than retract feedrate)
extruder.hotend.retract_zlift_length 0 # zlift on retract in mm, 0 disables
extruder.hotend.retract_zlift_feedrate 6000 # zlift feedrate in mm/min (Note mm/min NOT mm/sec)extruder.hotend.filament_diameter 1.75
delta_current 1.3 # First extruder stepper motor current
Second extruder module configuration example
extruder.hotend2.enable true # Whether to activate the extruder module at all. All configuration is ignored if false
extruder.hotend2.steps_per_mm 437 # Steps per mm for extruder stepper
extruder.hotend2.default_feed_rate 2000 # Default rate ( mm/minute ) for moves where only the extruder moves
extruder.hotend2.acceleration 500 # Acceleration for the stepper motor, as of 0.6, arbitrary ratio
extruder.hotend2.max_speed 50 # mm/sextruder.hotend2.step_pin 2.8 # Pin for extruder step signal
extruder.hotend2.dir_pin 2.13 # Pin for extruder dir signal
extruder.hotend2.en_pin 4.29 # Pin for extruder enable signalextruder.hotend2.x_offset 0 # x offset from origin in mm
extruder.hotend2.y_offset 9.0 # y offset from origin in mm
extruder.hotend2.z_offset 0 # z offset from origin in mmextruder.hotend.filament_diameter 1.75
epsilon_current 1.3 # Second extruder stepper motor current
Laser module configuration
laser_module_enable false # Whether to activate the laser module at all. All configuration is
# ignored if false.
#laser_module_pin 2.5 # this pin will be PWMed to control the laser. Only P2.0 - P2.5
# can be used since laser requires hardware PWM
#laser_module_max_power 0.8 # this is the maximum duty cycle that will be applied to the laser
#laser_module_tickle_power 0.0 # this duty cycle will be used for travel moves to keep the laser
# active without actually burning
#laser_module_pwm_period 20 # this sets the pwm frequency as the period in microsecondsHotend temperature control configuration
temperature_control.hotend.enable true # Whether to activate this ( “hotend” ) module at all.
# All configuration is ignored if false.
temperature_control.hotend.thermistor_pin 0.23 # Pin for the thermistor to read
temperature_control.hotend.heater_pin 2.7 # Pin that controls the heater
temperature_control.hotend.thermistor Semitec # see
#temperature_control.hotend.beta 4066 # or set the beta valuetemperature_control.hotend.set_m_code 104 #
temperature_control.hotend.set_and_wait_m_code 109 #
temperature_control.hotend.designator T ##temperature_control.hotend.p_factor 80 # permanently set the PID values after an auto pid
#temperature_control.hotend.i_factor 8.840 #
#temperature_control.hotend.d_factor 181 ##temperature_control.hotend.max_pwm 64 # max pwm, 64 is a good value if driving a 12v resistor with 24v.
Hotend2 temperature control configuration
temperature_control.hotend2.enable true # Whether to activate this ( “hotend” ) module at all.
# All configuration is ignored if false.temperature_control.hotend2.thermistor_pin 0.24 # Pin for the thermistor to read
temperature_control.hotend2.heater_pin 2.5 # Pin that controls the heater
temperature_control.hotend2.thermistor Semitec #
##temperature_control.hotend2.beta 4066 # or set the beta valuetemperature_control.hotend2.set_m_code 884 #
temperature_control.hotend2.set_and_wait_m_code 889 #
temperature_control.hotend2.designator T1 ##temperature_control.hotend2.p_factor 94.5 # permanently set the PID values after an auto pid
#temperature_control.hotend2.i_factor 8.895 #
#temperature_control.hotend2.d_factor 251 ##temperature_control.hotend2.max_pwm 64 # max pwm, 64 is a good value if driving a 12v resistor with 24v.
temperature_control.bed.enable true #
temperature_control.bed.thermistor_pin 0.25 #
temperature_control.bed.heater_pin 1.23 #
#temperature_control.bed.thermistor Honeywell100K #
temperature_control.bed.beta 3950 # or set the beta valuetemperature_control.bed.set_m_code 140 #
temperature_control.bed.set_and_wait_m_code 190 #
temperature_control.bed.designator B ##temperature_control.bed.bang_bang false # set to true to use bang bang control rather than PID
#temperature_control.bed.hysteresis 2.0 # set to the temperature in degrees C to use as hysteresis
# when using bang bang
#temperature_control.bed.p_factor 3137.6 # permanently set the PID values after an auto pid
#temperature_control.bed.i_factor 484.568 #
#temperature_control.bed.d_factor 5079 #Switch module for fan control
switch.fan.enable true #
switch.fan.input_on_command M106 #
switch.fan.input_off_command M107 #
switch.fan.output_pin 2.4 #
switch.fan.output_type pwm # pwm output settable with S parameter in the input_on_comand
#switch.fan.max_pwm 255 # set max pwm for the pin default is 255switch.verlichting.enable true # de verlichting van het bed
switch.verlichting.input_on_command M42 # inschakelen bij commando M2000
switch.verlichting.input_off_command M43 # uitschakelen bij commando M2001
switch.verlichting.output_pin 1.22 # de led-voeding is aangesloten op mosfet P1.22
switch.verlichting.output_type digital # gewoon aan/uit geen pwm gebruiken
switch.verlichting.startup_state true # de verlichting bij het opstarten inschakelenautomatically toggle a switch at a specified temperature. Different ones of these may be defined to monitor different temperatures and switch different swithxes
useful to turn on a fan or water pump to cool the hotend
#temperatureswitch.hotend.enable true #
#temperatureswitch.hotend.designator T # first character of the temperature control designator to use as the temperature sensor to monitor
#temperatureswitch.hotend.switch misc # select which switch to use, matches the name of the defined switch
#temperatureswitch.hotend.threshold_temp 60.0 # temperature to turn on (if rising) or off the switch
#temperatureswitch.hotend.heatup_poll 15 # poll heatup at 15 sec intervals
#temperatureswitch.hotend.cooldown_poll 60 # poll cooldown at 60 sec intervalsSwitch module for spindle control
#switch.spindle.enable false #
Endstops
endstops_enable true # the endstop module is enabled by default and can be disabled here
delta_homing true # forces all three axis to home a the same time regardless of
# what is specified in G28
alpha_min_endstop nc #
alpha_max_endstop 1.24^ # add ! to invert pullup if switch is NO to ground
alpha_homing_direction home_to_max # Home up
alpha_max 0 #
beta_min_endstop nc #
beta_max_endstop 1.26^ #
beta_homing_direction home_to_max #
beta_max 0 #
gamma_min_endstop nc #
gamma_max_endstop 1.28^ #
gamma_homing_direction home_to_max #
gamma_max 288.5 #alpha_fast_homing_rate_mm_s 80 # homing feedrates in mm/second
beta_fast_homing_rate_mm_s 80 #
gamma_fast_homing_rate_mm_s 80 #
alpha_slow_homing_rate_mm_s 20 #
beta_slow_homing_rate_mm_s 20 #
gamma_slow_homing_rate_mm_s 20alpha_homing_retract_mm 9 # retract/bounce distance after homing in mm
beta_homing_retract_mm 9 #
gamma_homing_retract_mm 9 #alpha_trim 0 # software trim for alpha stepper endstop (in mm)
beta_trim 0 # software trim for beta stepper endstop (in mm)
gamma_trim 0 # software trim for gamma stepper endstop (in mm)endstop_debounce_count 50 # uncomment if you get noise on your endstops
optional Z probe
zprobe.enable true # set to true to enable a zprobe
zprobe.probe_pin 1.29!^ # pin probe is attached to if NC remove the !
zprobe.slow_feedrate 5 # mm/sec probe feed rate
zprobe.debounce_count 100 # set if noisy
zprobe.fast_feedrate 50 # move feedrate mm/sec
zprobe.probe_height 5 # how much above bed to start probe
gamma_min_endstop nc # normally 1.28. Change to nc to prevent conflict,associated with zprobe the leveling strategy to use
leveling-strategy.delta-calibration.enable true # basic delta calibration
leveling-strategy.delta-calibration.radius 100 # the probe radiusPause button
pause_button_enable true #
Panel
panel.enable true # set to true to enable the panel code
Example for reprap discount GLCD
on glcd EXP1 is to left and EXP2 is to right, pin 1 is bottom left, pin 2 is top left etc.
+5v is EXP1 pin 10, Gnd is EXP1 pin 9
panel.lcd reprap_discount_glcd #
panel.spi_channel 0 # spi channel to use ; GLCD EXP1 Pins 3,5 (MOSI, SCLK)
panel.spi_cs_pin 0.16 # spi chip select ; GLCD EXP1 Pin 4
panel.encoder_a_pin 3.25!^ # encoder pin ; GLCD EXP2 Pin 3
panel.encoder_b_pin 3.26!^ # encoder pin ; GLCD EXP2 Pin 5
panel.click_button_pin 1.30!^ # click button ; GLCD EXP1 Pin 2
panel.buzz_pin 1.31 # pin for buzzer ; GLCD EXP1 Pin 1
panel.button_pause_pin 2.11^ # kill/pause ; GLCD EXP2 Pin 8 either
panel.back_button_pin 2.11!^ # back button ; GLCD EXP2 Pin 8 orsetup for external sd card on the GLCD which uses the onboard sdcard SPI port
panel.external_sd true # set to true if there is an extrernal sdcard on the panel
panel.external_sd.spi_channel 1 # set spi channel the sdcard is on
panel.external_sd.spi_cs_pin 0.28 # set spi chip select for the sdcard (or any spare pin)
panel.external_sd.sdcd_pin 0.27!^ # sd detect signal (set to nc if no sdcard detect) (or any spare pin)pins used with other panels
#panel.up_button_pin 0.1! # up button if used
#panel.down_button_pin 0.0! # down button if used
#panel.click_button_pin 0.18! # click button if usedpanel.menu_offset 0 # some panels will need 1 here
panel.alpha_jog_feedrate 6000 # x jogging feedrate in mm/min
panel.beta_jog_feedrate 6000 # y jogging feedrate in mm/min
panel.gamma_jog_feedrate 200 # z jogging feedrate in mm/minpanel.hotend_temperature 185 # temp to set hotend when preheat is selected
panel.bed_temperature 60 # temp to set bed when preheat is selectedExample of a custom menu entry, which will show up in the Custom entry.
NOTE _ gets converted to space in the menu and commands, | is used to separate multiple commands
custom_menu.laad-extruder0.enable true #
custom_menu.laad-extruder0.name Load_extruder0 #
custom_menu.laad-extruder0.command T0G1E550F4500 #custom_menu.load-extruder1.enable true #
custom_menu.load-extruder1.name Load_extruder1 #
custom_menu.load-extruder1.command T1G1E550F4500 #custom_menu.unload-extruder0.enable true #
custom_menu.unload-extruder0.name Unload_extruder0 #
custom_menu.unload-extruder0.command T0G1E-580F4500 #custom_menu.unload-extruder1.enable true #
custom_menu.unload-extruder1.name Unload_extruder1 #
custom_menu.unload-extruder1.command T1G1E-580F4500 #custom_menu.select-extruder0.enable true #
custom_menu.select-extruder0.name Select_extruder0 #
custom_menu.select-extruder0.command T0 #custom_menu.select-extruder1.enable true #
custom_menu.select-extruder1.name Select_extruder1 #
custom_menu.select-extruder1.command T1 #custom_menu.fan_on.enable true #
custom_menu.fan_on.name Fan_On #
custom_menu.fan_on.command M106 #custom_menu.fan_off.enable true #
custom_menu.fan_off.name Fan_Off #
custom_menu.fan_off.command M107 #custom_menu.extrude15mm.enable true #
custom_menu.extrude15mm.name Extrude_15mm #
custom_menu.extrude15mm.command G1E15F2000 #custom_menu.Reverse15mm.enable true #
custom_menu.Reverse15mm.name Reverse_15mm #
custom_menu.Reverse15mm.command G1E-15F2000 #custom_menu.verlichting-aan.enable true #
custom_menu.verlichting-aan.name Verlichting_aan #
custom_menu.verlichting-aan.command M42 #custom_menu.verlichting-uit.enable true #
custom_menu.verlichting-uit.name Verlichting_uit #
custom_menu.verlichting-uit.command M43 #Only needed on a smoothieboard
currentcontrol_module_enable true #
return_error_on_unhandled_gcode false #
network settings
network.enable true # enable the ethernet network services
network.webserver.enable true # enable the webserver
network.telnet.enable true # enable the telnet server
network.ip_address auto # use dhcp to get ip addressuncomment the 3 below to manually setup ip address
#network.ip_address 192.168.0.222 # the IP address
#network.ip_mask 255.255.255.0 # the ip mask
#network.ip_gateway 192.168.0.1 # the gateway address
#network.mac_override xx.xx.xx.xx.xx.xx # override the mac address, only do this if you have a conflict
switch.controllerfan.enable true # hier de ventilator die de smoothie-controller moet koelen
switch.controllerfan.output_pin 2.6 # ventilator is aangesloten op mosfet P2.6
switch.controllerfan.output_type digital # de pin gewoon aan of uit zetten, geen (software)-pwm.
switch.controllerfan.startup_state true # fan aanzetten bij opstarten
thanks in advance.
Imported from wikidot