The other issue that I am trying to work out is bed adhesion. In my ring print, there was some spots at 6 o’clock that just did not adhere. That print is in PC+, on top of PEI at what I thought was 80C. I have witnessed it getting printed on other printers no problem with the same setup.
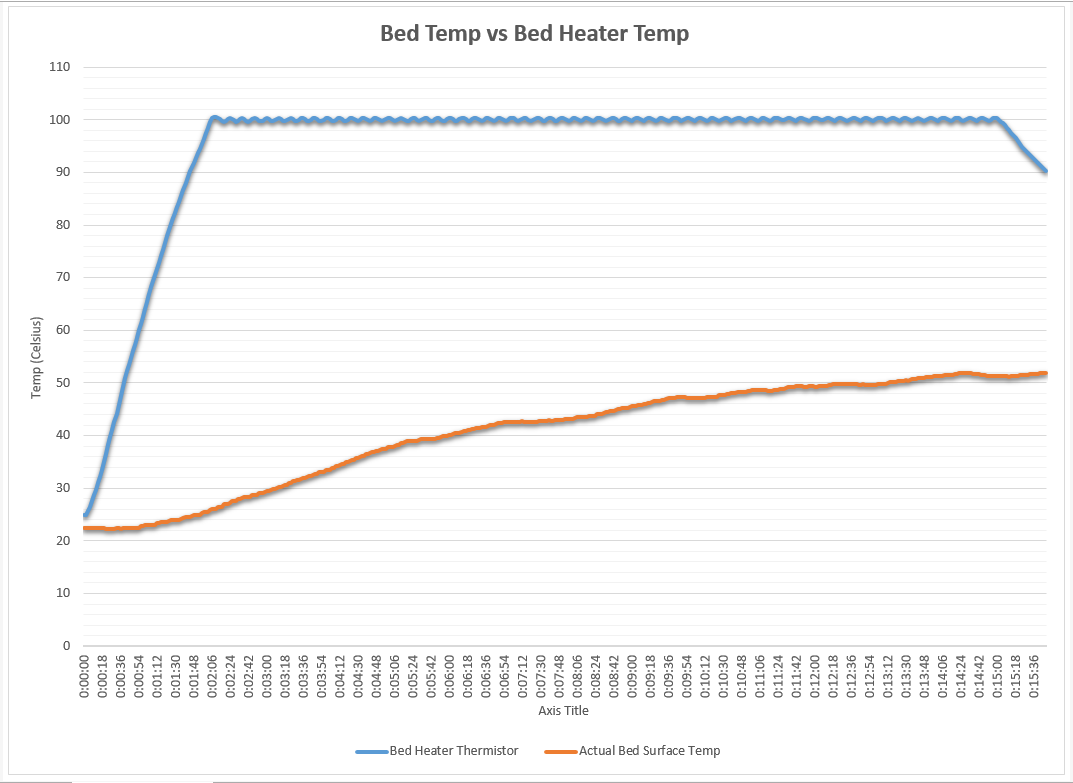
So after fighting it for too long, I decided to try some ‘science’ - I enabled the chamber temp sensor in Marlin and used the serial output from Octoprint to see what the temp was on the top of the PEI on the glass bed.
My Eustahios is in an unfinished basement, in the same room as the water heater and boiler, it stays about 55-58F down there right now. My bed surface seems to top out at 50C after about 15 minutes of running the 800W, 120V silicone bed heater at 100C- and the bed heater reads about 10 degrees LOW, so it was really running like 110-115C. The temp readings are about as accurate as one can expect with no-name 100k 3950 thermistors on the top surface. I checked the bed surface temp with thermocouple on the multimeter and its pretty close.
How do folks contain the heat better on their heatbeds? How do we enclose the printers and not cook the motors or belts?
When I print PC I set the bed temp to 110C and let it warm up for about 20-30 minutes (350W silicon heater). I’m not using the thermistor in the silicon heater for bed temp, but have put a thermistor into the aluminium plate, which gives better readings. No enclosure and if my shed gets too cold in winter I tend to heat it up first a little and then let the printer take over.
I do print the first layer quite slowly at 260C and that seems to help with adhesion a lot too.
I haven’t checked the temp on top of the PEI sheet, but do suspect that it will be a fair bit lower than the reported bed temp. Having said that I’ve been printing a fair amount of PC and this setup works well for me.
After some wringing of hands and gnashing of teeth…
Dollar store foam core makes great temporary draft stoppers/enclosures. A few magnets buried in the plies stick great to screws on the extrusions. Easy to remove too. Someday I might upgrade to Coroplast but its good enough for now.
I bought REAL, known good, ie with legit, readable datasheets, thermistors from Digikey. I don’t know why I settled for knockoff-unbranded crap from Aliexpress… $2.50 each and no more headaches.
Real bed temps were confirmed with the 2nd thermistor set as ‘Chamber Temp’ in Marlin. I will move the thermistor to the top after I get a new PEI plate this week, then I will try it again w/o the glass bed.
ps: What PC are you using and how do you like it? I am using Snolabs PC+ and despite my mechanical and electrical/sensor issues, its been really nice to print with. Same general settings as PETG. Its a bit on the sticky side, like no preload and decrease retracts. Post processing and machining has been nice too. 240/245 and bed at 100C
I’m using Polymaker PC-Max at 260(1st layer)/255 degrees on a 110 degrees PEI bed at 30mm/sec (half speed first layer). It’s the only PC I’ve tried so far, but I’m quite happy with it, plus I used to get it shipped quickly and cheaply directly from China, whereas most other filaments can be really hard to get here. I’ve printed among other things about 100 socket/outlet covers for hospital equipment for a client. I do sometimes get warping issues on corners of parts that are large and have high infill, but have been able to mostly avoid that.
I use it over PETG, which is my standard go to filament, when I need a little more rigidity or temperature resistance. I’ve also been printing a few things in CF reinforced Nylon (Matter Hackers NylonX and ColorFabb PA-CF) which seems to be more robust than the PC if you don’t mind the matte finish.
I found that a little ethanol really helps with part separation from the PEI (don’t try large TPU parts on PEI - it took me hours to separate).