Greetings!
The main reason I purchased the Vigotec was because it was supposed to have a much larger printing area. I recently made an engraving from a wedding photo which turned out rather well after a lot of trial and error but, I kept getting an error that the image size was larger than the printable area. When I finally got to an area that the machine would accept, the final engraving was only about 4"W x 5"H. I think that only equates to about 101mm by 127 mm. The machine is supposed to have a printable area of about 190mm by 330 mm. What must I do to improve the printing area on my Vigotec BX20 laser engraver? Thank you very much for an anticipated reply. God Bless! Bob
Hi,
I have my Vigotec L7/BX20 for 2 weeks now and by playing with the settings and giving the expected
size (using jpg files with 300dpi) on the right side of the menu (the mm-settings near the hands)
I manged to make some nice plywood burns & cuts. I tell this because it worked - for a while.
After entering some not-so-good parameters I could not switch back to proper working mode.
My solution and hint:
In the download package of vigotec.cn there is also a not too old version of “grbl”
(called “Standard_Grbl_v1.1f.hex”) and instructions for loading it to the Cutter.
Now I am using lasergrbl.com and I am happy - stable as a rock. If you add some additional
buttons, it is as convinient as the china-software (the dxf option seems not to be too brilliant anyway).
“Brightness PWM value” should “1” for a nice orientation point, “1000” for cutting (full power).
The only thing that does not work is the laser fan: it is always ON - which translates to “noisy”.
If somebody walks this route and finds out how to
- control the fan (M08, M09 does NOT work)
- add homing switches (the L7 has none)
please respond
Long first post - Regards Wood
2 Likes
Oh man. You got LaserGRBL to work for your VigoTEC??? I can’t get my laser to move, it turns on but wont’ move. The Steppers get all tight and locked up, but will not zip around.
I did nothing special… if the Chinese Software “VigoEngraverL7” (I downloaded Version 2.32 from vigotec.cn) works (so your Hardware is ok), then just click on “Settings”, “Model Select”, “Upload Firmware” (checkbox) and you get a file dialog to pick a “.hex” file. This is the super easy way to push “Standard_Grbl_v1.1f.hex” to your controller board (and the exact same procedure to go back to “VigoEngraver_Firmware_V1.3_B20200718.hex” if you want).
Wish you the best of luck! Regards, wood
3 Likes
oh another thing: as the Cutter has NO END SWITCHES, at power up the laser head should be in the lower left corner (with the fixed arm to your left and the connectors/power button away from you) - or you see it suffer, when the poor thing bangs into the mechanics…
Regards, wood
3 Likes
Thank you so much!! I’m going to give this a whirl after lunch! This thing has been a nightmare for me lol
I have a SainSmart CNC 3018 and thank God it has the limit switches haha
Oaky, hooked up the laser, opened up LaserGRBL and tried to Flash all 3 available Firmwares. Selected Arduino Nano, COM5 and 57600 and Flashed it. Says it cannot do any of the listed firmwares. 
Hello Bob;
I also wanted a larger printing area. I have the VG-L7X which is a simple machine without limit switches. I purchased a 1 meter main bar to match the short bar currently on the laser and a length of stepper belt. I replaced the main bar and belt on my machine with the one meter bar. In the setting tab, I changed the y(Longitudinal) setting to be 950mm. When I import an image that is too large, I get an error and just allow the software to scale the image. Once imported, I adjust the height and width dimension to as large as 190mm wide by 950mm high. So far, I have been able to print simple DXF imports, PNG files and manually entered text as large as the hardware can support.
I hope this helps. Good Luck
1 Like
Thanks for the reply, Tim,
Sorry for such a late reply. I’m having numerous problems with the engraver and am not very good at navigating this site either.
Can you possibly post photos or some type of schematic showing how to remove and replace the belts on the Chinese laser engravers that would help me, and hopefully other members.
I can only surmise that KKmoon, Ortur, Neje, and the Vigo Tec are all about the same other than perhaps the length of the belts.
I will probably try to remove the X-axis belt and change it’s position to see if that helps eliminate the problem of text getting skewed. I don’t know if it is from a slipping belt or what but, I have to start somewhere! LOL
Also, if you know where new belts can be purchased for the Vigo Tec VG L-7 BX20, I would appreciate that info also.
If you up-load any photos or diagrams, please label it with something referring to Belt Replacement so I can find the post.
God Bless! Bob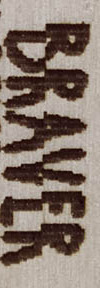
P.S. I added a photo of what I meant by skewed text. It looks like the X-axis just moved over slightly from one line to the next.
Hello Bob;
Here is the link to the timing belt I ordered and which seemed to work fine:
5m 2gt-6mm pu open timing belt s2m gt2 belt for 3d printer Sale - Banggood.com
I installed it into the new 1000mm bar in the same way it was installed in the shorter bar. There is a screw at each end of the bar that clamps belt to the bar. I did not have a way to adjust belt tension so just attempted to remove the slack without adding much tension, then clamped the new belt with the screw.
The shift in text is strange. Does it produce this same shift when printing other test patterns and graphics or just with text? Testing other patterns for similar behavior might provide additional clues to the problem.
The belt system is pretty simple but I guess if you had enough slack in the belt it could possibly slip a gear tooth. Try checking for slack in the belt.
2 Likes
Thanks. I don’t think that is the X-axis bar. It appears I would have to remove the top of the stepper motor, the end of the X-axis bar, and see how the laser diode slips behind the belt to engage the teeth on the belt. I’ like to find a diagram before I disassemble a new engraver. What engraver do you own? I’ll have to try to get measurements for the belt on my Vigo Tec L-7. God bless! Bob
Hello Bob;
I have a Vigotec L-7 as well. You are right, the situation I described applied to the x-axis. The Y-axis appears to be a complete loop that is likely anchored behind the laser. I did not remove mine to double check.
Looking at the Image, I wonder if the belt gear is a little loose on the stepper motor shaft.
1 Like