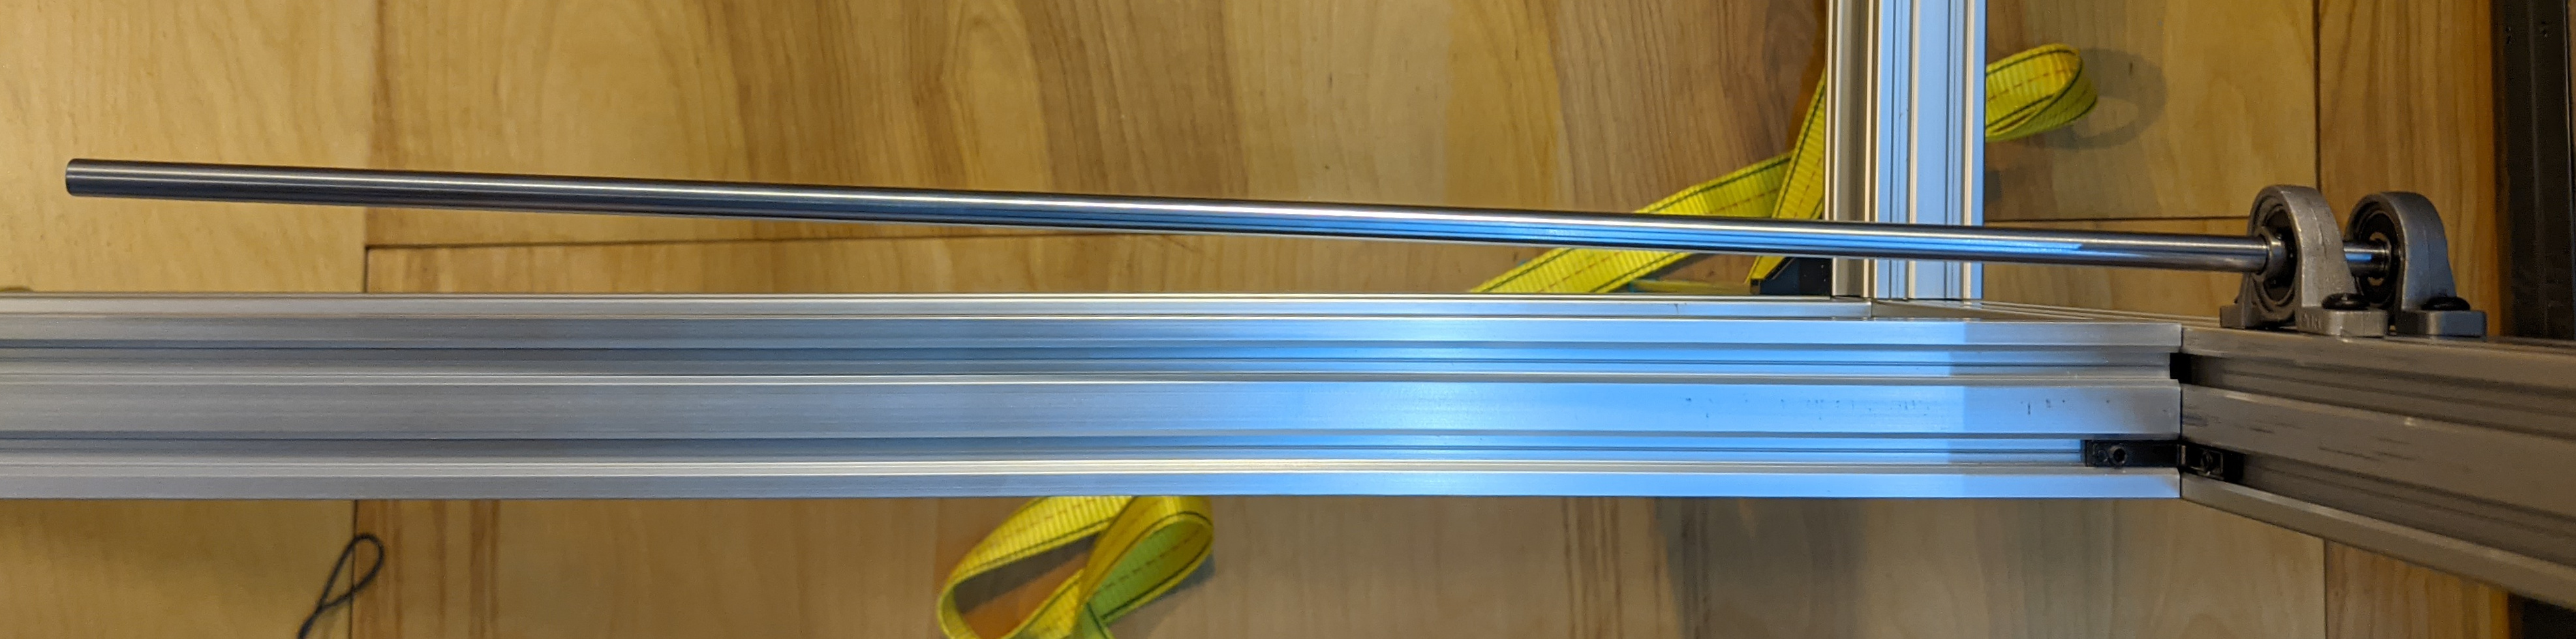
I tried installing some KP08 pillow block bearings in the Monocle this evening. I purchased all my bearings together in a single order and kept a pack together; I didn’t mix and match. Yet I had blocks of different heights, so that a rod through the bearings next to each other is not remotely close to even. I’ll have to test the rest of them and find out how many packs I need to return for replacement. This doesn’t have to be perfect, but it has to be a lot better than this to work right!
2 Likes
That’ll be that Plasticine mold they use for casting 
1 Like
Silly question … the KP08 is not a fixed bearing, so could it be that that one or both are offset in the housing?
Dunc
Nope, the casting is visibly a different height, and they are fixed to a vertical member (the image is looking down) so regardless of any difference in elevation, the problem of azimuth relative to the frame can only be related to that difference in height. It’s just real inconsistency between the parts.
You going to return them and try and get better quality ones, or just fly cut the bottoms of all of them to put the center lines at the same height?
I’ll return the grossly-wrong ones; I have until some time in January to do that. But yeah, I’ve thought about lining them all up with a single rod through them as a reference to improve alignment, if I can also figure out the rest of the fixturing, which so far is stumping this amateur machinist. 
Fixturing was a pain, but I succeeded in the end.
I had discovered that if I put a rod through them to create a coaxial constraint, I couldn’t grip them safely in my vice jaws, because the sides of the blocks were too slanted to hold. But I finally found a fixture that worked.
I put the pillow blocks on the rod and locked them in place with the grub screws, each snug against the previous block. I set ¼" rod on top of each vice jaw and laid the pillow blocks on top of the rods with the rod in between the vice jaws. I used a 1-2-3 block to align and settle them with gentle taps of a dead-blow hammer, and skimmed them with a two-flute end mill until they were all even.
I did them in two sets of six because my vice isn’t wide enough, and didn’t realize until I was done that I hadn’t succeeded in a common reference across all dozen. (I could have done that with machinists jacks under the rod.) So I’ll have to keep the two sets separate. That shouldn’t cause me any trouble, I think.
2 Likes
Now that I cut them, I discovered that at least one of them has bad bearings in the races! Argh. I might wait to buy more until I get more parts assembled. At least as far as I can tell so far, only one is bad, though to get the axis straight I might need to buy two and fly-cut them together as before.
2 Likes
Actually, several are bad. I need to find a better source. But mcmaster doesn’t sell these, and the closest they have is $33 each, and for 12 of them that would multiply out to quite the pretty penny.
I’m starting to think of designing my own blocks and putting 608RS bearings in them. I’ve been doing other stuff with 3D printing; why not this too?
Ordered a 20-pack of 608RS to experiment with. These are the classic skate bearings, so no supply problems here.
I might cut the locking collars off the junk KP08s to use as stop collars with the 3D-printed blocks.
2 Likes
I might just locktite the rods in the bearings; they will have almost zero side load; it just needs something trivial to hold it in place. I keep coming up with more uses for 3D printing for this laser. 
1 Like
I’m thinking something like this:

There are tiny nubs inside the hole to hold the bearing in place, and I’ll have to play with the size until they just barely print. My idea is to size this to be a tight press fit for the bearing. The outer race will sit against the flange, which needs to be wide enough to not touch the inner race. The holes are sized for M5 screws.
1 Like
I haven’t printed it yet, and I expect to need to tweak it until it prints well, but anyone who wants to follow along can do so:
2 Likes
I made the silly mistake of using a second bearing to seat the first one, not considering that I wouldn’t be able to remove the second bearing. So I cut it apart and redesigned a bit based on that experience.
Here is what I have pushed to the repository right now:

On the left (in fuschia) is a tool for installing bearings in the single-bearing block (center, purple). The installation tool has a stem to register in the middle of the bearing being installed, and to press in only on the outer race. It is enough smaller than the hole to not bind, and has a ridge around it to grip.
I made the single block lower profile in this iteration. Someone who wants a higher profile to more closely match a KP08 would have to tweak the design. I also reduced the fillet on the foot to have a smaller overhang and print better. But designing for the exact diameter worked quite well; I expected to have to tweak it until it fit.
At the front, I need a cantilevered rod. Rather that aligning two blocks, I decided to take advantage of 3D printing and make one block that accepts two bearings. I put three holes in each foot; the outer two on each foot are on a 20mm pitch for installation on 4040 vslot, and the center one is for installation when only a larger center slot is available. I don’t need it but it might make the design more useful.
Off to the printer!
3 Likes
The single block cracked, so I need a bit more clearance. The double block did not crack even though it’s the same dimensions, so I didn’t adjust by very much for the next print (after my replacement control board arrives, sigh). It looks like the double block is going to work great; I’m planning to try the threadlock trick today and just make sure that no threadlock gets inside the bearing race! 
The installation tool worked great. I used a dead-blow hammer to seat the bearings, which might have contributed to cracking the single block; I think I’ll avoid the hammer next time and just go for a press fit.
2 Likes
Installed the replacement control board on my printer and printed the new versions with slightly more clearance. The bearings are a secure press fit with hand pressure, no hammering or mechanical advantage required.
Printing the rest of the bearings over night, to get back to making progress on the laser!
2 Likes
I’ve installed them all, and they all run smooth, unlike the KP08 junk I had previously installed. Those KP08 bearings were a waste of time and money. I haven’t actually put any thread lock on yet; I’ll wait on that until a slightly later stage. Very happy to recommend this as a general solution though!
3 Likes