Well I am about to give up on this thing. I powered it up and it appeared to be working, nothing exploded anyway and the power LED lit up and displayed.
So decided to test fire the laser. Made sure water was pumping, etc. The read out was on 007, I pressed the fire button and I hear a buzzing noise but I do not see the laser fire.
Getting weird side effects when I press the button the two battery powered temp displays go completely blank, the LCD for my Cohesion3D board becomes scrambled. The milli-amp meter reads about 3ma when I am pressing the button.
This thing just seems like a ticking time bomb. Totally disgusted.
Cohesion3D always ship a dedicated power supply. I haven’t read all the scrollback, but just wanted to make sure; are you using a dedicated power supply that they shipped for that board?
Thats whats weird that display gets scrambled, the battery operated displays go blank while I am holding the button and I do not see the laser fire. I can take a video if I am able to post it here.
Ok, so the noob is really showing in me now. So it appears the laser is working, I just had it on such low power I didn’t see anything then I turned it up to 30% and now I can see it firing and it does burn through the piece of blue tape I put on mirror 1.
Now the other main problem is that when I fire the laser it crashes and or reboots my Cohesion3D board every time, even though its on its own power supply and those two little temp displays go blank.
please read through the K40 FAQ at the top of this page. You do not want to use blue tape in front of any of the mirrors or lens. The burn-through melts the glue and splatters it onto the mirror and makes a mess. Can even cause a cracked mirror if the laser burns it to the mirror for very long. ie it’ll heat the mirror.
The L+ and L- wires which go to the tube are essentially a loop antenna. The larger the area between those two wires, the better this loop antenna will work.
Of course we do not want this antenna to be any good. We want to keep the noise to a minimum.
So, keep those two wires close together and try to keep some distance to other wires where possible.
It should work fine if you reroute the wires a bit.
It sounds to me like you have a grounding problem.
Check all the DC grounds and ensure they are connected together with no loops.
This includes the:
LPS
Controller PS
Panels
I just noticed that the displays run on batteries. Are sensors for those displays running near the Anode wire?
The really long cable from the controller to the display may be a problem. Try pulling that display out over the front with the lid up and see if the display stops resetting.
I have also seen this kind of problem is the LPS is arching. Do you see or hear any arching?
may I give my 2 cents ?? …
How many Amps do the thing need ? ( I don’t hve one), but : An Amp meter must have a shunt to measure the amps. if thgis shunt can’t handle the amps and the current is pulled down by the amp-meter you have a problem like this. So the amp-meter is reducing the current and the voltage drops to zero. That yould explain the voltage drop of the board as well as I can hear that you are losing the USB connection to your PC (sound in the background) …
maybe I’m wrong.
Ok, I will review the whole FAQ, thanks for pointing that out. Only did it cause I have watched hundreds of video of people doing that to align the laser to the mirrors. I will stick to paper in front from now on.
I do not see any arching, All the wires are connected with plugs at each end so which grounds specifically are you talking about? The one temp sensor is run directly to the tube water hose next to the laser tube and the other one is glued to the top of the power supply I guess to read the ambient air temp in the LPS.
The display with the two long cables that go back to the C3D board is bolted to the panel with 4 screws and nuts and is not easily movable by design, but I will try and do something with the cables.
Which FAQ are you referring to specifically? Only one I see at the top of this page is the Site Rules FAQ.
I kind of assumed you were saying your comment about the blue tape was in the FAQ, or are you saying I am breaking a rule here and need to read the Site Rules?
The “K40 Intro” leads to the whole Getting Started with CO2 Lasers category which has a lot of useful content and which we want to continue to keep improving to help users new to the K40 and similar hobbyist laser cutters.
Ground loops make these machines’ electronics very susceptible to both radiated & conducted noise usually from the anode HV side of the LPS. That is why typically these problems are a combination of the LPS arching or emitting corona and/or poor grounding design.
The cathode side is usually not a source as it should be at ground potential and the max current is in the MA range.
Long ground wires or long input wires to low voltage electronics especially in poorly grounded systems can result in dynamic ground shifts that are interpreted as resets and other false control signals. In a CO2 laser machine, the presence of 10’s of thousands of volts and 3.3vdc electronics make this a HARSH environment.
Don’t think of ground wires as simple DC returns of current. Rather think of them as active transmission lines with inductance and capacitance. That means that high-speed changes in current with enough energy can shift the ground for ns.
In the case of radiated problems think of wires as antennas where enough wire, placed close enough to the emitter, when combined with poor grounds, can shift the level of a signal…
These problems are hard to fix because of their dynamic nature and because they relate to problematic physical characteristics and layouts i.e. wire length, size, fastening, and placement.
Ugly rat’s nest wiring often also means poor grounding designs which are susceptible to noise.
The above does not directly tell you how to fix this problem it is intended to give you some background to use while you hunt for the problem.
Try these simple things first:
Disconnect the USB cable going to a PC and see if the problem is still present.
You can turn out the lights and look for corona around the LPS its wiring and HV connectors.
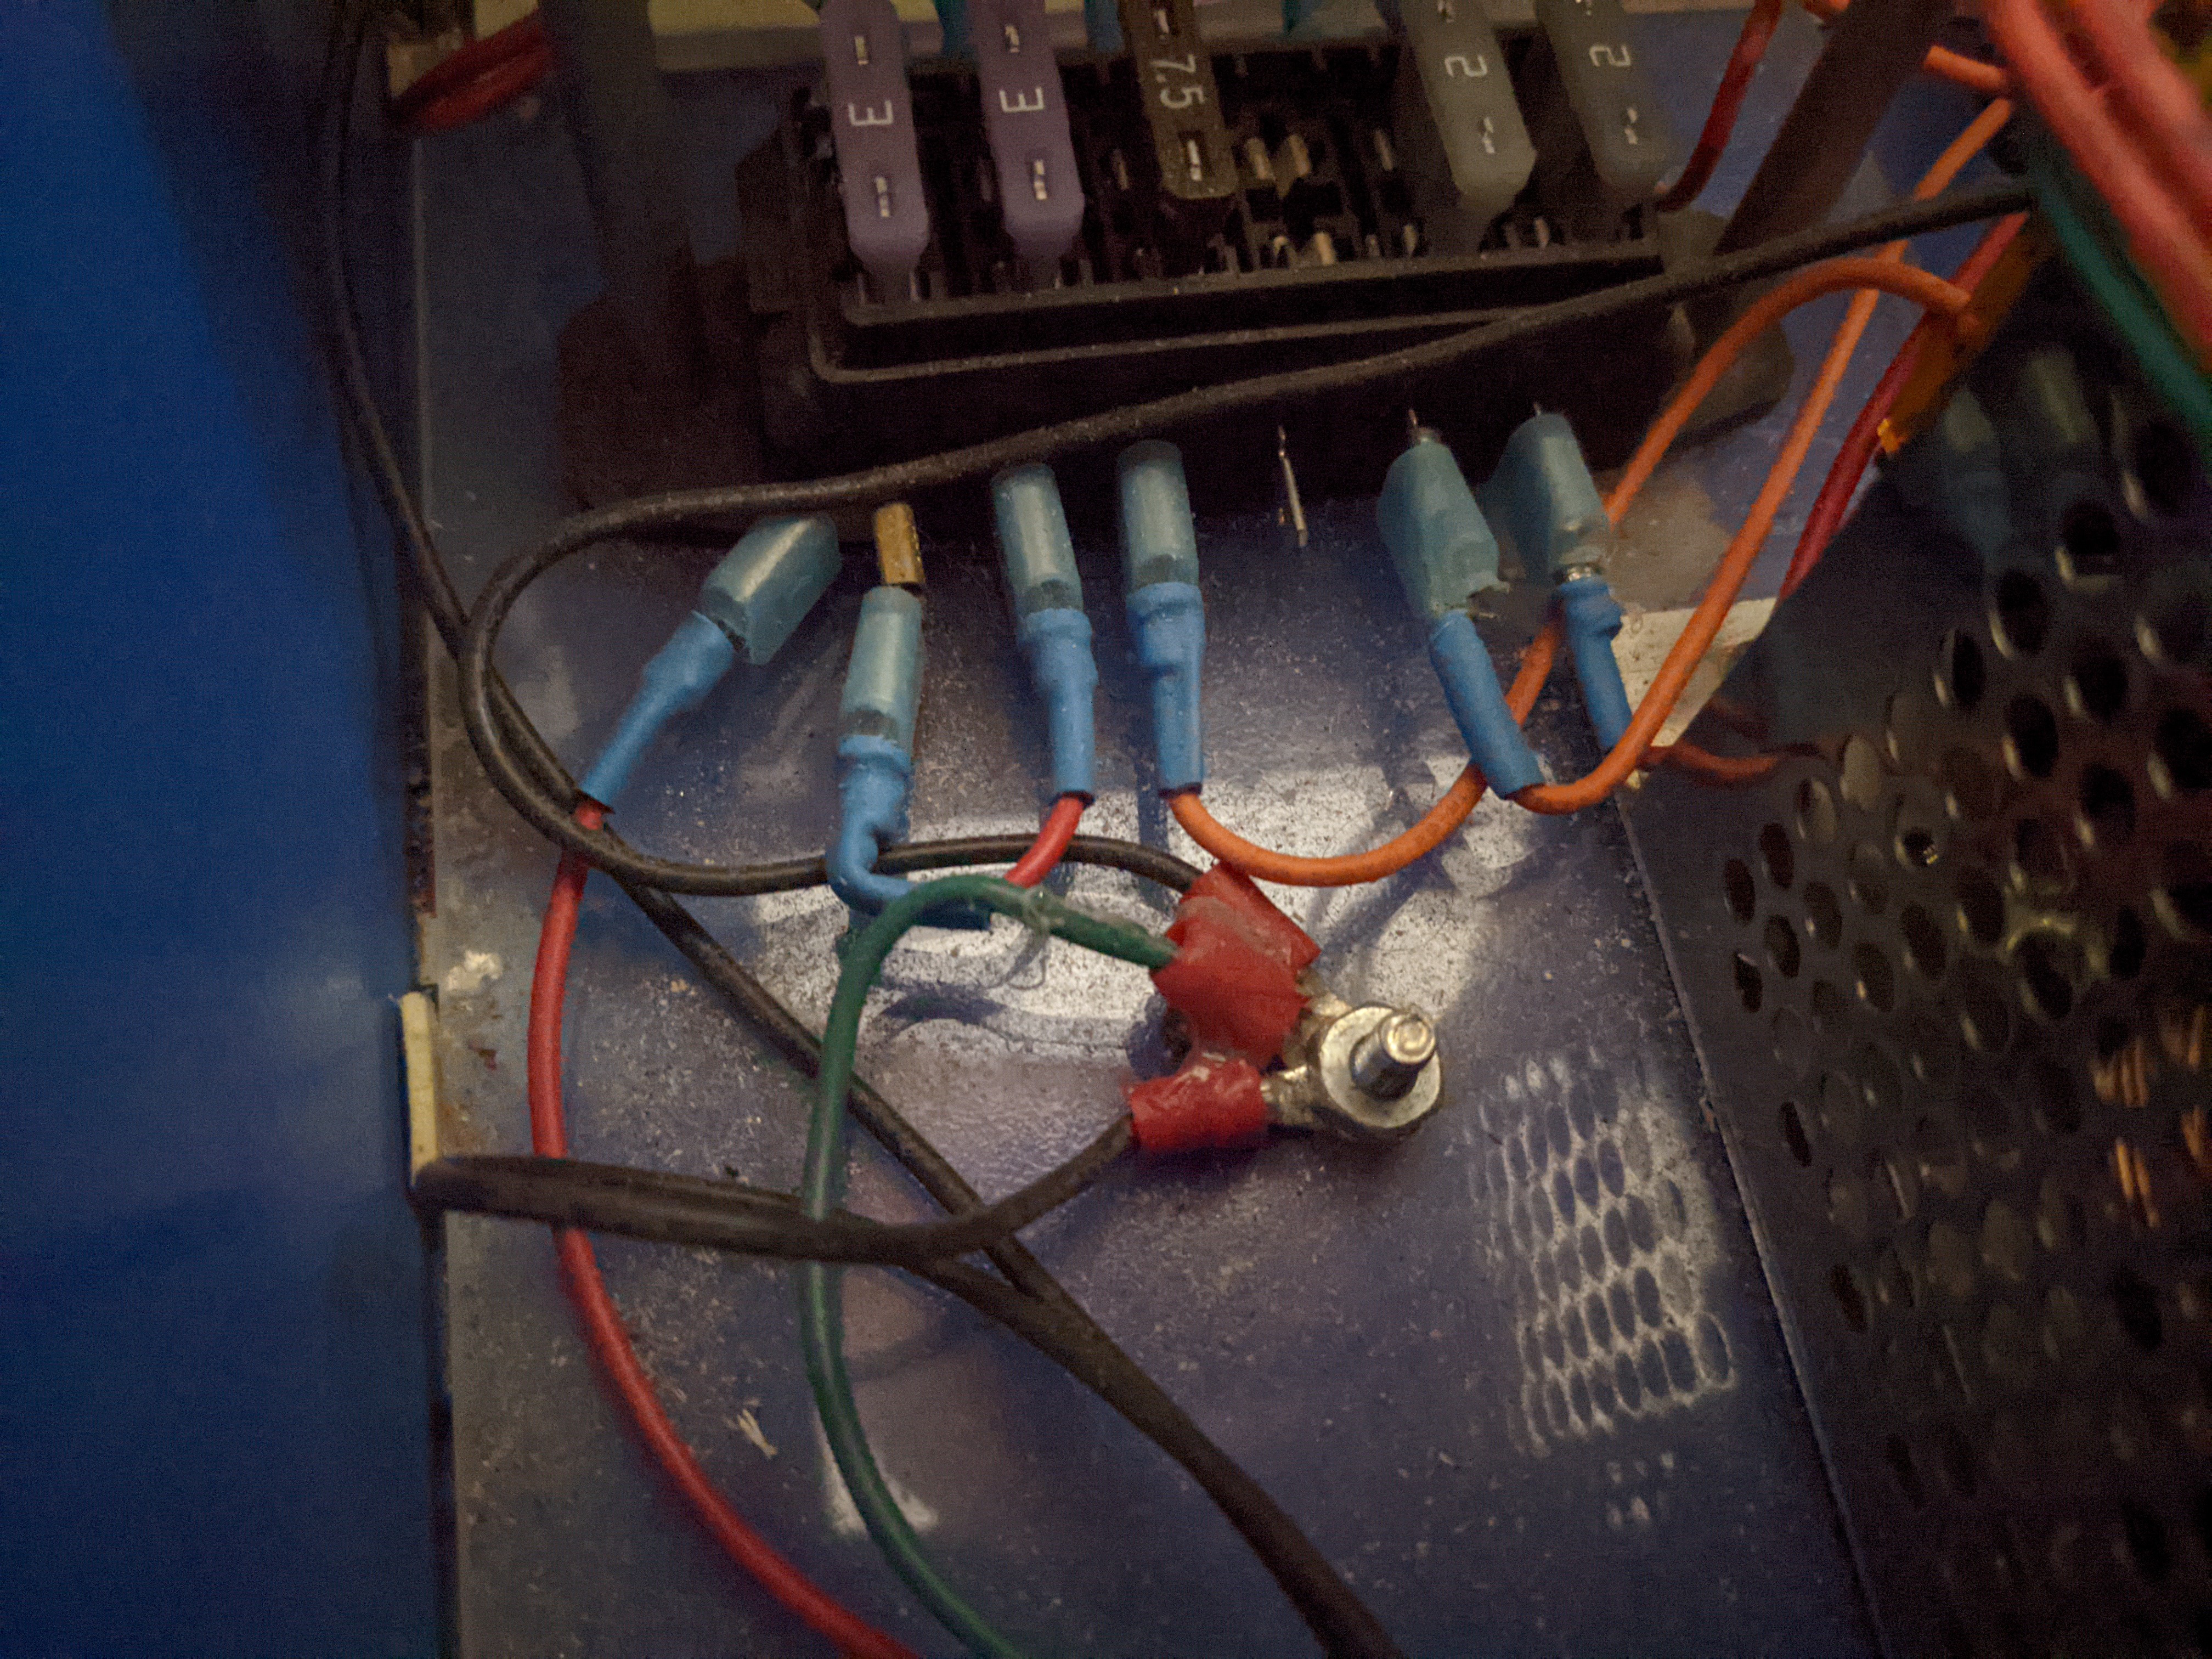
I would add a wire from the L- to a purposeful bolt in the frame. L- is the cathode return that comes from your laser current meter. That current should already be tied to the frame through the LPS frame… but who knows. Use this same bolt as your common return for the DC supplies.
Tie a short-as-possible beefy wire directly from each supplies ground to that same lug using ringtones that are soldered. Fasten ring tongues to the bolt with star washers on either side. Do not daisy chain these grounds.
Reroute signal wires as far from the anode wiring as you can
You probably cannot do much about #1 other than ensure input wires are as short as possible. Focus on 2-5 first. If that does not resolve the problem then you may have to start moving things and experimenting with the layout until you find the source.
My experience has been that these problems first manifest themselves as mysterious radiated noise but end up being solved by better grounding.
Grounding Design:
The ground system design must consider the path the current follows to get back to the source driver (that’s usually the device on the PCB). Signals that are a long way away that are not grounded back to the source can experience ground shifts when exposed to strong transients due to line inductance, capacitive coupling, voltage drop, etc. The distance that the current has to travel can have a profound effect on the signal voltage seen at the receiving end of the wire. As an example, if a switch out on the gantry uses one signal wire but the return is tied to the frame out on the gantry, the return current has to flow through the frame back to the controller’s ground connection then across the PCB and to the input receivers ground connection. Unless the frame of the gantry has a beefy wire running back to the controller the ground path may not exist at all or at best travel through moving ball bearings. In unknown paths like this who knows what voltage is dropped across what unexpected resistances/inductances.
Power supply wiring should be designed just like signal wiring. Power supplies should be wired directly to their load. That means two beefy wires (power and ground) as short as possible directly to each load. The bigger the wire the better, size matters here. Do not run a PS’s wiring to one load and then daisy chain the grounds to the others. Each supply has dedicated power and ground wires to the load.
Ground each power supply back at the supply’s terminal with an additional wire run to a common gas-tight connection on a common frame location. Yes, I mean a single lug that all PS ground lugs connect to. All supplies should literally have a beefy wire from the ground lug on the supply to the common frame lug.
Tie the safety ground from the AC plug to this same common lug. In weird conditions, I have found that isolating frame ground from PS ground to solve some noise problems. Try this only as a last resort.
For the common ground, I use a bolt with soldered ring tongues stacked with star washers in between each lug.
@Mameniac This is an analog amp meter which doesn’t have a “shunt resistor”. Instead the current directly flows through the coil (which is some kind of shunt) that megnetically drives the needle. The maximum current of the LPS is around 25mA, which can be handled by the 30mA amp meter.
The very small voltage drop over the amp meter in the high voltage loop can not cause the problems on the low voltage side. But interference from the HV side could make the controller or display crash.