At MRRF I got in a discussion with Daniel Halvorson and @Luke_Cunningham. We decided that we would love to build an infinite Z printer. I will invite them to post here but everyone is welcome.
The basic concept is that you use the print itself to support the printer.
There are a lot of details to throw around at this point. I plan to use this thread to toss ideas around until it seems we are converging on a rough game plan.
Here are two questions to get us going. I am sure they will create many more questions.
- What is the 2D motion platform?
- How do you lift the 2D motion platform?
1 Like
To answer my own questions…
I think a SCARA arm like HELIOS would be a good fit since it doesn’t need a big frame to print big. However, my lift idea will need a big frame (but it could be an expandable frame).
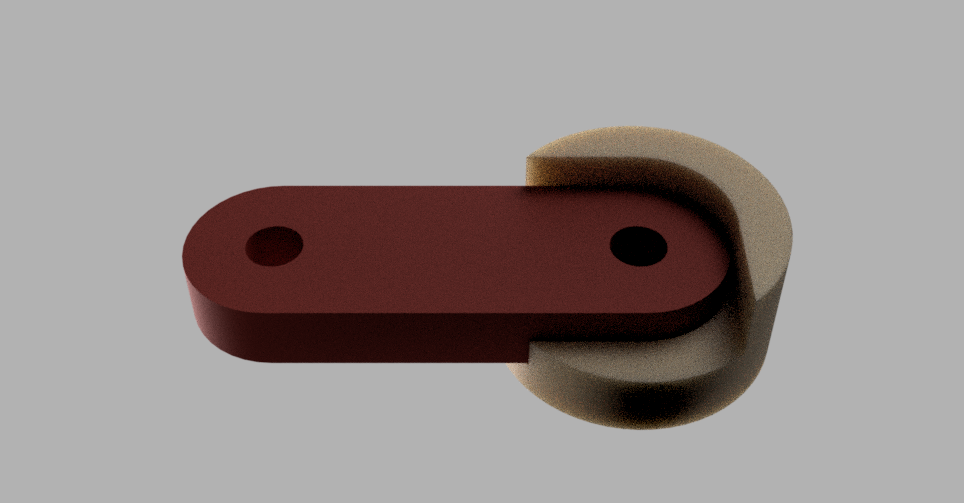
I attached a picture that represents my basic lift mechanism. The printer would have 6 of these tabs. A screw would run through the right and would lift the tab until it clears the indention and then it would swing out of the way. Run in reverse, the tab would rotate over the indention and then lower. 3 of these would be right handed and 3 of these would be left handed. This means all of them could use the same stepper. The left side of the tab is for a threaded foot that you can microadjust at the start of a print.
Printing would consist of …
- printing on the top of 3 exposed towers
- raise 3 tabs while lowering the other 3 tabs.
- repeat
This would require a large frame and a crap ton of belts. If I use 2 z steppers, the extruder wouldn’t have to have a safe zone and the first layer would be easier.
What are your thoughts?
I’ve considered this before, a couple of times. It’s particularly interesting for printing long structures in orbit, and it would be awesome to get the idea to work inside a cubesat.
Your Z axis should incorporate linear motion components that the printer can add onto. I’m thinking something similar to an I-beam or an extrusion profile something like v-slot combined with a rack-and-pinion drive system would work best. You would need to start with a pre-made piece of this shape loaded into the machine, which it would then add onto. Another option might be to surround the rest of the print with something like an inside-out version of the Tiko printer’s extruded frame (with the pinion racks already printed into it, rather than added after the fact the way they did it).
As for the X/Y stage, it could be anything, as long as the Z drive mechanism sits within the X/Y area and below the printing plane.
Btw, Made In Space apparently has something along these lines working in the lab, but a quick search doesn’t bring up any details about how theirs works.
I thought about the rack and pinion. I went from that to three screws. I liked the screw better because they could be printed easier as a thin shell and still work. That said…to make either work…there is a lot of fiddling you would need to do to get the print to interface with the start pieces. The fiddly-ness and the need for the start pieces made me go to this 6 tower approach. The towers could be poorly registered in the X and Y and they would still work. For the screws, I would have to nail the X,Y, and rotation of the screws. For the rack and pinion, I would have similar issues.
All that said, do you have any ideas that would allow for an easy start and low amount of throw away material?
Side note: The towers can also be prints themselves. For instance, I could print 6 squirrels at .2mm for all the towers and 1 squirrel at .1mm in the middle.
I don’t see how screws would work. If you’re rotating a nut around the screw, you have to be able to turn it all the way around. This means that you can’t have any horizontal bracing between the screws or to other parts of the print. They could be connected at the base, but that’s it. As your print grows, those screws are going to become flimsy, and things are going to fail. Rack-and-pinion rails, on the other hand, can carry a carriage that is open on one side, allowing other structures to connect to it.
It occurs to me that there is another solution, though. If your Z axis was driven by a pair of large-diameter counter-rotating nuts, they could drive themselves along something that looks like a knurled shaft, and you could print other things inside this knurled-tube-shaped shell, and still be able to brace to the wall for stability.
The nuts wouldn’t even have to both rotate. One could be fixed to the frame, causing the X/Y stage to rotate as it prints. Or you could just make it a screw with a slot or a flat side, similar to a pipe wrench’s adjustment mechanism, but that’s less fun to picture than your printer rotating as it prints itself.
The screws would be large diameter but thin walled. That said, your single big screw with a rotating printer appeals to me. My only gripe is the need for a starter piece and registering the printer to interface perfectly with that. However, doing registration on one big screw is easier than doing it for 3. However, however, this will hide the print from observers. I can add port holes but that would ultimately require more plastic to achieve the same strength.
Back to my tab idea, I can design the tabs to intersect the part on most of the layers and we can add support structures for the layers that don’t intersect the tabs. This could give us almost no waste. I have an idea for an accordion frame that would let you move the tabs in and out to work with a lot of different prints.
I’m still not picturing how your tab/screws thing works.
There is, of course, the existing infinite-axis belt design, which you could probably arrange to be vertical, either lifting the printer as it runs off the end of the belt or sending your print higher and higher into the air.
Baron Münchhausen pulls himself out of a mire by his own hair
For really tall items printing a complete circumference cylinder tower to climb on can offer sufficient rigid base for the XY mechanics that accelerate and shake. In this case a rack printed on the wall of the tower is doable more than screws.
My this one meter tall light frame printer shakes heavily though producing correct items thanks that the whole frame shakes together as one box.
Here is an animation of how one tab would work. I would have 6. 3 would support the printer at any given time and the other 3 would be retracted so you could print where they are.
The belt could work. However, one of my goals is to have it fit in a backpack. I think we can keep all of the components in a 350x350x75 box.
A printer like this would have low acceleration values. In fact, acceleration could be a function of the z in firmware.
Nice animation. I could see that working very well (provided it’s made with smooth surfaces and kept clean, so it indexes to the exact same point every time).
My gut says that simple “X” shaped towers would be an efficient use of throwaway material. However, thinking more logically about it… since the goal is to use a design with a high second moment of area (for high bending stiffness per plastic invested), maybe simple circular tubes are better.
Building on that concept: assuming circular throwaway Z tubes, would it be useful to have the Z feet be conical, so they must be concentric with the throwaway tubes? It would be overconstrained (a kinematic coupling would be better) but it would increase the amount of horizontal forces the printer could take without shaking off the supports. More consistent layer registration, maybe. Or, hm, could some sort of kinematic coupling shape be printed? Probably a Maxwell type.
2 Likes
I think a something close to a circular tube would be ideal. I think you could do a bit better by slowly shifting back and forth between an x oriented fat ellipse and a y oriented fat ellipse. This will increase the lateral rigidity. They will also make action shots look bad-ass.
My ellipses will screw up the conical seat idea. With kinematic seats and conical seats we would need to built in enough lift into the tabs to allow us to get off the ground.
I like the built in registration but my gut is telling me to go with simple pads. The simple pads may work so I don’t want to avoid them for another solution that might cause the system to be over-constrained. With kinematics couplings we would have to calibrate the two sets together. It shouldn’t be too hard but I would like to avoid any fiddling unless absolutely necessary.
Side note: each of the tabs could have a small adjustable foot that you can rotate down to meet the table perfectly at the start of a print. This would work for a flat, ball, or cone foot.
I also think we should put something rubbery on the bottom of the feet. I think if someone hit the frame or the table with enough force to make the rubber slip then you are in danger of cracking off the towers from the bed anyways.
if it should be “infinite” might be funny if the printer print its frame while printing the object … So like printing 3 columns which are inside the printers print area. A CoreXY frame like design would ensure stability. I think the changing lever of a SCARA would make it difficult to keep stable - maybe a double SCARA with 2 columns in the centerhub of each (printed by the counterpart A↦prints B’s Z rail and vica verca)
just my 2¢
I think you are right about CoreXY being superior to the SCARA. We need a big frame for the printed columns so might as well use it for the motion.
what about using Roller screws - the outside gets connected to a stepper and the inside screw is printed. A Ball screw should also work. But you probably need to print them 10cm diameter to be stable enough - and you need a center laser to keep them straight. Maybe using a rotary mini printer inside the screws would be something. Do you know Markus Kayser somthing like the Fiberbots could support a printer aswell…
How about making a reversed hangprinter with a helium bag pulling it up and cords keeping it grounded. The spools of the three cords are on the ground. For the cords can be used the wiring that should deliver electricity to the printer.
Fun idea but we are looking form something that you can pull out of a backpack and hit print. I want to minimize the setup and the number of helium tanks required. 
Please help concentrating  So it is not really about an endless Z. What is the tallest object imaginable with the planned setup?