Help requested with a C-Beam Robot recording position and measurement data in lab experiments

I will describe what I have working so you have an idea of what I have designed and the help I need.

I began this project with the goal of replacing a human operator with a robotic solution.
We were using a manually operated X-Y-Z table and positioning it with micrometers.
This was very labor intensive, and would take an entire day to setup and run a single experiment.
We would take 6 to 8 measurements, write them in a logbook and then move the table to the next position repeating the 6 to 8 measurements, and writing them in a logbook.

If we did a 30X30 Grid of measurements that would be 900 positions, 8 measurements = 7200 values.

The idea was to develop an automated way to move the sample, which I have accomplished, and to automate the data logging, which is the part I’m trying to deal with now.

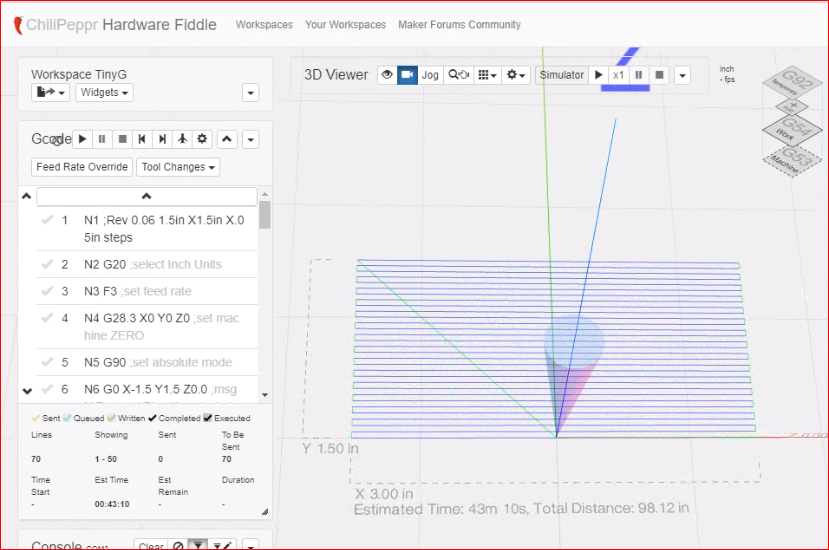
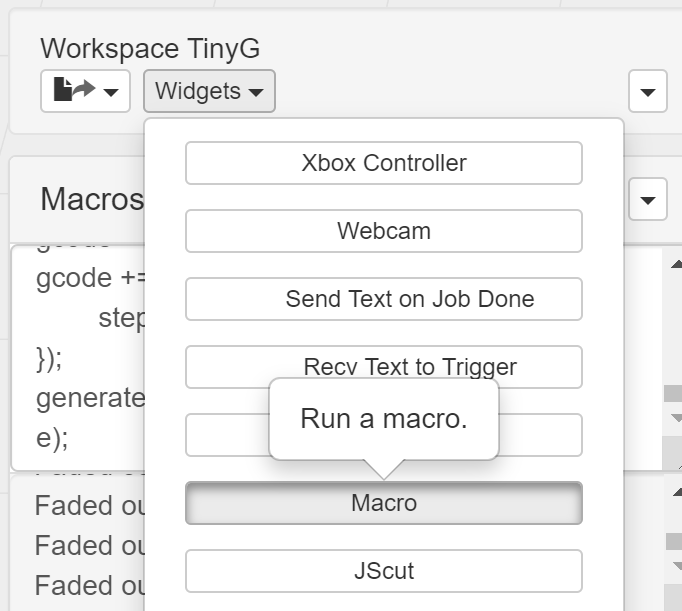
I’m using ChiliPeppr and the TingG controller with the robot. I create the G-code with a text editor.

This works to move the sample, now I need to be able to record the position data (X,Y,Z) of the robot and the measurements taken at that location into a log file (CSV) to be loaded into a SQL database.

I’m not sure the best way to do this. All my measurements values are available via RS-232 or USB.
What is extremely important is that I can associate the measured values with the robots position.

I tried to do some of the tutorials but Cloud9 got in my way. I downloaded Visual Studio Code, Node.js and Brackets in an attempt to set up a development environment.

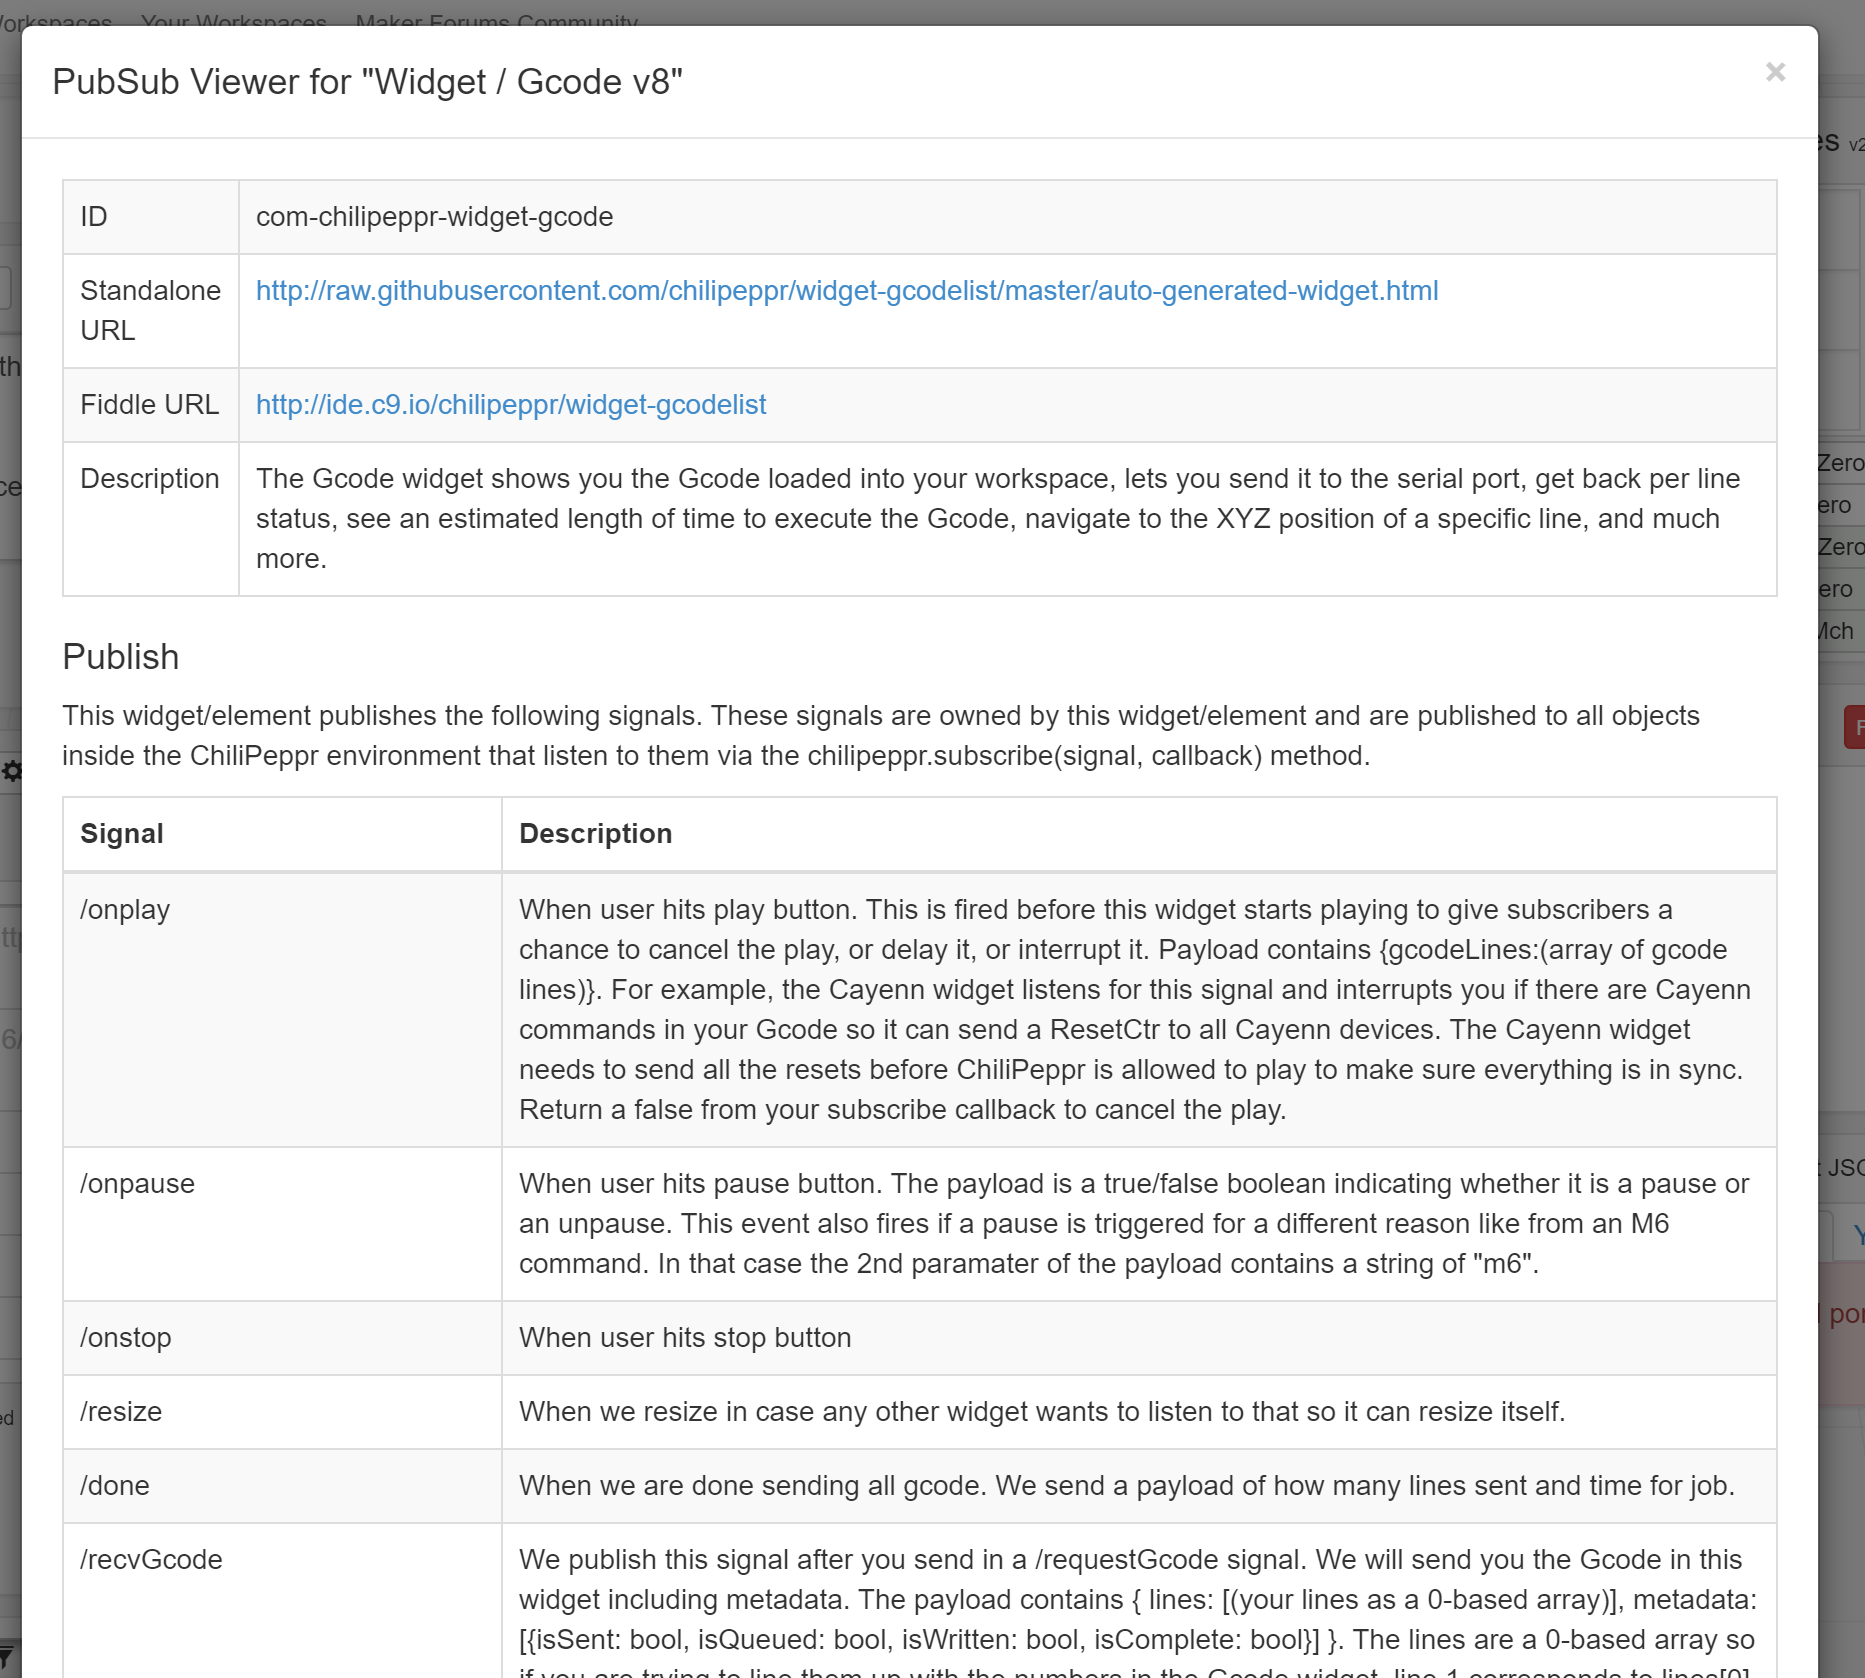
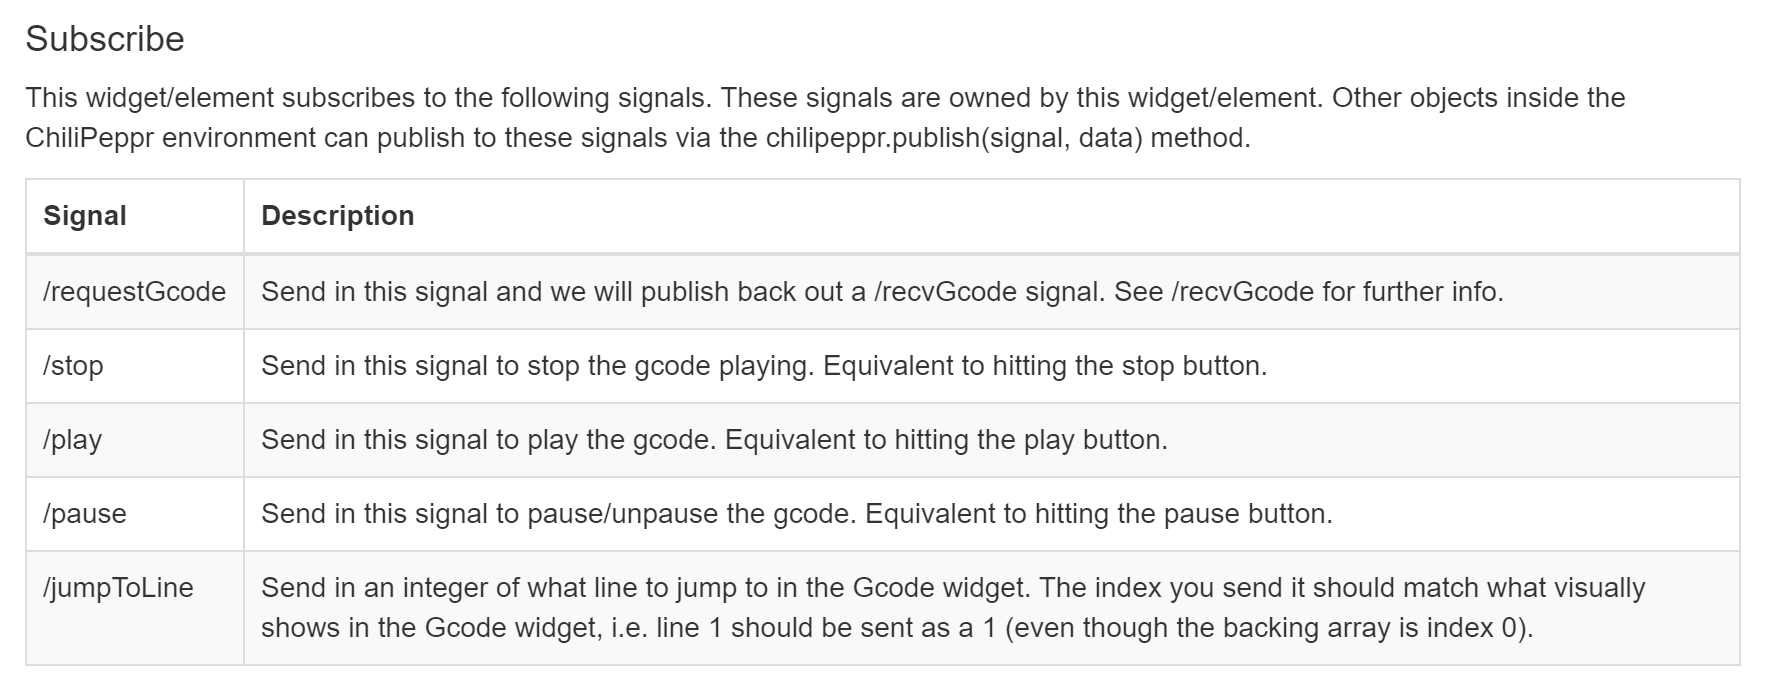
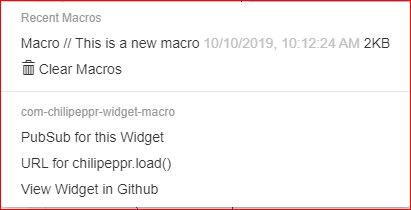
I was looking for the source code so I could look at the properties and methods availabe to me.
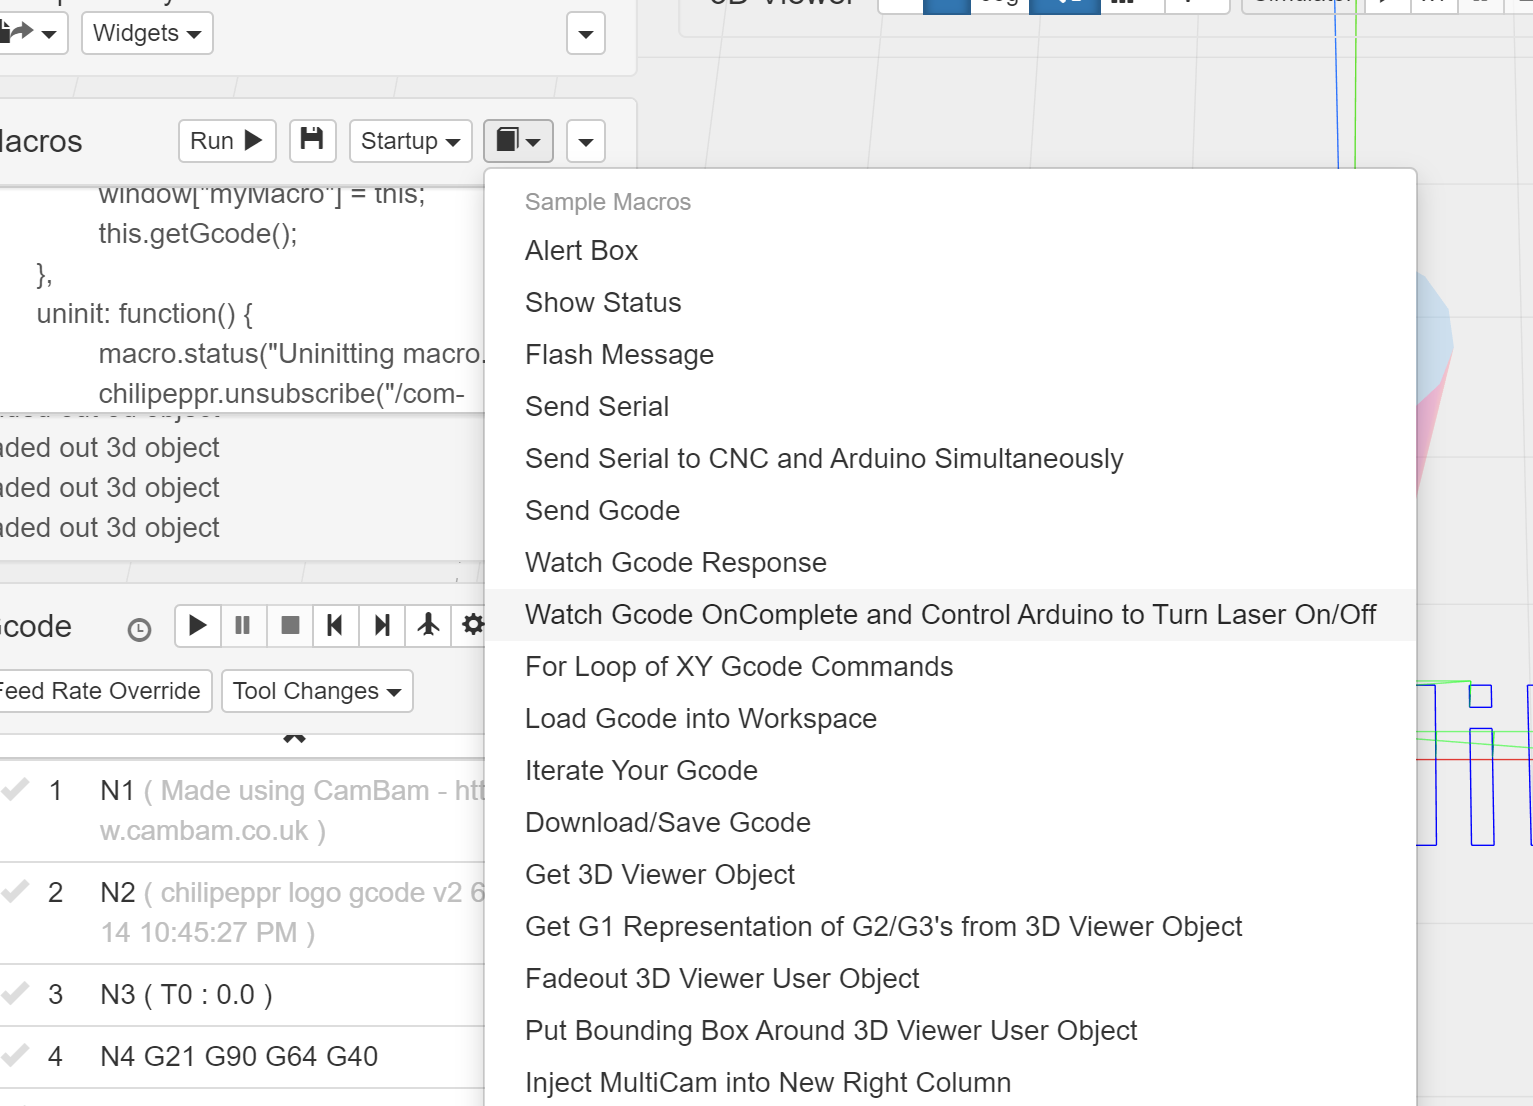
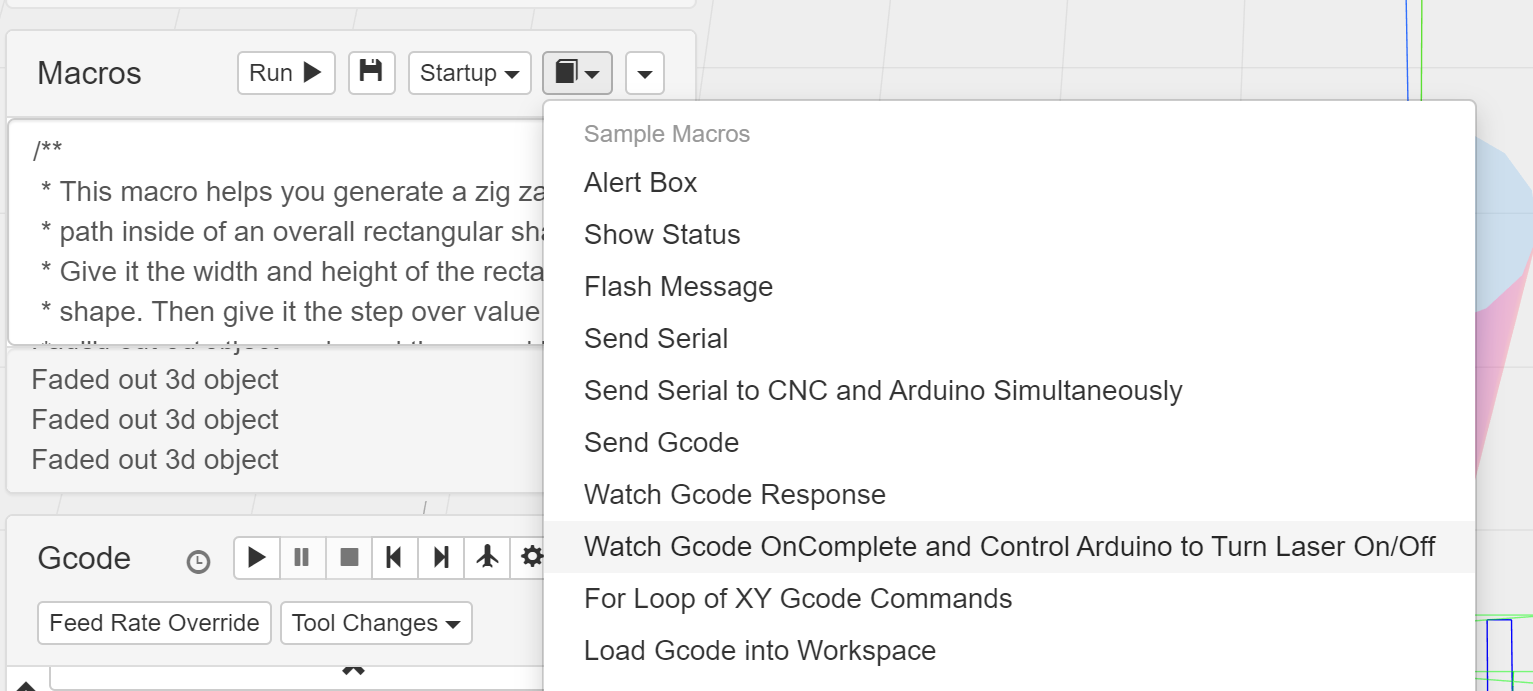
I made some modifications to one of the macros that fired a laser to have it parse the G-code.

My question is could you point me in the right direction for my next steps. I have programmed in machine language, assembler, pascal, c, c++, java and other languages but never in javascript.
I have done Client - Server and Object Oriented programming and am familiar with Networking.

Thanks

Can you post a screenshot of the toolpath in the ChiliPeppr screen so I can get an idea of what it looks like? And possibly also post some of the Gcode? I want to see if there’s a way for you to add an M6 tool change pause at each location you want to collect data from. Perhaps the M6 is best trick because the Gcode widget will play to that part, send out a pause, then you can record your data, then unpause the Gcode.

Alternatively, you could watch the onComplete command but this would play the Gcode all the way through without stopping, so you’d have to collect data very quickly without missing a beat. There could be timing issues on the data collection because there’s lag in getting the onComplete, processing the Javascript to read the data, and hope you got the correct data for the correct line of Gcode that just got onCompleted. You could add a Gcode delay statement in as well to give you a couple second delay at each spot, so that’s a possibility. Here’s the onComplete macro you could start with from the examples menu that would be the closest to what you’re after.

Another approach would be to just generate the Gcode in the macro, send it line by line, watch for when it’s done, and then at the appropriate slot collect the data. However, you would then not see your toolpath in the 3D viewer. Not sure if that matters to you.

1 Like


I’ll have to hunt down the code as Ive been changing it a lot lately.
I have tried several different ways to move the robot and then pause.
I’ll post some code with comments after I clean it up a bit.

Ok, so my suggestion is to put an M6 at each location in your Gcode where you want to read your data. Then take a look at the pubsub for the Gcode widget. You can subscribe to the /onpause event.

When you get that event, you could ask your USB device to give you the data. Then record it. Then send the pause signal when you’re ready to move the CNC machine again to the next spot.

Keep in mind that you will get the M6 event when the Gcode widget gets to it, so that will be before the physical CNC machine has reached that spot, so you really would need to also watch for the onComplete signal for when your line of Gcode is executed by TinyG. In fact, you could probably totally ignore the M6 signal because I don’t think it will have any value for you. The key is to place it in your Gcode so that the CNC machine stops when reaching that M6 position.

I will try to implement your suggestions with the M4

Below is 2 of the different ways I have tried so far.

This is the first way I tried to do things in the beginning

(Rev 0.0 300x300inch0.5inch steps)
G20 (select inch Units)
G90 (set absolute mode)
F25 (set feed rate); this doesnt seem to do anything?

F100 ;set feed rate Doesn’t seem to do anything?
G90 ;set absolute mode
G28.3 X0 Y0 Z0 ;set machine ZERO

G0 X0 Y0 Z0 ;msg Y Forward Direction start at 0,0,0

G0 Y0.05 ;Go to x=0,y=.05,z=0
G4 P1 ;Pause 1 second
G0 Y0.10 ;etc
G4 P1
G0 Y0.15
G4 P1
G0 Y0.20
G4 P1
G0 Y0.25
G4 P1

G0 Y0.30
G4 P1
G0 Y0.35
G4 P1
G0 Y0.40
G4 P1
G0 Y0.45
G4 P1

G0 Y0.50 ;msg 10
G4 P1
G0 Y0.55
G4 P1
G0 Y0.60
G4 P1
G0 Y0.65
G4 P1
G0 Y0.70
G4 P1
G0 Y0.75
G4 P1
G0 Y0.80
G4 P1
G0 Y0.85
G4 P1
G0 Y0.90
G4 P1
G0 Y0.95
G4 P1
G0 Y1.00 ;msg 20
G4 P1
G0 Y1.05
G4 P1
G0 Y1.10
G4 P1
G0 Y1.15
G4 P1
G0 Y1.20
G4 P1
G0 Y1.25
G4 P1

G0 Y1.30
G4 P1
G0 Y1.35
G4 P1
G0 Y1.40
G4 P1
G0 Y1.45
G4 P1
G0 Y1.50 ;msg 30
G4 P1

G0 Y0.0 ;msg X Forward Direction start at 0,0,0

G4 P1
G0 X0.05
G4 P1
G0 X0.10
G4 P1
G0 X0.15
G4 P1
G0 X0.20
G4 P1
G0 X0.25
G4 P1

G0 X0.30
G4 P1
G0 X0.35
G4 P1
G0 X0.40
G4 P1
G0 X0.45
G4 P1

G0 X0.50 ;msg 10
G4 P1
G0 X0.55
G4 P1
G0 X0.60
G4 P1
G0 X0.65
G4 P1
G0 X0.70
G4 P1
G0 X0.75
G4 P1
G0 X0.80
G4 P1
G0 X0.85
G4 P1
G0 X0.90
G4 P1
G0 X0.95
G4 P1
G0 X1.00 ;msg 20
G4 P1
G0 X1.05
G4 P1
G0 X1.10
G4 P1
G0 X1.15
G4 P1
G0 X1.20
G4 P1
G0 X1.25
G4 P1

G0 X1.30
G4 P1
G0 X1.35
G4 P1
G0 X1.40
G4 P1
G0 X1.45
G4 P1
G0 X1.50 ;msg 30
G4 P1
G0 X0.0 ;msg X Forward Direction start at 0,0,0

Another way using a calibrated feed rate of .05 inches/second = 3 inch/min using F3 and G1
Our instrument takes a reading every 250 ms so we can figure the position by the number of readings.
4 readings = .05 inches so every 4 readings is = .05 inches.

This is the G-code for the screen shot I posted previously

;Rev 0.06 1.5inX1.5inX.05in steps

G20 ;select Inch Units
F3 ;set feed rate
G91 ;set relative mode
G28.3 X0 Y0 Z0 ;set machine ZERO

G0 X-1.5 Y1.5 Z0.0 ;msg X Forward Direction start at -1.5,1.5,0

g1 X3 f3 ; Go +3 inches X Axis
g0 y.05 ; Go +.05 inches Y Axis
g1 X-3 f3 ; Go -3 inches X Axis reverse direction
g0 y.05 ; Go +.05 inches Y Axis
g1 X3 f3 ; Go +3 inches X Axis
g0 y.05 ; Go +.05 inches Y Axis
g1 X-3 f3 ; Go -3 inches X Axis reverse direction
g0 y.05 ; Go +.05 inches Y Axis
g1 X3 f3 ; Go +3 inches X Axis
g0 y.05 ; Go +.05 inches Y Axis
g1 X-3 f3 ; Go -3 inches X Axis reverse direction
g0 y.05 ; Go +.05 inches Y Axis
g1 X3 f3 ; Go +3 inches X Axis
g0 y.05 ; Go +.05 inches Y Axis
g1 X-3 f3 ; Go -3 inches X Axis reverse direction
g0 y.05 ; Go +.05 inches Y Axis
g1 X3 f3 ; Go +3 inches X Axis

Your feed rate isn’t working because g0 moves ignore feed rate. Only g1 moves do, so just replace.

You are using a pause with those g4 p1’s so you could just look for the oncomplete event callback on those lines and take a reading, but if there is any slow down in the browser you will miss the timing. But, you could try it and possibly slow the pause of g4 p1 to longer like p2 or even p5.

I like the M4 suggestion as I would have to tell the robot to move after I take the measurements.
That way if the 8 measurements take longer than expected I will not miss them. I can also take a reading and retake it if there is an error without the robot moving position. There are times when the readings need to be taken again at the same spot because of timing errors in the circuits.

Now I have to attempt to implement this, I’ll get back to you with results as I get them, Thanks

I need some help locating the “Widget / Gcode v8”
I searched github but no luck.
Thanks.

Found it !

A did you look at the sample macro for the on complete event

Yes I did, my problems now are with setting up a development environment. I even made some changes to the macro to parse the G-code G4 P1 to display the line number when it found the pattern, I’ll watch the videos again to see how to clone the project and make the changes. I’m new to this environment but will be ok once I figure it out.

You don’t need a dev environment. You just edit the macro.

So, turn on macros.

Load this macro.

And edit it to your heart’s content right in that edit box.

BTW, how do you read the readings? Is it something like an Arduino or other microcontroller that’s available on a serial port? That sample macro shows how to talk with a microcontroller on the serial port at each step of the Gcode.

Thanks, I loaded the macro that dispenses the solder paste as that one uses onChiliPepprPauseOnExecute which is supported on my TinyG.

I’m working on creating a G-Code file using the “(chilipeppr_pause)” when I want to take a measurement. After I get the macro to stop and start the robot correctly I will work on the serial port commands. We will be using 3 serial ports in addition the one running the TinyG.

We have several instruments that support Standard Commands for Programmable Instruments (SCPI) and one that we are working with the manufacturer to impliment a command set that is similar to SCPI. All measurements are done internal to the instrument and available by command via the serial/USB port.

Using this G-code with the watch_chilipeppr_pause Pubsub Event macro works as expected.
However the macro that dispenses solder paste on second controller does not.

I’ll look a little deeper. I also would like to get access to the G-code line that has the chilipeppr_pause since it contains the location of the robot.

I think this would be a reliable way to get the robot position data to put with the measurement data.

Can anyone suggest another way to get the current position X,Y,Z for the robot?

Modifed to use (chilipeppr_pause)

(Rev 0.1 300x300inch0.5inch steps)
G20 (select inch Units)
G90 (set absolute mode)
F25 (set feed rate); this doesnt seem to do anything?

F100 ;set feed rate Doesn’t seem to do anything?
G90 ;set absolute mode
G28.3 X0 Y0 Z0 ;set machine ZERO

G1 X0 Y0 Z0 (chilipeppr_pause) ;msg Y Forward Direction start at 0,0,0

G1 Y0.05 (chilipeppr_pause) ;Go to x=0,y=.05,z=0
; G4 P1 ;Pause 1 second
G1 Y0.10 (chilipeppr_pause)
; G4 P1
G1 Y0.15 (chilipeppr_pause)
; G4 P1
G1 Y0.20 (chilipeppr_pause)
; G4 P1
G1 Y0.25 (chilipeppr_pause)
; G4 P1

G1 Y0.30 (chilipeppr_pause)
; G4 P1
G1 Y0.35 (chilipeppr_pause)
; G4 P1
G1 Y0.40 (chilipeppr_pause)
; G4 P1
G1 Y0.45 (chilipeppr_pause)
; G4 P1

G1 Y0.50 (chilipeppr_pause) ;msg 10
; G4 P1
G1 Y0.55 (chilipeppr_pause)
; G4 P1
G1 Y0.60 (chilipeppr_pause)
; G4 P1
G1 Y0.65 (chilipeppr_pause)
; G4 P1
G1 Y0.70 (chilipeppr_pause)
; G4 P1
G1 Y0.75 (chilipeppr_pause)
; G4 P1
G1 Y0.80 (chilipeppr_pause)
; G4 P1
G1 Y0.85 (chilipeppr_pause)
; G4 P1
G1 Y0.90 (chilipeppr_pause)
; G4 P1
G1 Y0.95 (chilipeppr_pause)
; G4 P1
G1 Y1.00 (chilipeppr_pause) ;msg 20
; G4 P1
G1 Y1.05 (chilipeppr_pause)
; G4 P1
G1 Y1.10 (chilipeppr_pause)
; G4 P1
G1 Y1.15 (chilipeppr_pause)
; G4 P1
G1 Y1.20 (chilipeppr_pause)
; G4 P1
G1 Y1.25 (chilipeppr_pause)
; G4 P1

G1 Y1.30 (chilipeppr_pause)
; G4 P1
G1 Y1.35 (chilipeppr_pause)
; G4 P1
G1 Y1.40 (chilipeppr_pause)
; G4 P1
G1 Y1.45 (chilipeppr_pause)
; G4 P1
G1 Y1.50 (chilipeppr_pause) ;msg 30
; G4 P1

G1 Y0.0 (chilipeppr_pause) ;msg X Forward Direction start at 0,0,0

; G4 P1
G1 X0.05 (chilipeppr_pause)
; G4 P1
G1 X0.10 (chilipeppr_pause)
; G4 P1
G1 X0.15 (chilipeppr_pause)
; G4 P1
G1 X0.20 (chilipeppr_pause)
; G4 P1
G1 X0.25 (chilipeppr_pause)
; G4 P1

G1 X0.30 (chilipeppr_pause)
; G4 P1
G1 X0.35 (chilipeppr_pause)
; G4 P1
G1 X0.40 (chilipeppr_pause)
; G4 P1
G1 X0.45 (chilipeppr_pause)
; G4 P1

G1 X0.50 (chilipeppr_pause) ;msg 10
; G4 P1
G1 X0.55 (chilipeppr_pause)
; G4 P1
G1 X0.60 (chilipeppr_pause)
; G4 P1
G1 X0.65 (chilipeppr_pause)
; G4 P1
G1 X0.70 (chilipeppr_pause)
; G4 P1
G1 X0.75 (chilipeppr_pause)
; G4 P1
G1 X0.80 (chilipeppr_pause)
; G4 P1
G1 X0.85 (chilipeppr_pause)
; G4 P1
G1 X0.90 (chilipeppr_pause)
; G4 P1
G1 X0.95 (chilipeppr_pause)
; G4 P1
G1 X1.00 (chilipeppr_pause) ;msg 20
; G4 P1
G1 X1.05 (chilipeppr_pause)
; G4 P1
G1 X1.10 (chilipeppr_pause)
; G4 P1
G1 X1.15 (chilipeppr_pause)
; G4 P1
G1 X1.20 (chilipeppr_pause)
; G4 P1
G1 X1.25 (chilipeppr_pause)
; G4 P1

G1 X1.30 (chilipeppr_pause)
; G4 P1
G1 X1.35 (chilipeppr_pause)
; G4 P1
G1 X1.40 (chilipeppr_pause)
; G4 P1
G1 X1.45 (chilipeppr_pause)
; G4 P1
G1 X1.50 (chilipeppr_pause) ;msg 30
; G4 P1
G1 X0.0 ;msg X Forward Direction start at 0,0,0

You get data passed back to you in the callback that I believe has the line of gcode. My recommendation is print that data to the console while you are debugging and it will help you immensely.

1 Like

In looking at the code for that sample macro again, it really does have everything you need in it. It shows that on the callback you can look at the line of Gcode and see what’s in it. So you could get the position from that. However, you can also subscribe to the axes published signal from the TinyG widget pubsub.

// Watch onComplete and Fire Laser
var myMacro = {
	gcode: null, // holds our gcode
	arduinoSerialPort: "COM37", // we send laser cmds to Arduino
	init: function() {
		// Uninit previous runs to unsubscribe correctly, i.e.
		// so we don't subscribe 100's of times each time we modify
		// and run this macro
		if (window["myMacro"]) {
			macro.status("This macro was run before. Cleaning up...");
			window["myMacro"].uninit();
		}
		macro.status("Starting watch onComplete macro");
		// subscribe to onComplete
		chilipeppr.subscribe("/com-chilipeppr-widget-serialport/onComplete", this, this.onComplete);
		// store macro in window object so we have it next time thru
		window["myMacro"] = this;
		this.getGcode();
	},
	uninit: function() {
		macro.status("Uninitting macro.");
		chilipeppr.unsubscribe("/com-chilipeppr-widget-serialport/onComplete", this.onComplete);
	},
	getGcode: function() {
		chilipeppr.subscribe("/com-chilipeppr-widget-gcode/recvGcode", this, this.getGcodeCallback);
		chilipeppr.publish("/com-chilipeppr-widget-gcode/requestGcode", "");
		chilipeppr.unsubscribe("/com-chilipeppr-widget-gcode/recvGcode", this.getGcodeCallback);
	},
	getGcodeCallback: function(data) {
		this.gcode = data;
	},
	onComplete: function(data) {
		// macro.status("Got onCompleted. data:" + JSON.stringify(data));
		// Id's from the Gcode widget always start with g
		// If you jog, use the serial port console, or do other stuff we'll 
		// see callbacks too, but we only want real gcode data here
		if (data.Id.match(/^g(\d+)/)) {
			// $1 is populated with digits from the .match regex above
			var index = parseInt(RegExp.$1); 
			// our id is always 1 ahead of the gcode.lines array index, i.e.
			// line 1 in the widget is this.gcode.lines[0]
			var gcodeline = this.gcode.lines[index - 1];
			
			// Try to match M3, M5, and M30 (program end)
			// The \b is a word boundary so looking for M3 doesn't also
			// hit on M30
			if (gcodeline.match(/\bM3\b/i)) {
				// turn laser off
				macro.status("Laser Off from line " + data.Id);
				chilipeppr.publish("/com-chilipeppr-widget-serialport/ws/send", "send " + this.arduinoSerialPort + " laser-off\n");
			} else if (gcodeline.match(/\bM5\b/i)) {
				// turn laser on
				macro.status("Laser On from line " + data.Id);
				chilipeppr.publish("/com-chilipeppr-widget-serialport/ws/send", "send " + this.arduinoSerialPort + " laser-on\n");
			} else if (gcodeline.match(/\bM30\b/i)) {
				macro.status("Done running our gcode. Laser off.");
				chilipeppr.publish("/com-chilipeppr-widget-serialport/ws/send", "send " + this.arduinoSerialPort + " laser-off\n");
				this.uninit();
			}
			
		}
	}
}
myMacro.init();
1 Like

When I make changes to a Macro and Save the Macro I can see it on the dropdown menu.
Is there any way I can make a file from it so I can use another editor and print it for reference?
There are times when I’m away from the Internet and want to work on my macro programs.
How Persistent is this macro? Can I load it from another instance of Chilipeppr on a different computer?
Thanks

Recent%20Macros

Yeah, you just have to cut and paste it into a text editor. The browser is a sandbox and makes it hard to do local files natively, so you just have to use your clipboard.

Thats what I’m doing. Got the Pause and unPause working now trying to display the XYZ location.
After that I’m working on the serial port send and receive. Thanks for your help