Hello FastLED folks,
Looking for some advice or guidance please on building a 200 pixel, 4 letter WS2811 marquee sign. BTW, I love the information and creativity in this group - a very deep rabbit hole to fall down for sure.
My wife is a huge KISS fan, so as a surprise for her and learning experience for me, I’m working on an LED sign, similar to this gentleman’s work: KISS sign build - Album on Imgur. The goal would be some simple patterns to start, perhaps getting more complex as I learn more. For example, lighting up from left to right, right to left, etc, lighting each letter at a time, all letters on “fire”, etc.
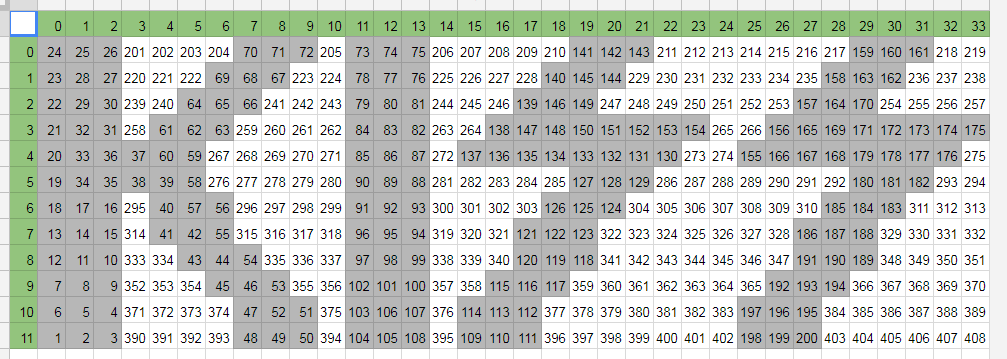
I have 4x50 strings of lights and a NodeMCU 8266 I was planning on using. I’ve done some searching in this group and it looks like the “RGB Shades” may be a good starting point with the XY mapping, etc. I started a Google Sheets mapping as a draft of what that might look like as a 12x34 matrix (see below).
Questions for the group:
Is the RGB Shades code a good starting point? Any other basic examples that would be helpful? My level of expertise so far is with various single strips of WS2812s around the house running various patterns such as the demo reel, and TwinkleFOX.
Should I run all four letters/200 pixels from one data pin? Or one pin per letter?
Does my draft matrix and layout of the LEDs look ok? (Starting with pixel #1 at the lower left of the “K” and winding around through all letters. The last visible pixel would be #200.)
If I wanted to do different effects/patterns per letter, would each letter have it’s own XY mapping/array?
I think that would be fine to start with a single data line and keep things simple. You could always split the letters up later if you want to try that.
I would suggest doing long vertical strips instead of the back and forth weaving in your sketch. Will make wiring much easier. Order of pixels does not matter since it will all get mapped (similar to the RGB Shades example)
It might make certain things slightly easier in certain cases, but you can certainly still do different stuff per letter even if everything is run on one data pin.
One other thought regarding the layout, are you using strips or strings? If strings, then doing the layout as you had would be fine too and could actually make it a bit easier to go from letter to letter.
Using a string would also easily allow you to do an actual curve on the bottom leg of the K.
Thank you Mark - yes, using strings, so you’re exactly right, a little easier to get that curve. I still need to visit the hardware store or craft store to find something that will make the layout easy and still allow for a curve (or just do a full scale print out/template and poke holes through a board/cloth for the individual LEDs).
I had thought about maybe ping pong balls, but that’s a lot of ping pong balls! I think diffusion would definitely help with brightness and that 1970s retro feel, but not sure what would be economical but not too labor intensive - I’m open to suggestions though!
Yes, ping pong balls are fairly cheap and could work. Sort of depends how big you want the finished piece to be and if you want something a bit more 3D or more of a smooth front.
Personally I think I would try using a hole saw and drill out all those holes in some thin plywood (or use laser cutter or CNC if you have access to one), and then put a sheet of some sort of diffusion right behind that. Essentially build a thin box with the pixels mounted in the back panel, and the front with the holes an inch or so away (experiment with distance) to diffuse the pixels nicely.
Really looking forward to seeing whatever you build!
Hi everyone - my plans are moving along. I debated on the ping pong ball approach which would have created a sign about 5’ wide, so I went slightly smaller (30" wide) and used an online laser cutter service (http://www.ponoko.com). It worked out really well - I used a combination of http://paint.net, GIMP, and Inkscape to create the hole pattern and have it cut in 3mm black acrylic.
Question on code - I used the ‘stock’ RGB shades code on a Wemos D1 mini pro (with the intent of eventually trying to integrate @Jason_Coon 's tree v2 web app. Everything appeared work when I just had one string of 50 LEDs, However, when testing all 200, there are some in the 2nd, 3rd, and 4th sets of 50 that are not lighting up. Any thoughts why? Here is the code to my XY mapping: https://gist.github.com/badgraemer/d3e011524fa72766ca5531271fcf96e7
I haven’t done any power injection yet, but plan to for each set of 50 LEDs. Also I’ve tested each string of 50 separately and they all work. Thanks in advance!
 I think diffusion would definitely help with brightness and that 1970s retro feel, but not sure what would be economical but not too labor intensive - I’m open to suggestions though!