hello,
need some help. My Y,X,Z axis are " Ball screw type: 1605 (diameter 16mm, lead 5mm"" how do i configure or setting in bcnc software, to set the Y,X,Z, that lead is 5mm. Axis are Y=400, X=200, Z=200.
also to set work area table. when jog Y, which is 400mm L, bcnc read from -Y to +Y 65mm, which is incorrect.
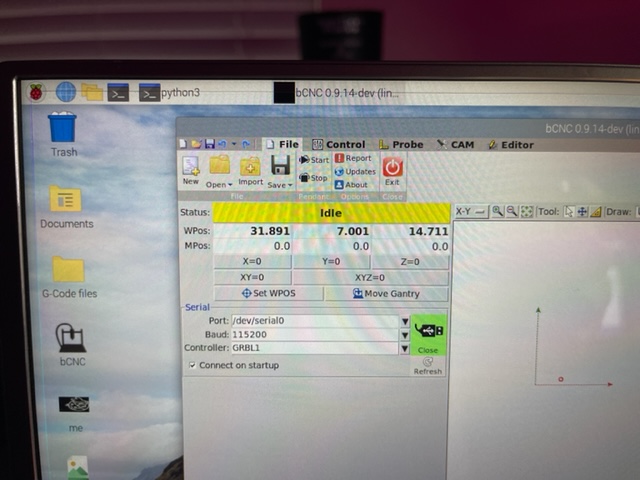
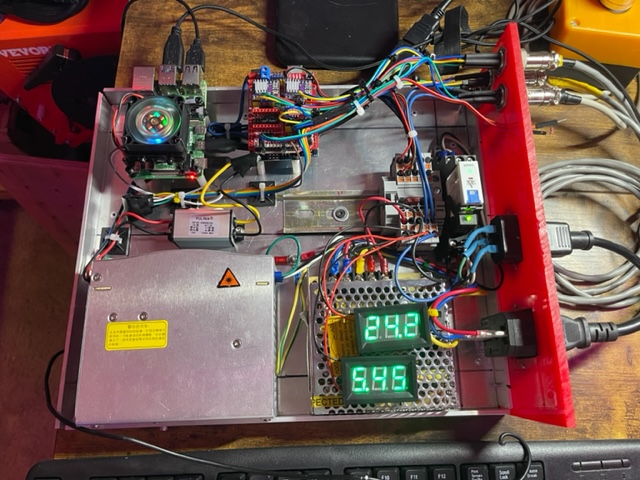
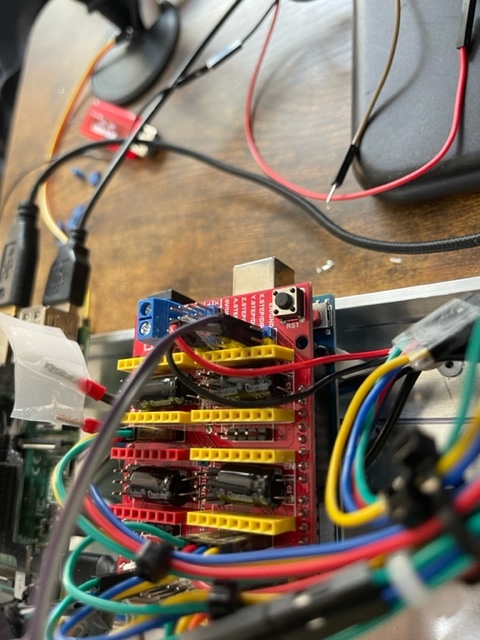
My controller is Respberry Pi 4 and Kuman UNO R3 Board ATmega328P Arduino + CNC Shield Expansion Board V3.0 Board DRV8825 Stepper Motor Driver.
bCNC 0.9.14-dev Linux PY3.92 Python3
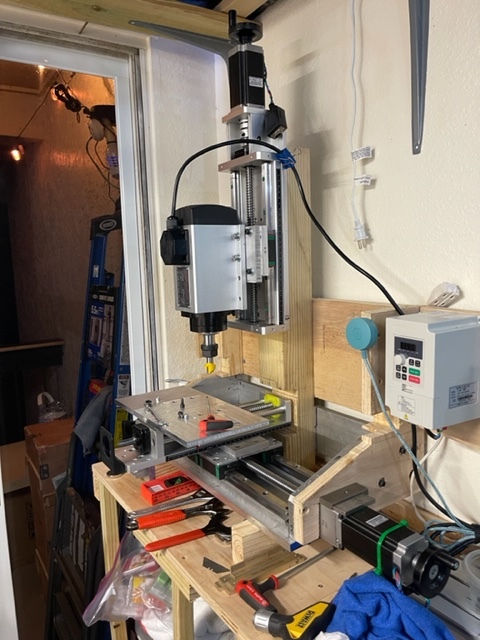
my previous machine was Proxxon MF70., But now i build my own Milling/Router.
on the proxxon the Lead 0.2 screw was small. now compared to the new build the Lead is 5mm.
Some where in bcnc configuation need to change 5mm, instead 0.2 otherwise it going jog wrong.
Pictures of my setup
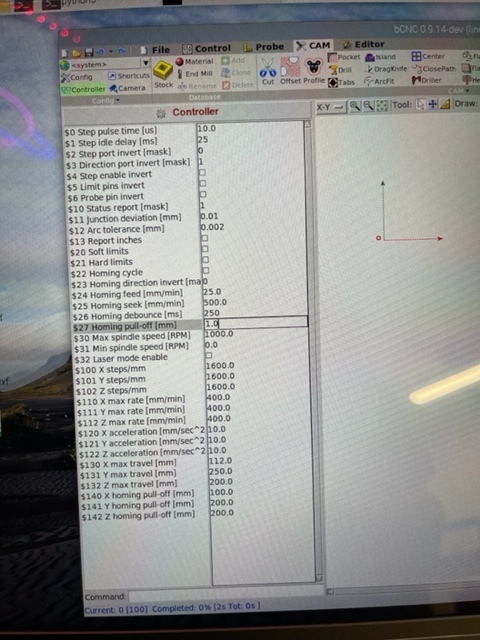
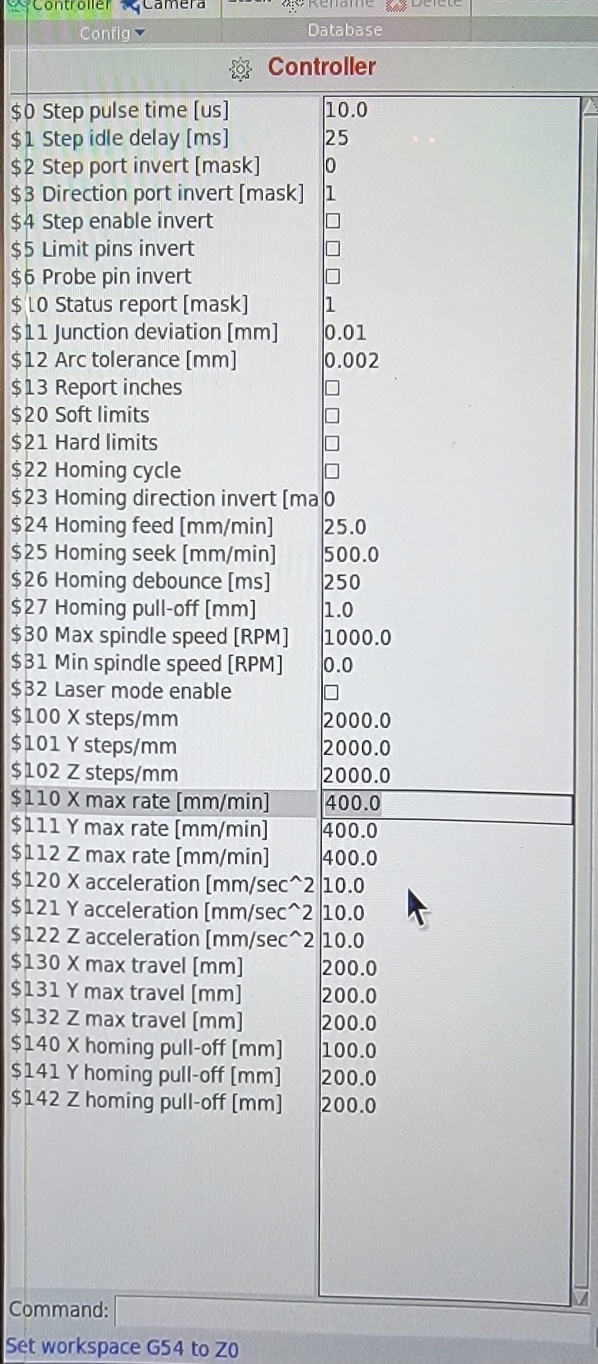
It looks like your controller is an Arduino Uno with a CNC Shield running GRBL Firmware. This firmware get configured with $ commands, as shown in your first picture.
With $100, $101 and $102 you can configure the steps/mm for the axes X, Y, Z.
1605 ballscrews make 5mm/revolution. Now you need to know how many steps per revolution your motors make and how many microsteps per step the drives make. Then you ca calculate the needed setting.
The Proxxon MF70 usually have 1mm/rev., so if the $100 value of 1600 on the screenshot was from the proxxon and the steppers are 200 steps/rev, then your drivers are set to 8 microsteps/step.
For the 1605 ballscrew this would result in 200 * 8 / 5 = 320
thanks, im just leaning how to work Grbl V1.1 software…
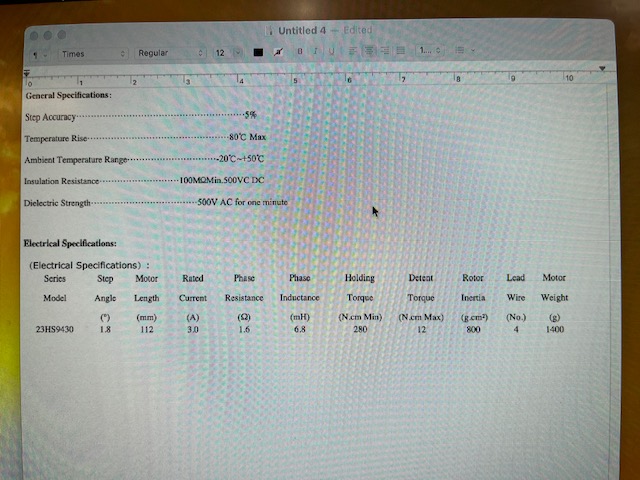
Stepper motor im using are Longs Stepper Motor 23 nema===> Nema 23 Stepper Motor DUAL SHAFT: Frame Size: Nema 23 Phase: 2 Phase Step Angle: 1.8 Degree Current: 3.0 A Rated Voltage: 4.8 V Resistance: 1.6Ohm/Phase Inductance: 6.8 mH/Phase Holding Torque: 425oz-in (2.8N.m) Dentent Torque: 24.5N.cm Rotor Inertia: 800g.cm2
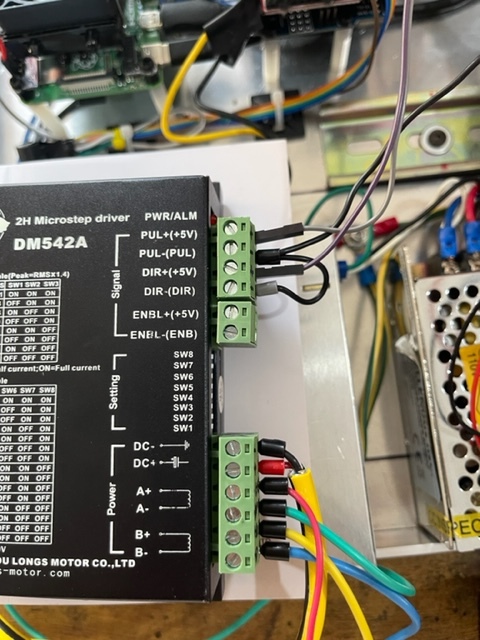
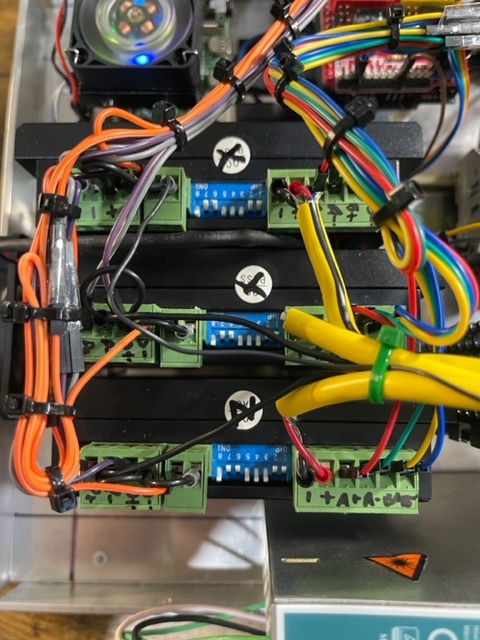
Yea im aware of that, ill be changing the Driver to DM542. i order driver kit.
in regards of stepper motor drivers they’re different one, DM542T, B,S. and DM542. Also i guess they the same.?
Your signal ground should be the same ground that the signal generator is using… I would not go to the power supply with THAT ground.
Your controller should have the same ground as the power supply unless you are powering it with a different power supply. Again, then the signal ground should be the controller ground.
Also, Isn’t the power to the stepper motor driver, the high power connections using also using the Power supply ground?
did you understand what I said about the ground wires?
As far as bCNC goes, it send GCode to your controller… the GCode commands are like this:
G1 X200 Y100 F1000 where the controller is commanded to move 200 mm in the positive X direction and 100 mm in the positive Y direction at as speed of 1000.
So it’s a nice looking build but you really should stop and start reading about what is going on both electrically and on the control side.
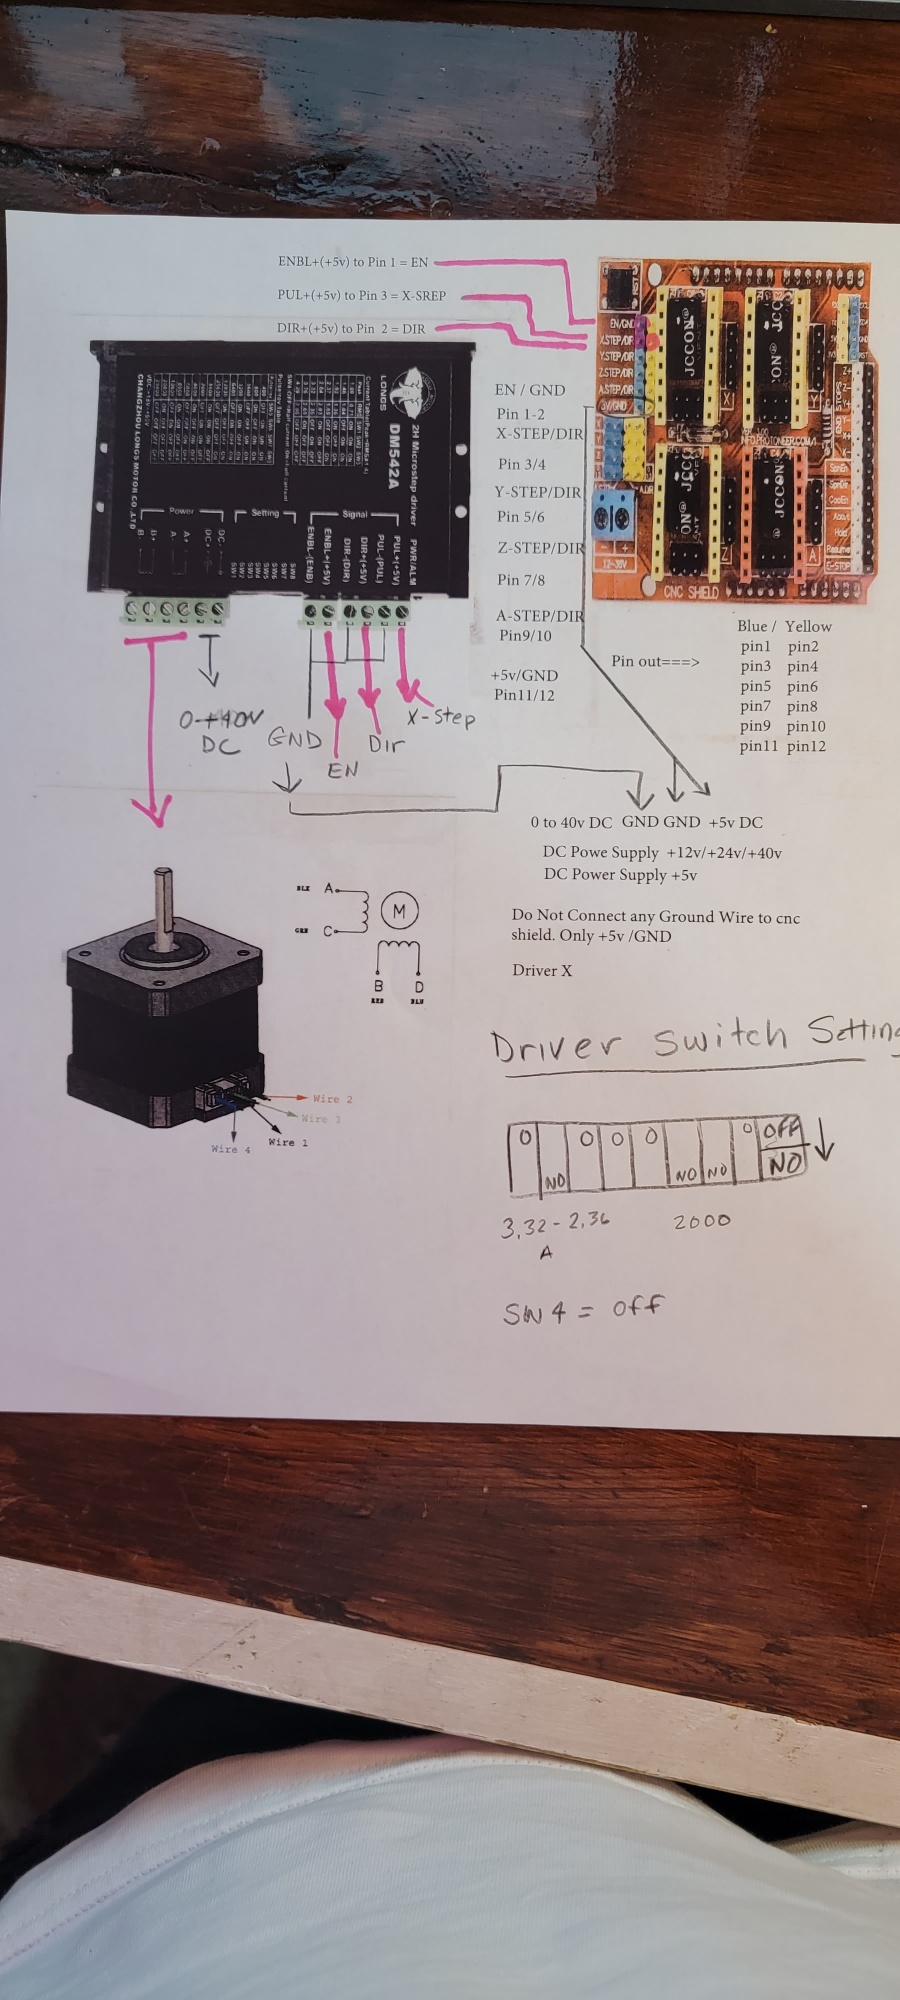
The DM542 stepper driver dip-switches set steps/rev for 1.8° motors (which you use), so your calculation would just be: 2000 steps/rev / 5 mm/rev = 400 steps/mm
So set $100…$102 to 400 and check if a 100mm move (G0 X100) realy moves 100mm
i did’t mean any disrespect to anybody on this forums. Just need help.
I didn’t make any changes to the controller settings it was the original setting for Nema 17 motors Stephen motors.
$100=1600
$110=400
$120=10
So like he said, change from 1600 to 400.
So that you understand what going on.
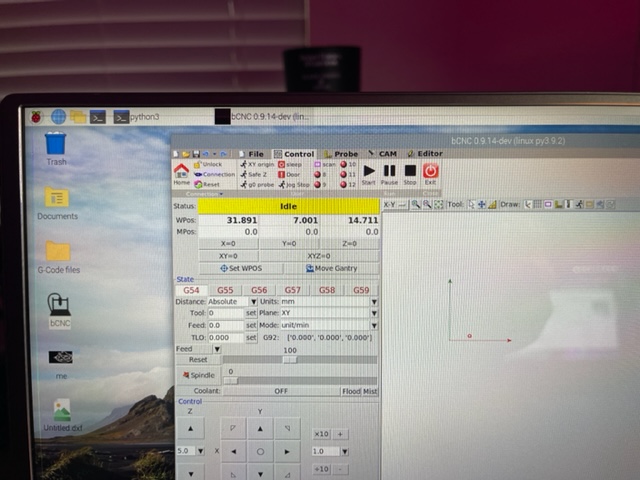
My work area X 400mm / Y 200mm / Z 200mm
With the original setting, when do G0 X100,
It started to move, from -X to +X, instead of reading 400mm at end across, it read 64mm.
So my stepper motors are 23 Nema 1.8/4.5A 425oz. On the stepper driver dip switches are set to 2.8A @ 2000 Pulse/rev
The ballscrew are 1605/0.5
Stepper motor specification: look pics.
So doing some research and reading some information about the software bcnc, I understand that everything has to be entered manually. because the software does not know the type of machine you’re using, nor does it have any way to tell it what type of machine you’re using.
I did a couple of changes to controller setting.
Try this numbers,
$100=400
$110=800
$120=10
And this time, Z moved from Z- to Z+, got a reading of 300mm
Theses settings came from my old cnc 6030 Mach3 setting.
So now that you understand was going on.
What I need is to get the correct parameters to enter in a controller settings so the stepper motors move correctly.
If you do what the people who are trying to help you ask you to do we can move you forward. If you keep changing other things and talk about other problems it will be a very long road to finding solutions and you might lose some help here.
If you set your controller settings to what they were when you took the picture of your screen (here-Bcnc 0.9.14-der linux PY 3.92/ configuation cnc machine - #14 by lloxley016 ) and then change only $100, $101, $102 to 400 then restart your machine/controller.
Next jog the machine to a spot where you can measure 100mm distance in the X axis.
Now send the command, G0 X100 and physically measure who far the head moved and report back what happened.