Ok I will take a look…
1 Like
Absolutely. That would be appreciated, in fact.
Well I have never shared a schematic with this tool before.
It seems that the person your sharing with cannot edit the original.
After editing a shared schematic you can save it in your own account but not back to the owners original :(((
So I have an edited version in my account. https://www.digikey.com/schemeit/project/k40-original-modified-31366790c8ad4d25bf7bb85e0dc10132 and you can see the changes I made. However I cannot give you the source in any way I have found.
I tried to cut and paste my version into another tab in yours and that will not work either. Grrrr.
There is an export but no import either ,uggh!
I guess you can share but not collaborate. This kind of missing function is why the tool has limited value.
It is however fine if you use it and share but without collaboration
Anyway you can see my changes you will just have to repeat them.
Thanks for working on that @donkjr! The ability to collaborate on a design would definitely be useful. I have access to the entire autodesk suite through my grad school for the next year. I really want to learn to use Fusion 360 and Eagle eventually.
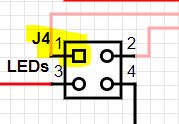
I see the changes that you made. They definitely improve the schematic. Are you asking about J4-1? I picked those symbols more because they had the right number of pins than for whatever their actual use should be. Later, I discovered the ability to use pins in the custom symbols area. I do have switches on my panel for both the laser and the LEDs.
I will attempt to turn the drawing that you did of the new layout into a schematic on scheme-it tomorrow. I will send you a link once I have completed it. I will attempt to incorporate what I learned from the redesign that you did.
1 Like
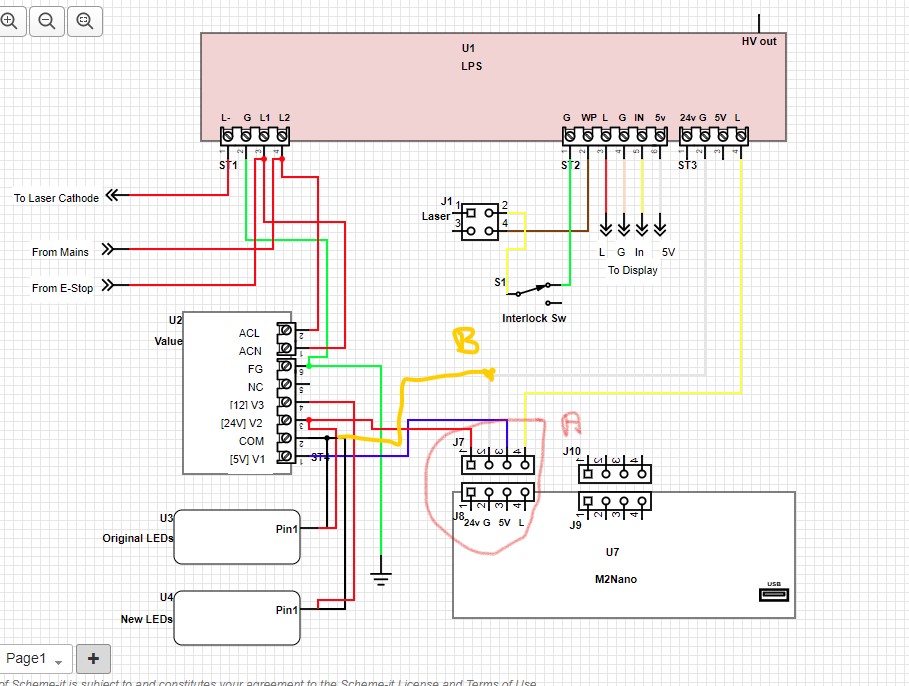
I have completed the new schematic. I haven’t left anything out, I hope. Here is the link to the schematic.
I bought another strip of LEDs to add. They will be powered by the PSU 12v. These are the ones that I bought.
Please let me know if you notice anything that I missed.
1 Like
@donkjr I used the above wiring to rewire. Every worked, except the stepper motors. Normally when I fully enable the laser, it goes to home. However, since the retiring, the laser head does not move. I disconnected the 24v and 5v wire and put them back to the original connectors. It worked. so, going to troubleshoot more…
I see two problems.
A: That connector is shown flipped horizontally. The L signal it on the right looking at the connector. The connections by name are connected correctly in the drawing so hopefully it just a drawing error not a wiring error.
B : I detect that the real problem is that there is no ground between the new DC supply and the nano?
My guess is that the led lights worked but not the nano.
When adding power to a system like this I always check the output with a DVM before I connect it to the load (nano). Make these checks referenced to all the grounds in the system.
In this case if you checked the DC supply relative to its ground it would have checked good.
Checking it relative to the nano’s ground would have read incorrect.
3 Likes
This fixed the issue. I got my new LEDs wired up as well. I cut the strip down and now have a short (5ish in) strip to put in the electronics compartment as well.
3 Likes
So your additional DC supply is installed and working.
We can call this solved?
@donkjr I added some new LEDs to the cutting compartment. They are working great. I was able to split the strip into two pieces, one for the cutting compartment and a smaller strip for the electronics compartment. I think I can splice the power wires for the second strip into the existing ones for the cutting compartment, is that correct? I only have 50/50 solder (no flux core or anything, stained glass solder, not acid core). Can I use that or do I need to buy solder explicitly for electronics? The connection would be through hole soldering.
You can connect two separate light strings in parallel.
I would use solder with rosin core.
I recently got this: https://amzn.to/2ZGm47Z … and so far it seems decent quality and a good deal
As an Amazon Affiliate, I earn from qualifying purchases.
4 Likes